
DIY Farmhouse Shelves
These simple to make DIY farmhouse shelves are an AMAZING addition to any room and what’s better is you’ll learn how to make them!
You guys, I made my own DIY farmhouse shelves for my dining room. And you’re thinking, “yeah, Sarah, we all know. You told us 100 times.” The day has FINALLY arrived.
Stop. The. Press.
Okay, okay. I know. I’ve been teasing this post for basically a year now.
I’ve been waiting for the most perfect day when the sun shines from the heavens in a glorious way and the shelves beam in the light.

You see, I wanted the MOST perfect pictures for these shelves because I want you all to see just how amazing they are and that you can make them, too!
{Ironically, I ended up taking the pictures on a relatively overcast day}
So, without further adieu…
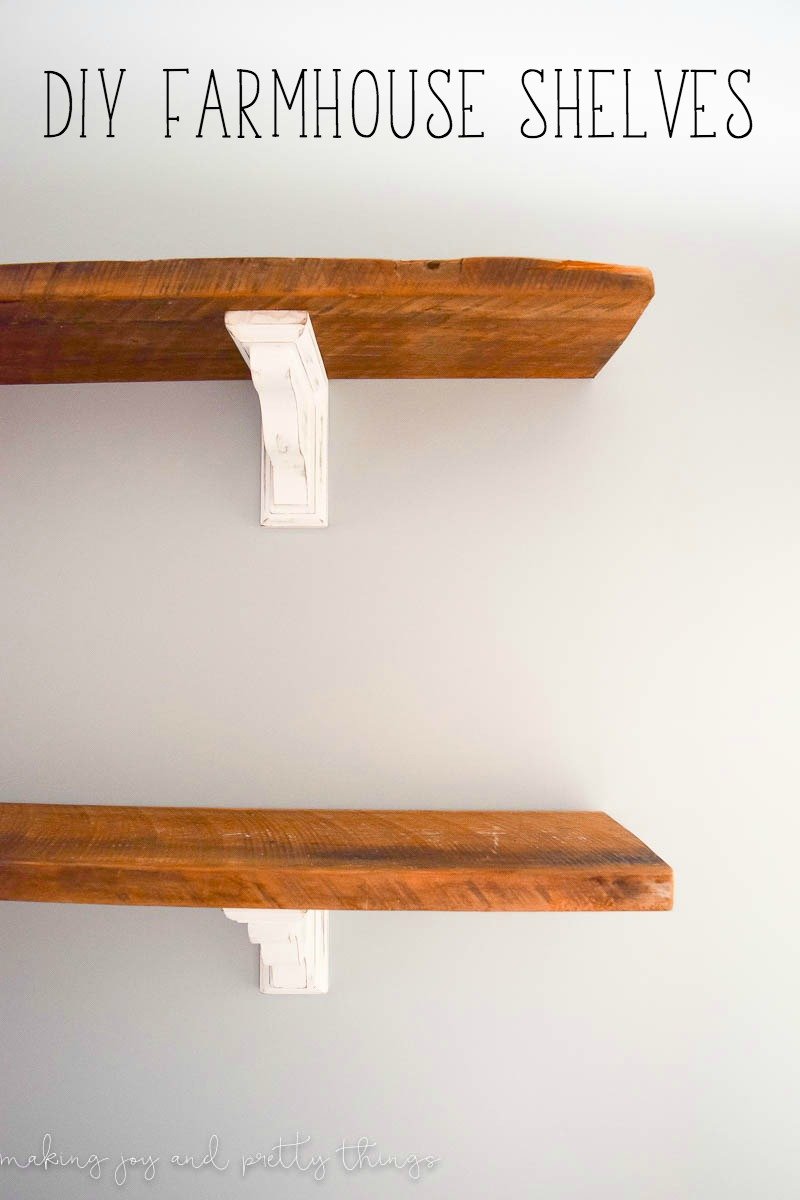
And another close up…

I am completely 100% thrilled with how they turned out. The shelves really anchor the room and have become such a lovely focal point.
The best part? They were actually very easy to make.
How To Make DIY Farmhouse Floating Shelves with Corbel Brackets
This post contains affiliate links. Please, click here to read my disclosure policy.
Supplies for DIY Farmhouse Shelves:
- Barn wood (or any type of wood)
- Corbels, similar
- Wood stain
- T-shirt (to use as a rag for staining)
- Chalk paint
- Paint brush
- Coarse grit sandpaper
- Level
- Stud finder
- Drill
Step 1. Find the Wood for DIY Farmhouse Shelves
We started with old Barnwood we found at a local warehouse. It was love at first sight with this wood. It was lying on a table completely separate from the other wood basically begging me to buy it.
We had to clean and seal the wood after many years of hard work holding up a barn, I’m assuming 😉 You can check out our whole 3 step process to get that barn wood dining room shelf ready!
We cut the wood down to 7 3/4 inches deep and left it at its original length (~78 inches). The width was cut because we were worried about the wood sticking out too far off of the shelf.
Since the shelves aren’t above a buffet table or other permanent fixture, there was a risk people could bump their heads off of the wood and damage the wood and hurt themselves.
{The length/width of the wood is entirely customizable based on your needs}
Step 2. Clean and Seal the Wood
Before cleaning and sealing:

After cleaning and sealing:

Isn’t that transformation amazing?? You can check out our whole 3 step process to get that barn wood dining room shelf ready!
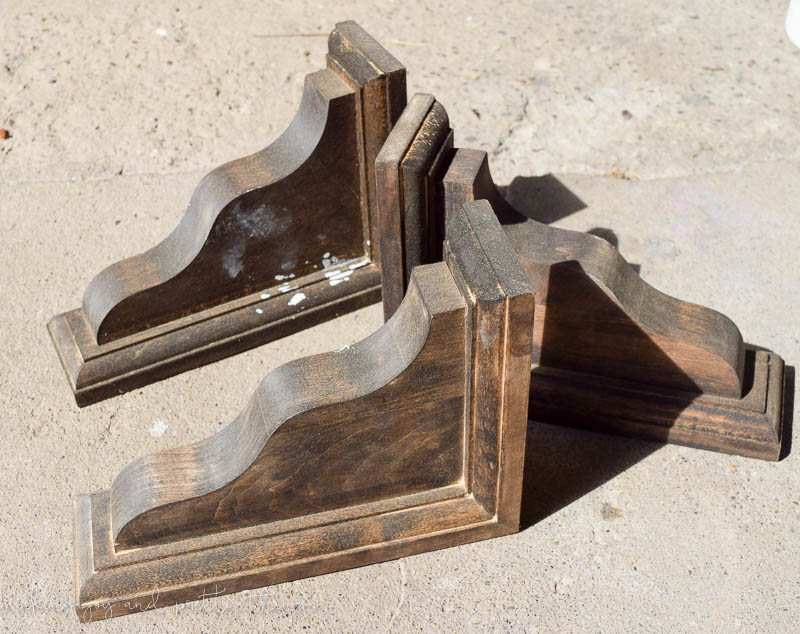
Step 3. Stain and Paint Corbels
We looked at the same warehouse for some decorative corbels to hold the wood up. I was originally looking for something pretty fancy, maybe like a rustic French decor look.
When we couldn’t find any old corbels, we decided to use some pretty plain ones from Home Depot (similar here).
I decided to go with less detailed corbels so that the focus would be on the shelves and the decor ON the shelves. But, I think the shelves would look fantastic with some more detailed corbels, too. Go with what you like 🙂
First, I stained them using my favorite stain: MinWax Dark Walnut. I applied it pretty sparingly using the old t-shirt method (is that a real method??)
Once the corbels were dry, I painted them using my second love (behind my husband and children) Rustoleum Chalked Paint in Linen White. Literally in love with this paint. I want to chalk paint all of the things.
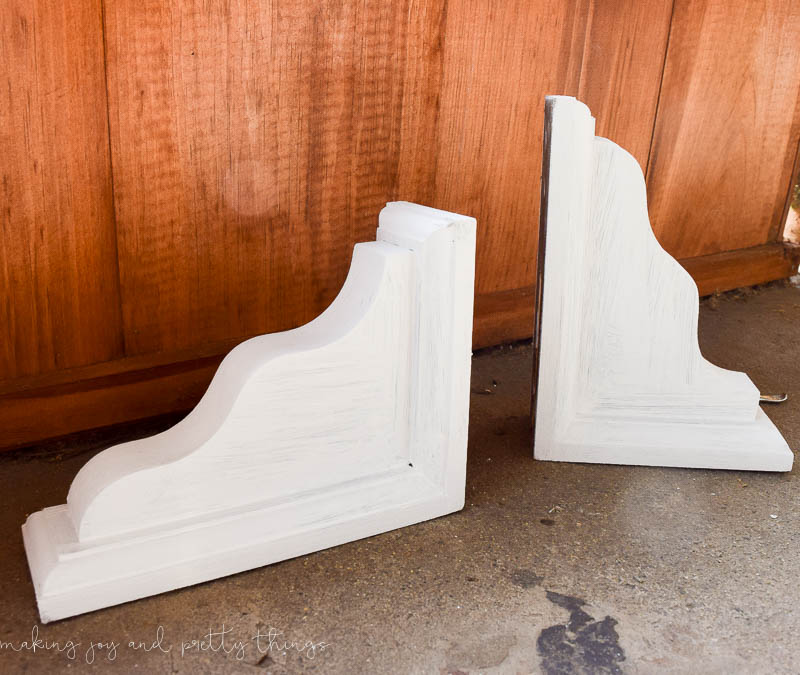
Step 4. Distress Farmhouse Corbels by Sanding
As is tradition, I sanded them down a bit using coarse grit sandpaper (similar here) to create a rustic look. I focused on all of the edges and corners and made sure to have at least one “rough” spot on the large flat portion of the corbel, too.

Step 5. Hang up Corbels for DIY Farmhouse Shelves
Now, I had no part in hanging them, aside from sitting and watching my husband father-in-law hang them. Precision, measuring, and patience, that’s not my style. So, here’s my husband to explain that part:
Hi, it’s TJ! The process itself took a bit of time, but it was relatively straightforward. We used a stud finder to locate studs that fell within the width of the shelves. Once we had two studs near the end of the shelves we drilled the holes on one side at the correct height.
We used a level to make sure the holes on the other side of the shelf were at the right point, then drilled those holes as well. Lather, rinse, repeat and then we had all the holes we needed to hang two beautiful farmhouse shelves at exactly the right height, and perfectly level.
And, the shelves were FINISHED!!


Look at the lovely detail in this wood:


As you can see, I could post pictures ALL day of these shelves.
Plus, wasn’t it easier than you expected??
Now…it’s on to the styling. Which is a whole other ballgame. Judging by the pace I get things done, we should expect to see that reveal sometime in 2017.
But, seriously, I’m trying to style both shelves with mostly DIY projects and budget-friendly finds. I’m almost done and I’m SO excited to share the styled shelves soon. (UPDATE: See how they turned on here with how to style open shelves in 5 easy steps & check out this shopping guide of rustic decor for shelves.)
Have you been swooning over farmhouse shelves, too? Check out these other farmhouse ideas!
- Friday Inspiration: Farmhouse Loving by Studio Mcgee
- Farmhouse Throw Pillows by Making Manzanita
- DIY Farmhouse Neutral Floral Centerpiece by Me!
Wishing you a joyful day!

How To Make DIY Farmhouse Shelves
Materials
- Barn wood
- Corbels
- Stain
- Chalk paint
- Coarse grit sandpaper
Tools
- T-shirt (to use as a rag for stain)
- Paint brush
- Level
- Stud finder
- Drill
Instructions
- Find the Wood for DIY Farmhouse Shelves. We were using old barn wood that we found at a local warehouse.
- Clean and Seal the Wood. You can check out our whole 3 step process to get that barn wood dining room shelf ready!
- Stain and Paint Corbels
- Distress Farmhouse Corbels by Sanding
- Hang up Corbels for DIY Farmhouse Shelves


Looks great Sarah!! Isn’t it so rewarding to sit back and gaze at a finished product that you know was a labor of love?! So happy you love your new shelves! They look great, especially against the wall color!
Thank you so much, Colette!! I do love how how they turned out. I’m glad you like them 🙂
They are beautiful, Sarah! I can totally see why you’re so thrilled with them! xo
Thanks, Kendra!! Yes, I’m slightly obsessed with them. I’m so glad you like them!
Did your husband just drill and screw through the corbels into the studs? And yes, they are beautiful! I agree with all of you!
Thanks,
K.C.
Hi K.C.! The corbels actually came with hanging brackets in the back of them. The screws went into studs but not through the corbels, if that makes sense. I probably wouldn’t have spaced the corbels exactly how they are, but we were limited by where the studs were in that wall. Thank you SO much for stopping by!!
Beautiful shelves! I also love the color of paint on the wall. Could you please tell me the brand and color?
Thanks so much, Karen! I’m going to send you a separate email with a picture of the exact can we used. Since it’s a custom color match (to a Sherwin Williams color I believe) there’s not a specific color. Look for my email! Thanks for stopping by 🙂
Your shelves are just beautiful! I love the white corbels up against the stained wood. I bet they will be so much fun to style!
Aw thanks Robin! They are so fun to style and switch up for the season. I’m so glad you like them!
I absolutely LOVE these shelves with the corbel idea! Just one question, how much weight do you think these shelves can hold up?
thank you so much Francesca!! Ours were anchored into the studs in the wall, so probably quite a bit. My hubby thinks 20lbs each based on how they were hung (so 60lbs for the whole shelf). The ones I linked to in my post available on Amazon say they can hold 150lbs each which is crazy!! But they’re also screwed in differently than the ones from Home Depot that we bought. So, I would look at the individual corbels you’re going to buy and judge based off of that 🙂 Hope that’s helpful!!
The shelves are beautiful! The hard part is finding the wood. You make it sound really simple, “at a local warehouse.” I don’t think those places exist near where I live. Any suggestions?
Hi Karen! I guess I should say a local warehouse that was turned into an antique shop. So more accurately, an antique shop 🙂 I would look in the Facebook marketplace! It will be all local people to you selling random things. I found around me (Pittsburgh area) old mirrors, barn wood and random things like kid’s playsets. Also check Craigslist (how I found the place local that barn wood and an old dresser for our nursery) or even Etsy! Good luck!!
Hello! What is your suggestion if I cannot find old wood?
They look great- can’t wait to try!!
Sarah
Hi Sarah! I totally understand not being able to find old wood. You can always check Craigslist and Facebook classified for local sources close to you or even Etsy! I also have another set of farmhouse shelves on the blog that used boards from Home Depot! Just search “farmhouse shelves” on my blog and it will bring it up for you. There are also tons upon tons of tutorials on Pinterest for making new wood look old. A combination of stains and distressing can give you the look you’re going for 🙂
Shelves are beautiful. Did your husband screw the shelves into the corbels?
Yes, the shelves can be screwed into the corbels from the top.
Sarah,
These are wonderful; the shelf boards are so rich in color. Your father-in-law did a straight job hanging them! They look so good & ‘farmhousey’. Show us photos after you decorate them. Thanks for sharing.
Terri