
Rope Planters Wrapped and Painted DIY
Need a quick and easy Mother’s day gift? Try out these rope planters wrapped and painted. They are and look amazing!
Hello, friends! I can’t even believe it’s June already! The lazy days of summer are almost upon us. I can’t wait to tell you about these rope planters that I did for Mother’s Day!
… and I’m just posting about it. Efficient, eh?? I blame the kids 😉
Want more easy handmade Mother’s Day gift ideas? Try this handprint art for a grandparent gift or make these suncatchers using real flowers!
I made these rope planters that I wrapped and painted for my mom for Mother’s Day. She needed something to match a trellis I gave her that was a bright turquoise color.
She wanted to paint it (gasp!!!) because she couldn’t find any matching planters to go with it. I wanted to create something complimenting the turquoise trellis without taking over the garden area.

Now guys, I waited until the NIGHT BEFORE Mother’s Day to make them. Even though I had bought the supplies a week beforehand. Is anyone else a major procrastinator?? So, this isn’t my best work…you’ll see later on this wasn’t even how I wanted them to look!!
Supplies for Rope Planters:

- Rust-oleum UltraCover Paint + Primer (in Gloss Seaside)
- Rust-oleum Chalked ultra matte paint (in Charcoal)
- Everbilt 1/4″ Natural Sisal Rope
- Terra Cotta pot
- Painter’s Tape
- Elmer’s Spray Glue
Prep: make sure you follow proper spray painting and spray glue techniques! Always read the bottle.
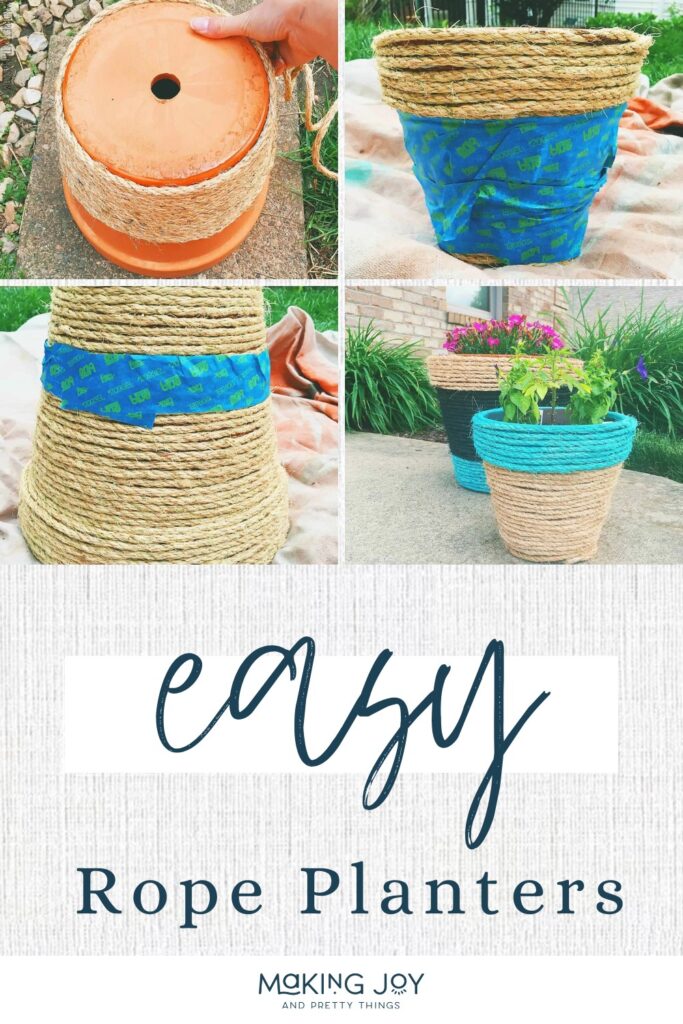
Step 1. Wrap the Planters with Rope
I used 2 different sizes of terra cotta pots (both from Home Depot). Starting at the bottom of the pot with the pot flipped over (as shown below), I sprayed a THICK coat of the spray glue around about the bottom 2 inches of the pot, all the way around.
I took the end of the rope and placed it on the bottom of the pot, and sprayed some extra glue on that point. Then, I wrapped the rope around, making sure to keep it pulled tightly and stopping every so often to make sure I wasn’t leaving gaps in between the rows.
This whole GIANT pot took maybe 5 minutes, tops.

After I reached the end of the section I had sprayed glue, I sprayed another 2 inches or so. Working in smaller sections assures the glue stays sticky and doesn’t get too dry.
I continued wrapping all the way to the top of the pot (even over the little rim part at the top). Once the rope was flush with the top of the rim, I cut the rope and tucked it under the last row. I sprayed a little more glue OVER that point to make sure it would stick.
Then it was dinner time and sleep time and the painting began…
Step 2. Painting the Terra Cotta Pots
My original thought was to just have turquoise accents on the rope planters to compliment the turquoise trellis, and the remaining part of the planter being the beige rope color would be perfect.
So, I taped off a section of the pot so that the bottom section would be exposed and began painting.

And, I didn’t tape it off well enough. Rookie mistake!!

Step 3. Tape off the Rope Planters…More!
I was SO upset. Do you see the faint turquoise color on the wrong side of the tape?? I really didn’t know what to do. I didn’t want to paint the whole thing turquoise because that defeated the purpose of having an accent planter. And I couldn’t start over because I waited until the day before Mother’s Day. Crap.
So I naturally whined to my husband who came up with a great idea. I had some chalkboard paint lying around (who doesn’t??) so we used that to paint over the turquoise section.
You better believe that I taped the next pot with half a roll of tape (not really). There was no way this one was getting messed up.

Step 4. Fill with Potting Soil and Plants
They turned out perfect!! I didn’t get a picture of them with the turquoise trellis, sadly. But, it’s the perfect accent piece to go on my mom’s front porch. I LOVE them.
Don’t mind the sweet little boy in this picture 🙂


or the bird poop in this one…oops!! I’m so bad at pictures.


I didn’t seal them, because, well, I didn’t have time 😉
My mom has had them out for a few weeks and they’ve held up great!
I’ve been sort of crushing over DIY pots/planters these days. If you can’t get enough like me check out my DIY Gold Foil Painted Pots or DIY Lace Wrapped Pot projects.
If you still need a teacher gift check out the DIY Teacher Gift “Thank for helping me grow” plus free printable tags! I also have a whole board on Pinterest dedicated to DIY planter ideas.
I hope everyone has a fantastic beginning of summer full of sunshine and joy.

How to Make Rope Planters
Beautiful rope planters made from terra cotta plants and made unique with a little bit of paint and hard work
Materials
Instructions
- Wrap the Planters with Rope
- Painting the Terra Cotta Pots
- Tape off the Rope Planters for Second Coat
- Fill with Potting Soil and Plants


Wow, I love your beautiful images and this craft is just lovely. I have a few DIY’s I did for mother’s day that never made it to the blog, too. I share your sentiment!! Oh well…
But I this will make an awesome summertime craft!!
Oh my gosh, thank you!! I’m always worried about my pictures. That made my day!! And yeah, I’m about a month behind on posting DIYs… 🙂
Hey – These looks great, thanks. Wont the adhesive come off or the color wear off in rain?