
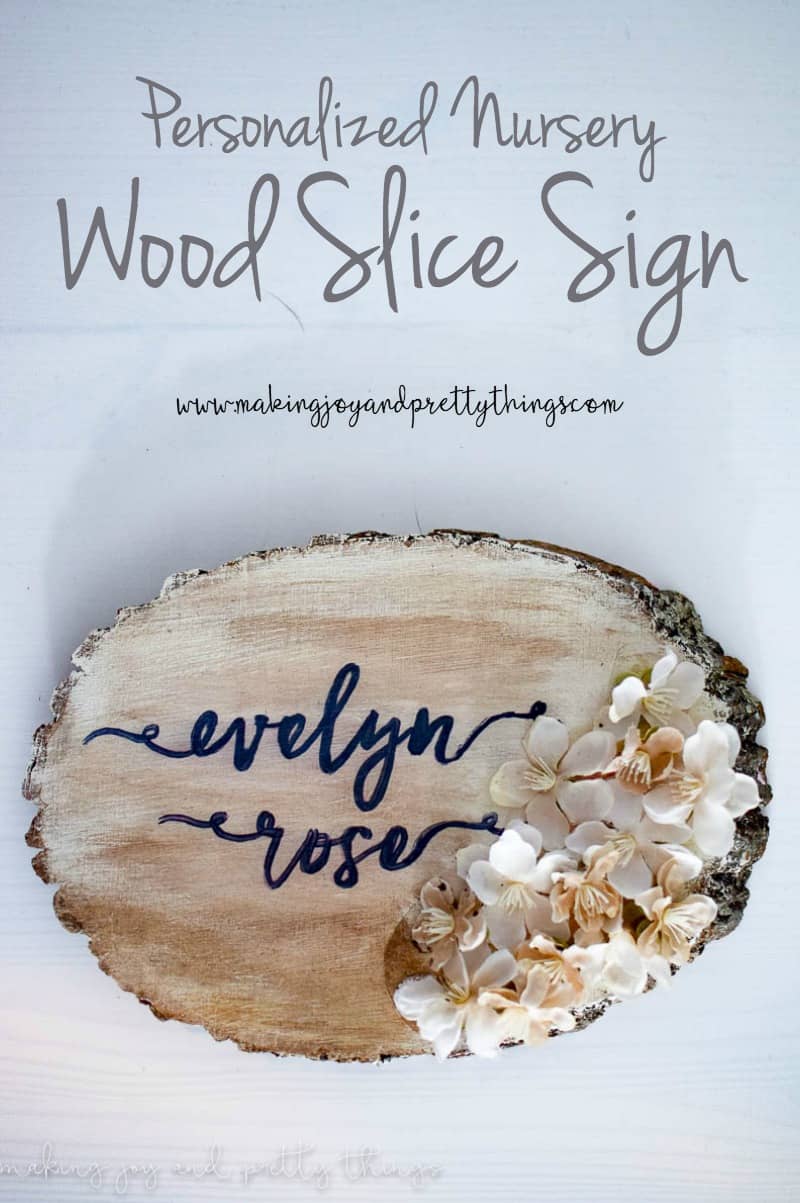
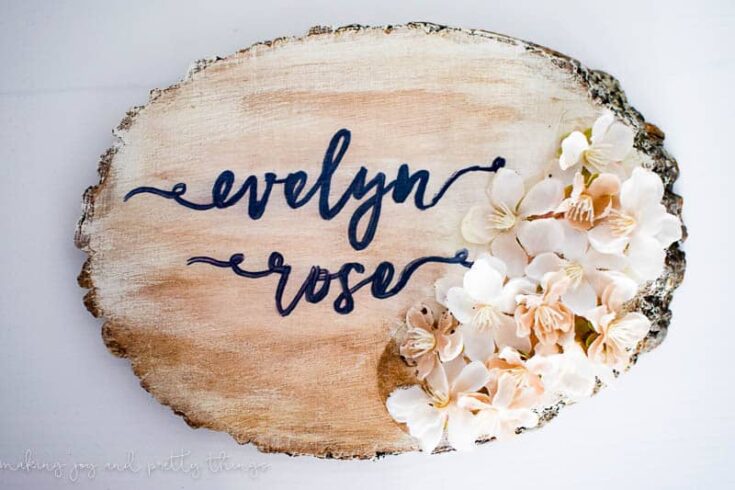
Personalized Wood Slice DIY Nursery Name Sign
Decorating with natural wood elements can really add farmhouse style to your home. Check out how I made a DIY nursery name sign to give my nursery a bit of farmhouse character.
Ever wanted something simple to do but had a big impact on the decor in your nursery for your new little one?
This DIY Nursery Name Sign is the perfect piece to add and is easy to make!
It’s time for another Create With Me Challenge! Last month, you voted for us to make a project using natural wood, which is speaking my DIY language!
Since I found out baby #3 was a girl, I knew I wanted to make her a farmhouse-style nursery.
Natural wood is an essential part of the farmhouse-style decor, so I knew I could make something for her room with a wood slice sign I had on hand.
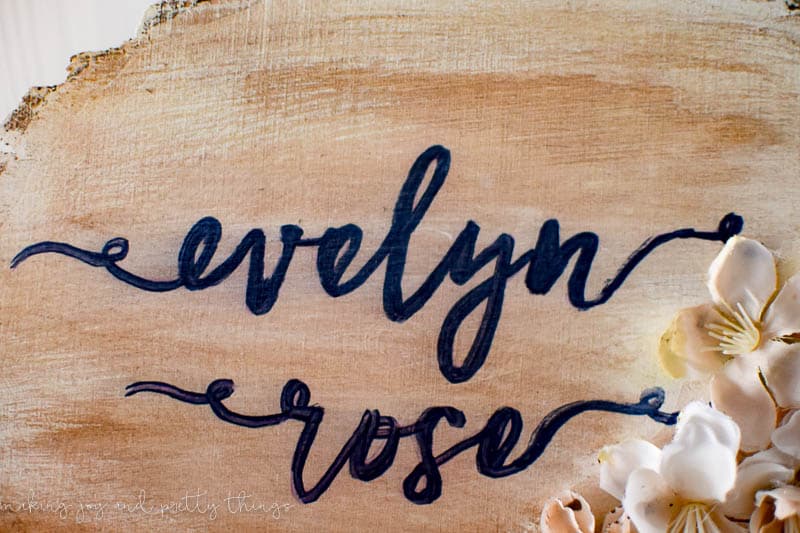
After failing at a couple of different ideas (note: you cannot do iron-on transfers to wood slices), I decided to stick with simple, neutral colors and her beautiful name: Evelyn Rose
This post contains affiliate links. Please, click here to read my disclosure policy.
Supplies for DIY Nursery Name Sign:
- Martha Stewart Vintage Decor Paint in Linen
- Wood Slice Sign
- Pencil
- Sharpie
- White Wax
- Antiquing Wax
- Flowers
- Paint Brush
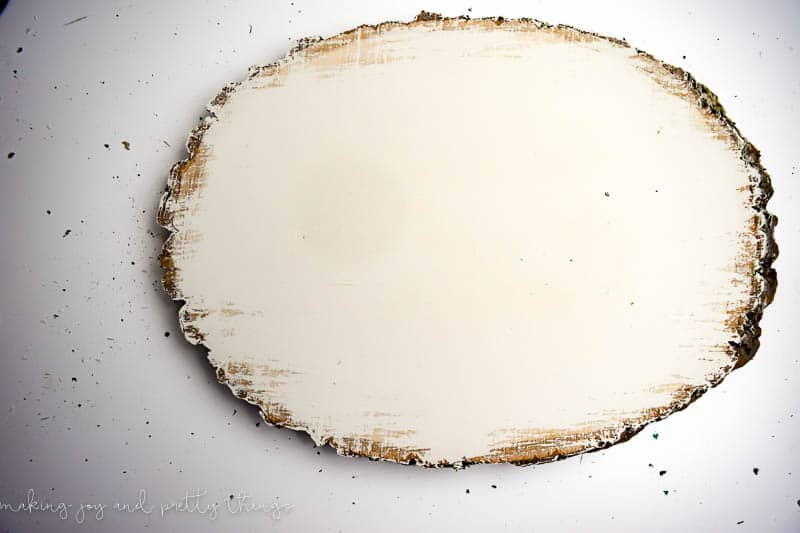
Step 1. Paint the Wood Slice
I started by painting the wood slice in Martha Stewart Vintage Decor Paint in Linen.
Next, I used one of those brushes with thick bristles (aka not a really expensive brush) so that the paint lines would show through. I also left some of the edges exposed.
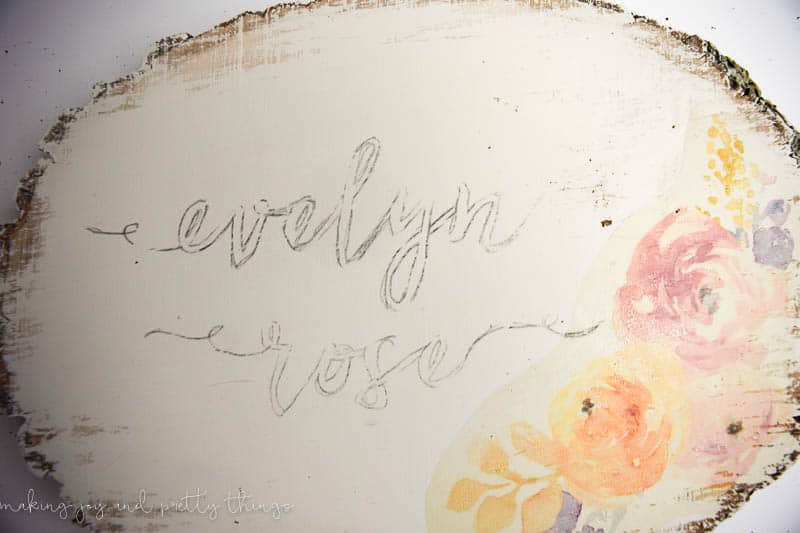
Step 2. Transfer Name onto Nursery Sign
Next, I tried to do the iron-on transfer of some pretty watercolor flowers and boy did that fail.
While I tried to figure out how I was going to salvage the ruined portion of the wood slice (because I had already ruined the OTHER side of the wood slice), I decided to add some pretty cursive for her name.
I love the dramatic swashes before and afterward. I think I mentioned before that I’m a font junkie. Tell me I can download a free font and you bet I’m going to do it.
Especially if it comes with pretty doodles. I designed her name on Picmonkey (SO easy) and printed it out.
Using the same method I’ve used to transfer words to any material before, I transferred the printed-out name onto the wood slice.
Basically, color the back of the paper with a pencil, tape that side onto the wood slice, then trace overtop with a pen or pencil. It magically transfers the perfect font onto the wood slice. No free-handing is required!

(See the gross watercolor transfer in the corner. It turned out so yellow….Ewwww!!!!)
Step 3. Fill in Name Trace
With the pencil tracing on the wood slice, I was easily able to color along the lines with a regular black Sharpie. I really wanted to use a gray chalk pen but didn’t have one (the horror!!!).
Because the black Sharpie was a little too harsh (I prefer a more muted tone), I applied some white wax over the surface.
Then, I quickly wiped off any excess with a paper towel.
Next, a quick wipe with some antiquing wax added a vintage look that I absolutely love!
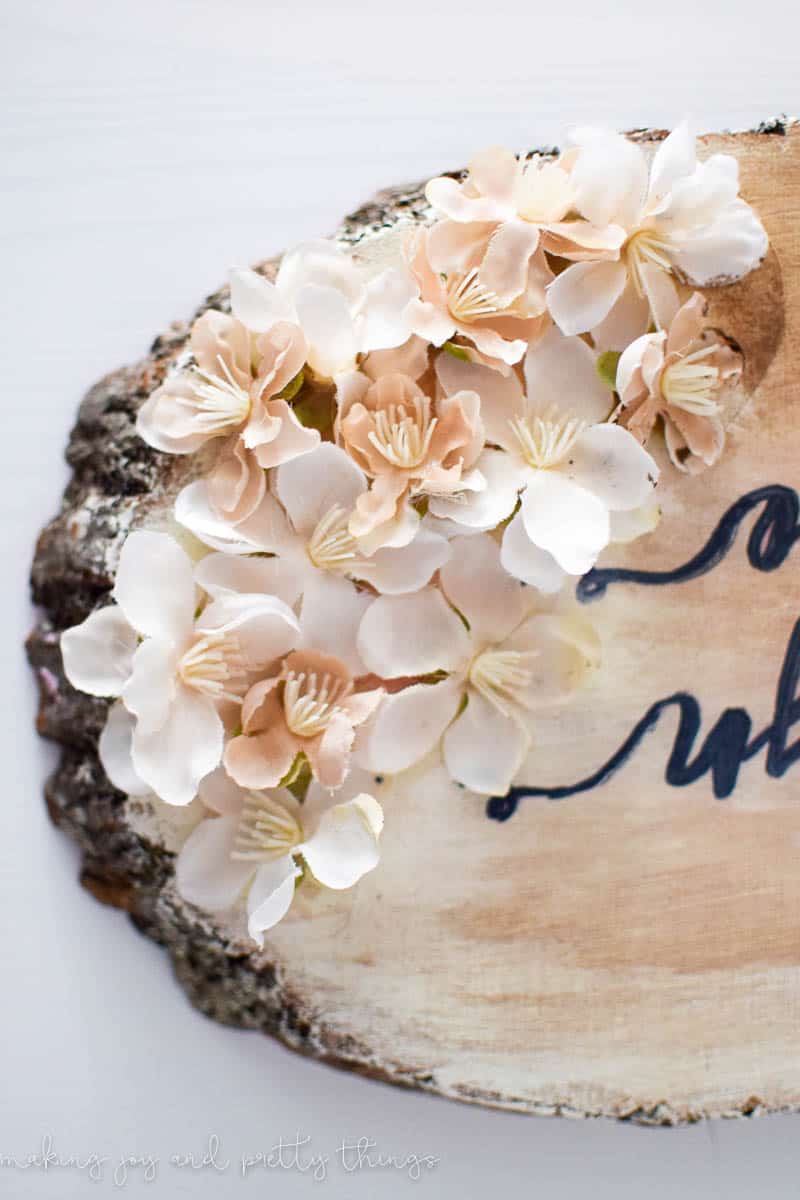
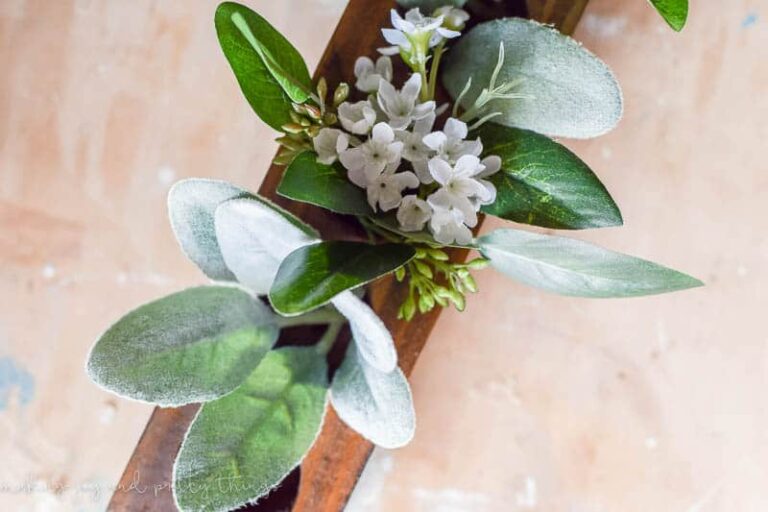
Step 4. Add in Flowers for DIY Nursery Name Sign
With the name complete, I had to do something with the yellow disaster in the corner. I ventured to my faux floral stash and found the perfect peach blossoms from last spring that I used for this garland.
They were a white/beige/cream color. With my handy glue gun, I strategically placed the flowers over the gross yellow.
I think I actually like it better with the bit of dimension that the flowers add.
And that was it! If I didn’t try two other designs first, this really would have only taken me 15 minutes (not including drying time for the paint/waxes).
Plus, it only cost me a few dollars for the supplies!

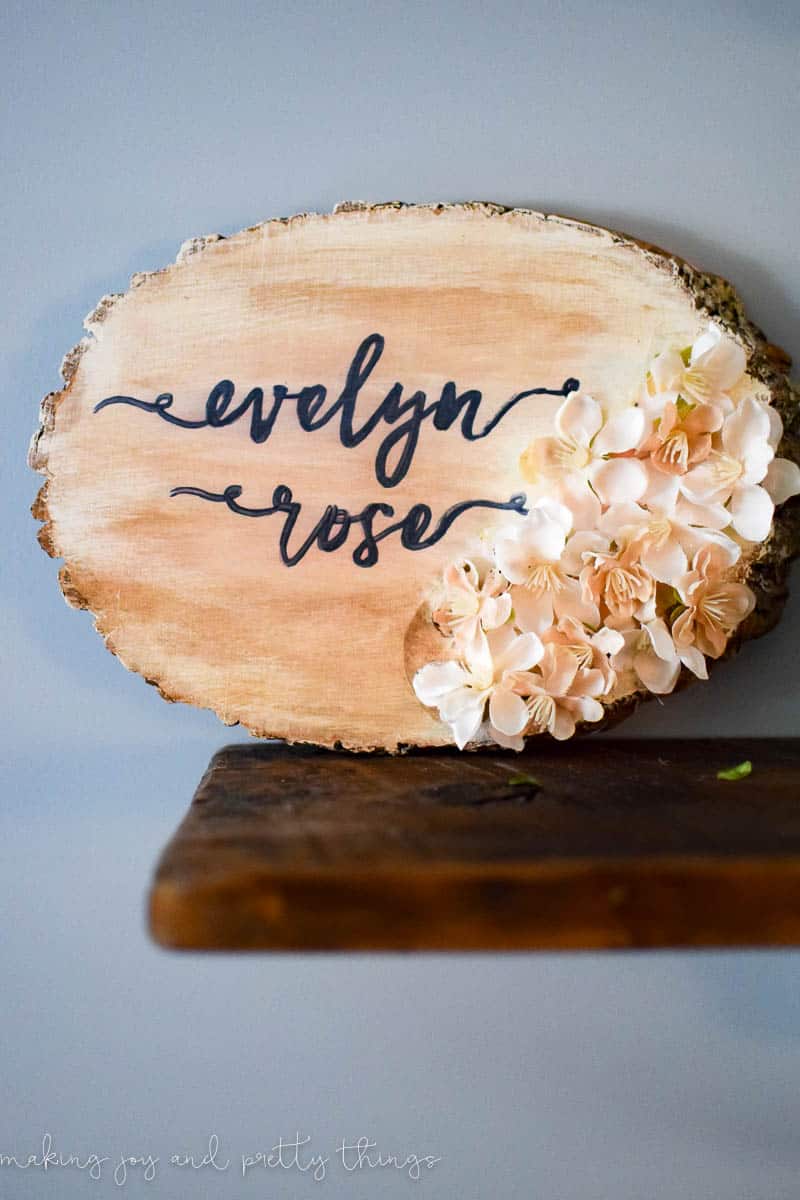
Ahh doesn’t it look so vintage and cute?! It’s perfect for my sweet little girl’s room. I can’t decide if I want to hang it on her door or put it on some DIY farmhouse shelves I’m planning to hang over her new dresser.
The combination of antique and white wax really transforms the whole sign.
So, what do you think?
I really enjoyed making this sign for my new little one and it was super simple to do. I just love adding that personal touch to all my decor where I can and just look how it turned out!
Want to see more natural wood projects? Check out these other creative projects from some talented blogging ladies.
Personalized Nursery Wood Slice Sign- Making Joy and Pretty Things (that’s me)
Driftwood Mirror- Little Bits of Home
Wood Slice Winter Garland- My Life from Home
Natural Wood Shelf- Our House Now a Home
Wood Slice Garland- Our Crafty Mom
Wishing you a joyful day, friends!

Want to see more of our farmhouse girl’s nursery?
- Farmhouse Girl’s Nursery: The Design Plan
- Farmhouse Girl’s Nursery: Week 1 Progress
- Farmhouse Girl’s Nursery: Weeks 2 and 3 Progress
- Farmhouse Girl’s Nursery Week 4 Progress
- A Farmhouse Nursery Dresser Makeover
- Personalized Nursery Wood Slice Name Sign
- Floral Wallpaper Ideas for Girl’s Bedrooms and Nurseries
- Lazy Girl’s DIY Typography Art
- DIY Wood Block Candle Holders
- How to do an Old Curtain Rod Update
- How to Make a DIY Triangle Shelf Planter
- How to Make a DIY Shadow Box
- Monthly Baby Photos: How to Make a DIY Letterboard
- How to Make a Wood Bead Chandelier
- Simple Floral Farmhouse Wreath
- Rustic DIY Planter using Book Pages
- How to Make Your Own Rustic String Art
- DIY Fabric Flower Garland
- DIY Wood Bead Hearts
- Farmhouse Girls Nursery Reveal!!
How to Make a DIY Nursery Name Sign
Decorating with natural wood elements can really add farmhouse style to your home. Check out how I made a DIY nursery name sign to give my nursery a bit of farmhouse character.
Materials
Tools
- Brush
- Pencil
- Sharpie
Instructions
- Paint the Wood Slice
- Transfer Name onto Nursery Sign
- Fill in Name Trace
- Add in Flowers for DIY Nursery Name Sign

So adorable! What a lovely idea for a name sign – I bet it looks so sweet in your daughter’s room!
Thanks so much, Kim!! I can’t wait to put it in her room 🙂
JUST BEAUTIFUL!!!!!
Thank you so much!! 🙂
Oh my word, I would have never guessed that this was your Plan B! It is so beautiful!! I love her name and I love how the flowers look on the raw wood! Pinning!
Aww thanks Samantha! I love the backup plan more than my original plan! When does that ever happen haha. I’m so glad you like it!
This turned out so lovely! What a great personalized sign & I love the flowers!
Thanks so much Michelle!
It turned out great! I love the combination of the rustic wood and the pretty flowers! Adorable!
Thanks Amy! The flowers did pair so nicely with the wood. Glad I have extra flowers lying around 😉
That is such a cute idea! I love it because it looks so feminine.
Aww thanks Bonnie! I’m excited I get to actually make feminine decor now that I’m having a sweet little girl!!
This is adorable! I love the dimension that the faux flowers add!
Thanks Emily!! The flowers turned out to be my favorite part!
I absolutely love how it turned out!! 🙂 super cute. Can’t wait to see the whole nursery. Congrats.
Aww thanks Chelsea! I can’t wait to get started on the nursery!
I love happy mistakes! The fake flowers really make the whole piece! Love this idea and might have to use it for my boy nursery! Minus the flowers 🙂
Thanks so much Chelsea!! You could definitely do a wood slice name sign for a boy’s nursery, too! Though, I agree the flowers may not work 😉
Very cute! I love wood slices for wall art because they add nice depth and texture – the flowers even more so!
Thanks so much Lora! It’s definitely going to be a focal point in her new nursery!
This is adorable. My first born daughter is named Evelyn Rose!
Thank you so much!! It’s a beautiful name 🙂
So cute! I love how you just came up with another idea to cover up the mistake. I’ve totally done the same thing, haha.
Thanks Shani!! I’m pretty sure I’m covering up a mistake more times than not, I just don’t always admit it haha!! Glad you do it, too!
This is such a cute idea and a beautiful name!
XO! Vanessa
Thanks so much Vanessa!
So sweet! Congratulations!! xo
Thank you!! We are so excited!
Is Evelyn Rose your daughter’s name? I saw this on Pinterest and I HAD to click over! That’s my daughter’s name too! Crazy!
Is it really?! That is my daughter’s name (who is due April 14th!). Evelyn was my grandma’s name 🙂 Great minds think alike!
This is beautiful! I would love to make one for my daughter’s bedroom. What is the name of the font you used? It’s gorgeous handwriting!
Thanks so much Amber!!! The font is called “hide away” and I purchased it from Creative Market. Honestly, it’s probably not worth it to buy the font. Creative Market gives out 6 free items every Monday so watch out for a pretty font you like and download it for free 🙂
I was just wondering where you found the wood? It’s such a cute idea and I’ve been looking for planks for awhile now.
Hi Emily! I found the wood slice at Michaels! It was from a few months ago but I’m pretty sure they still sell it. If not, you could try Hobby Lobby 🙂
Absolutely stunning I love this. Would you mind telling me what font that is please xxx
Thank you! I’m sorry I don’t remember what font I used. I get all my custom fonts from Creative Market though. Canva also has some nice free fonts!