
Easter Kid Craft: Coloring Eggs With Shaving Cream
Learn how to color Easter eggs with shaving cream and food coloring! These shaving cream Easter eggs are the perfect egg-dyeing craft for your kiddos. It’s a super-fun way to get into the Easter spirit!
I can’t believe Easter is almost here! I remember, as a little girl dyeing Easter eggs with my grandparents every year. But, with these little boys, the traditional way of dying Easter eggs is definitely not an option.
There would be vinegar food coloring splattered everyyyyywhere. I saw the shaving cream method on Pinterest last year and decided to try it out with the boys this year.

Look at these sweet little boys!!! All the {heart eye} emojis.
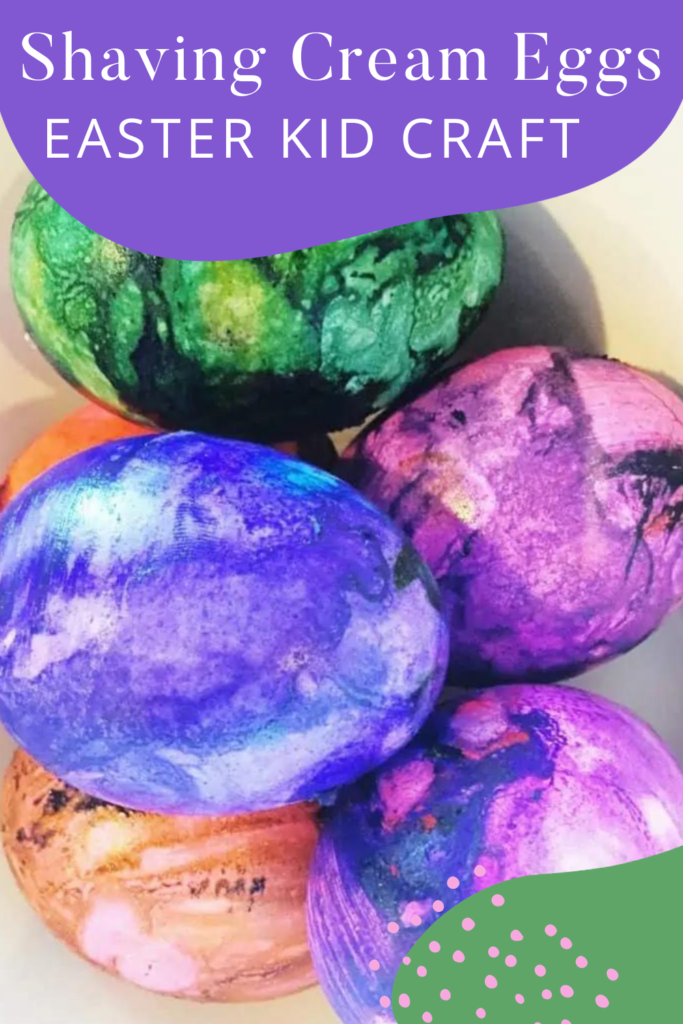
You guys, can you even believe how BEAUTIFUL shaving cream colored eggs these turned out?? I mean, the colors are just gorgeous.
I let Liam (my oldest) pick his own color combinations, and surprisingly no eggs turned into a gross brown color by mixing together all the different colors.
Don’t worry mamas! Making these shaving cream eggs is SO SO EASY. Now, we had a smallish-big disaster with a wall and Charlie (my younger).
So, if I were to do this kid’s craft again, I’d stick to an older toddler or older children, haha. More is explained below in the tutorial.
This post contains affiliate links. Please, click here to read my disclosure policy.
What Supplies Are Needed for Coloring Easter Eggs with Shaving Cream?

We used Gel Food Colors. Only because that’s all we had on hand. But I think they turned out great just because of how bright the colors are naturally and that translated well to the Easter eggs. Any food coloring would work, but for the most vibrant colors, stick with the gel, like we did.
I had some Barbasol shaving cream. Why? I have no idea. But there it was in my craft bin. Again, any can of shaving cream works as long as it is the foam kind, I don’t think this would work with gel shaving cream.
I started using glass containers, but, by the end, I was using paper plates. And I suggest using paper plates or bowls.
How to Color Easter Eggs with Shaving Cream
Supplies needed for this Easter craft:
- Gel food coloring (regular food coloring would work too, but may not be as bright)
- Foam shaving cream (this method may also work with cool whip or whipped cream too if you don’t have any shaving cream laying around)
- Hard-boiled eggs
- Mixing bowls or plastic containers
- Q-tips or paint brushes
- Paper plates
- Cookie sheet or muffin tin
- Paper towels
- Plastic gloves or a pair of rubber gloves (we didn’t use these, but we probably should have to make cleanup easier)
- Clothes you don’t care much about (don’t forget that food coloring will very easily stain fabrics and other surfaces)!
Step 1: Mix together shaving cream and food coloring
Start with about a tennis ball size amount of shaving cream in a mixing bowl, plastic container, or a paper plate.
Then you can have the kiddos drop some a few drops of the food coloring into a little pile of shaving cream. I didn’t measure anything here’s a pretty good example of one color amount spread out around the pile of shaving cream.
Remind your kiddos that with food color, a little goes a long way. Just use a few drops at a time rather than squirting a lot of color into the shaving cream.
Continue adding together a couple of different colors trying out different color combinations as you go.

Next, you need some type of “stirrer” to mix together the drops of food coloring with the shaving cream.
I had Liam using Q-tips and paintbrushes, swirling them gently to make a marble look. You could also use a plastic knife.


The marbled look of the colors mixing together in the shaving cream is just beautiful. Liam absolutely loved mixing the colors together. You can turn it into a little color lesson too, showing what happens when you mix together primary colors.
So now to the Charlie disaster. I knew he wasn’t going to quietly stir the colors with a Q-tip. I turned away for one second, I mean ONE SECOND, and this is what happened:

This kid is some type of ninja. Of course, I snapped a picture before cleaning up the colored shaving cream from the wall..oops. So, the moral of this story: maybe wait until the kids are 2 to do this. Or don’t blink while watching them!!
Step 2: Coloring the Eggs with Shaving Cream
Once you’ve achieved your desired “marbled” effect in the shaving cream with the food coloring, or just blended it into a totally new color, simply place the whole egg in the center and paint the egg!


Liam had the best time. He was in the zone with this Easter craft.

I tried again with Charlie, this time in his high chair with the shaving cream/food coloring mixture in a plastic container. The results were much better, haha.

Step 3: Let the Shaving Cream-Covered Easter Eggs Dry
Once the egg is coated, pick it out and place it on a cookie sheet (or another surface you don’t mind getting a little messy). A muffin tin would work great too!
Leave the colored coat of shaving cream on for a few hours so it can dry. Once it’s been a few hours, gently wipe the excess shaving cream off with a dry paper towel.


How to Dye Easter Eggs with Shaving Cream
Coloring Easter eggs with shaving cream is a fun, colorful, and messy craft your kids will love! All you need is shaving cream and food coloring!
Materials
- Shaving cream
- Food coloring (I used gel food coloring)
- Eggs (hard-boiled or faux eggs)
- Glass or plastic bowls
- Paper plates
Instructions
- First, prep your kiddos in oversized shirts or smocks. Prep your crafting surface (it gets messy!).
- Dispense some shaving cream into a bowl. Let the kids pick their food coloring color combinations.
- Drip the food coloring into the shaving cream and mix - use a paint brush, spoon, q-tip, or another mixing utensil.
- Once the shaving cream and food coloring is mixed to your preference (we went with marbled colors), dip the eggs into the shaving cream and fully cover.
- Place the shaving cream-covered eggs on a baking sheet or other surface and allow to dry for a few hours.
- Once the shaving cream is mostly dry, wipe it off with a paper towel to reveal your perfectly dyed Easter eggs!
I really love how the marbled-colored Easter eggs turned out. And if you forget about the minor wall staining, I’d call it a win.
Just keep an eye on those littles because it only takes a second for little hands to make a huge mess with the food dye!
Coloring Easter eggs with shaving cream was much easier to do with Liam than the traditional Easter egg cup method and no way regular Easter eggs look this artsy 🙂 This is now one of my favorite ways to color Easter eggs!
Hope you get to try this out with your kiddos this Easter season. I’m sure you will make some fun memories, just like we did! Wishing everyone a Happy Easter!
Find more fun kid crafts here:
- Kid Craft: DIY Pressed Flower Suncatcher (with Real Flowers!)
- Grandparent Gift Idea: DIY Handprint Art For Grandma
- DIY Kid’s Craft Table
*This post was originally published in March 2016, but was most recently updated in March 2023.*


This shaving cream Easter egg coloring method looks like a super fun and creative activity for everyone to try, can’t wait to give it a go and see the beautiful results!