
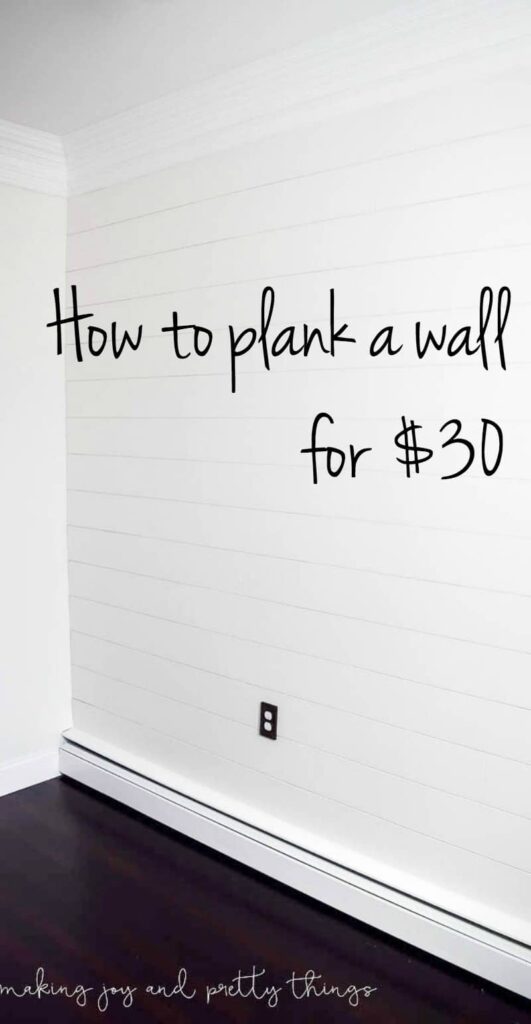
How to Plank a Wall for $30 (DIY Shiplap)
Creating a custom shiplap wall doesn’t have to be difficult or expensive. Learn how to make your own faux shiplap and plank a wall for $30!
Disclosure: I was provided paint from Sherwin-Williams for this project at no cost to me. All thoughts and opinions are 100% my own. Please see my full disclosure policy for more details.
Good morning 🙂
I hope your day is off to a great start but if not, there’s always time for more coffee 😉
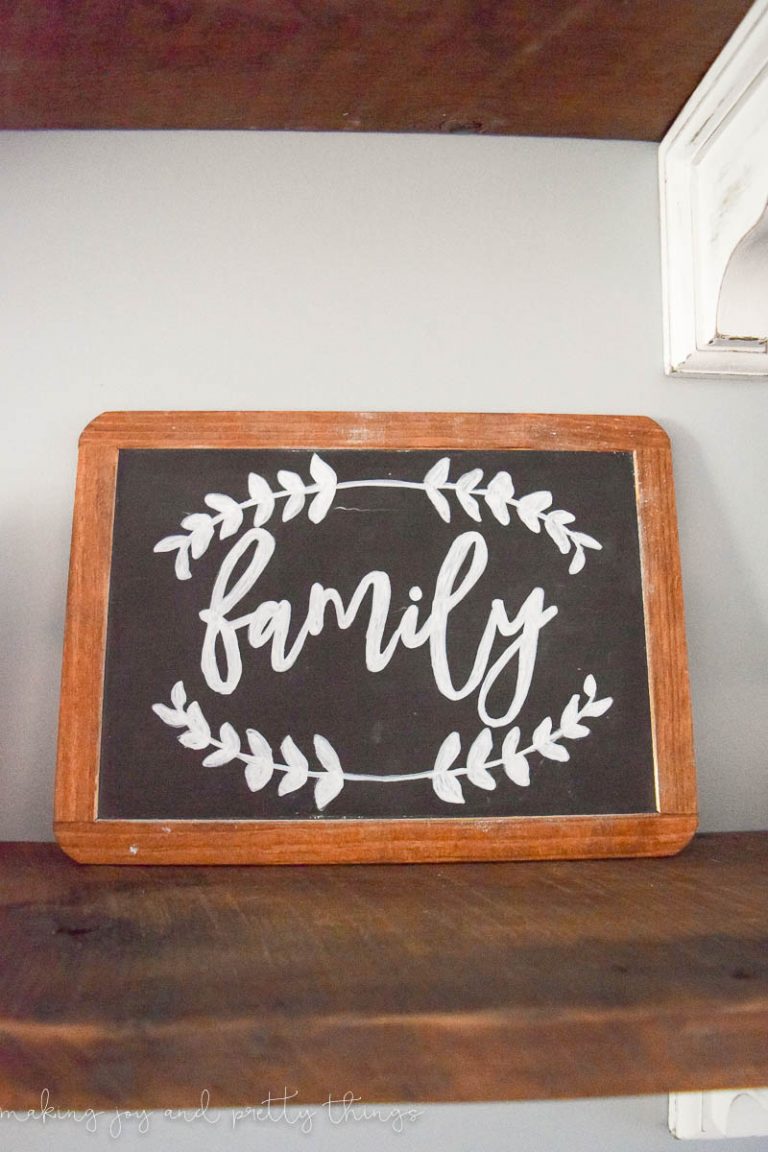
We have been living in our house for a little over a year now. That means it has taken over a year to plank/shiplap anything. Well, I did make this shiplap sign, but that doesn’t count.
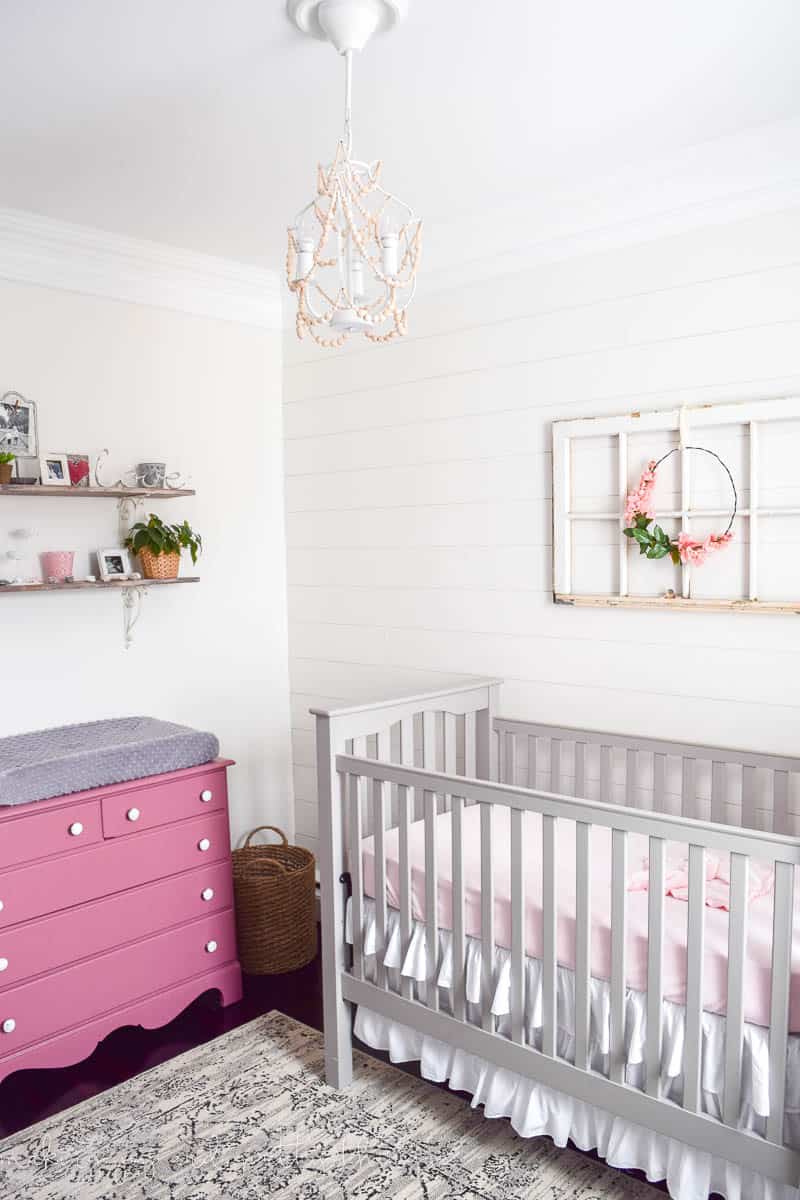
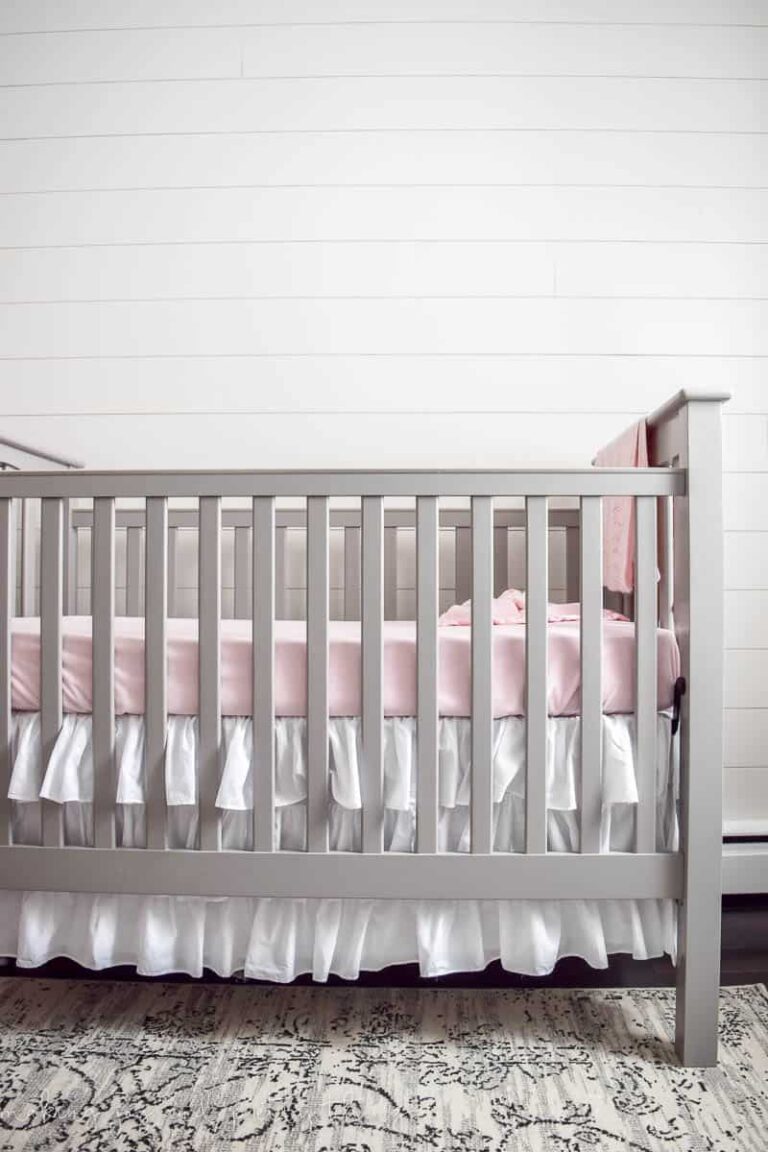
When I started the design plan for Evie’s farmhouse nursery, I knew I wanted to make a shiplap feature wall. The rustic wood and texture give the walls dimension and adds a visual focal point for the room. Also, it’s pretty 😉
I knew I could buy 8ft shiplap boards at a home improvement store. But, for nearly $13 A PIECE, I couldn’t justify the cost. That’s when I turned the planning over to my FIL. He said, “oh yeah we can use {insert name of wood I’ve never heard of}”. Sounded good to me!
Today I’m very excited to be sharing how to plank a wall like we did in Evie’s nursery for $30. Okay, so it was a couple more dollars but a round number sounds better, right?!
Supplies:
{Affiliate links were used at times. Please see my full disclosure policy for more details}
- Underlayment Plywood
- Nail gun nails
- Construction Adhesive
- 1/8 inch spacers (you can use tile spacers; we used strips of 1/8 particle board we had around)
- Crackshot Spackling Paste
- 250 grit sandpaper
Tools:
- Pneumatic Nail Gun
- Table Saw – to cut the board into planks
- Compound Miter Saw – to cut planks to length
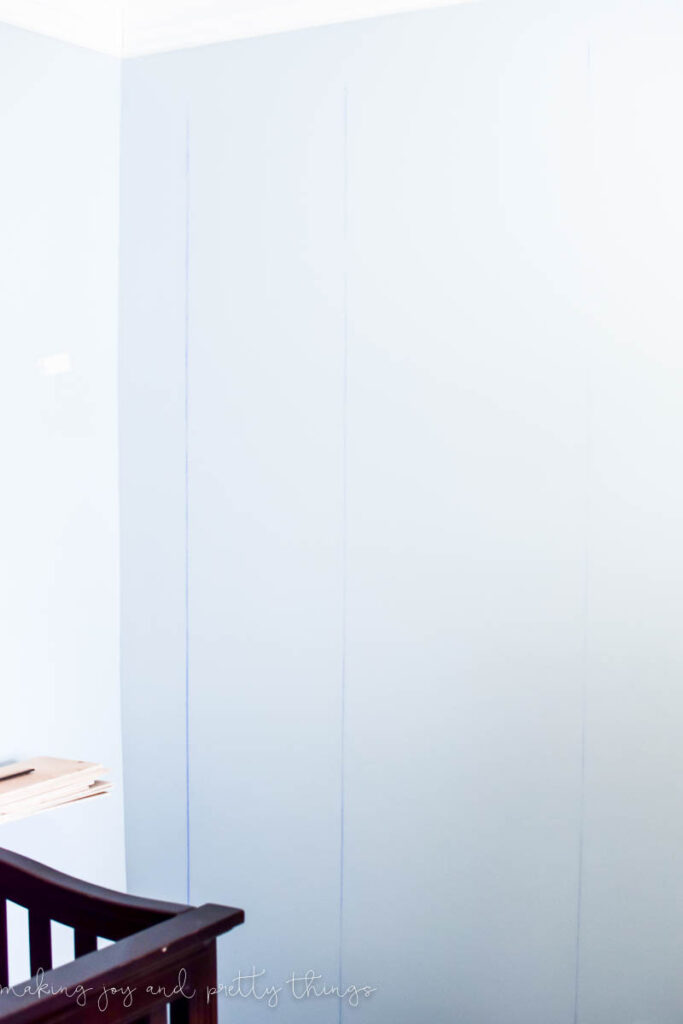
First things first. Gotta find your studs in the wall. Luckily, since we had our home stripped to the studs during renovations (I’m not sure that luckily applies?), we had a detailed map of sorts showing where each stud was. If you don’t have such a handy map, bust out the stud finder!
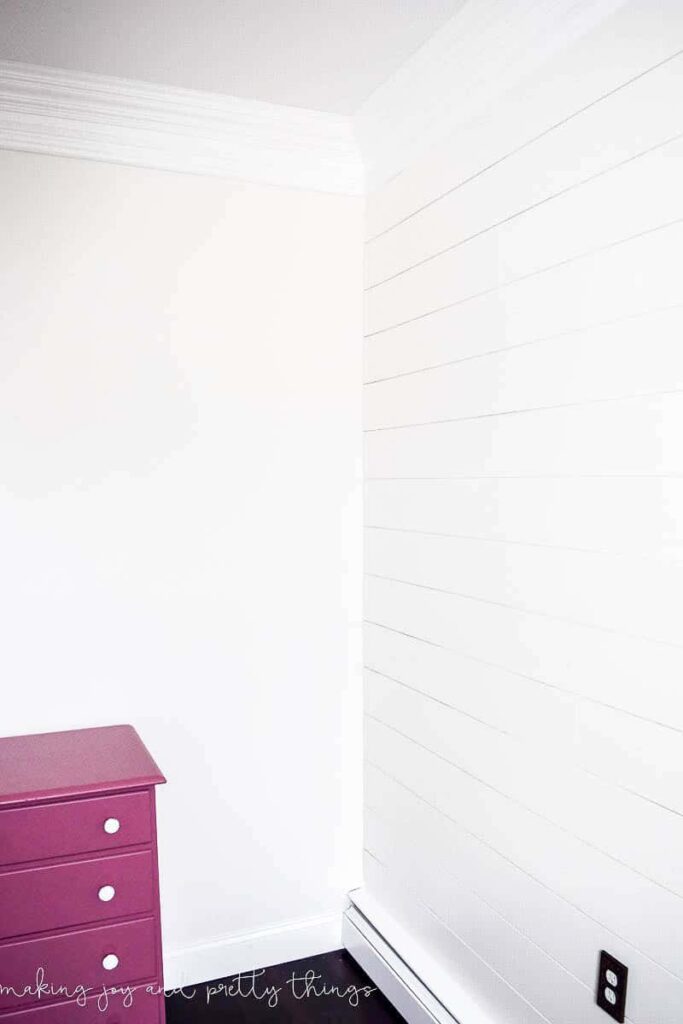
My hubby used a chalk line to mark a straight line from crown moulding to the baseboards overtop each stud.
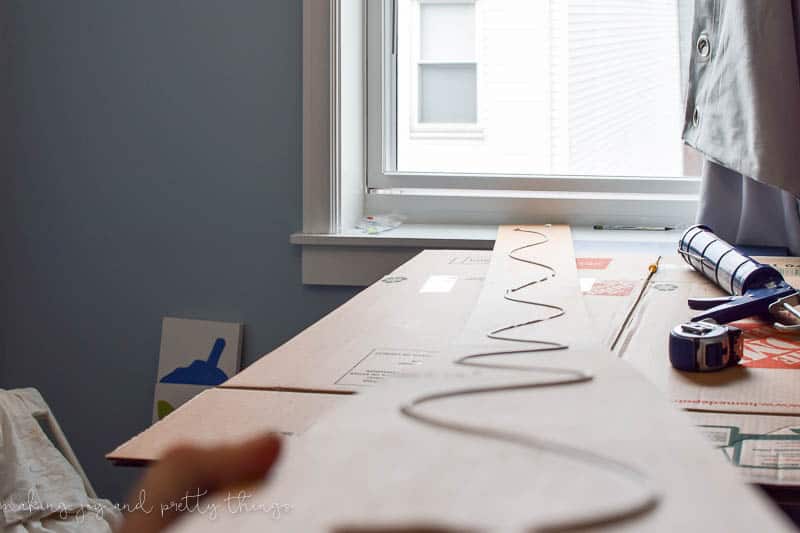
Next, we used a table saw to cut down the large sheets of underlayment into roughly 6 inch planks. We ended up with planks 5 7/8 inches wide due to the 1/8 of material lost to the blade on each cut. Technically you can do whatever width planks you want. Wider or thinner planks would definitely be different and fun.
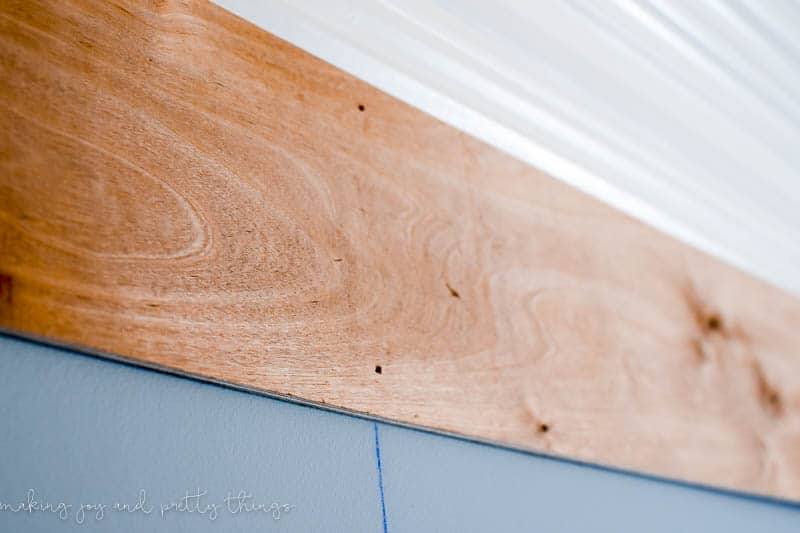
To hang the wood, we started with an 8 foot piece. First, apply some construction adhesive to the back of the wood.
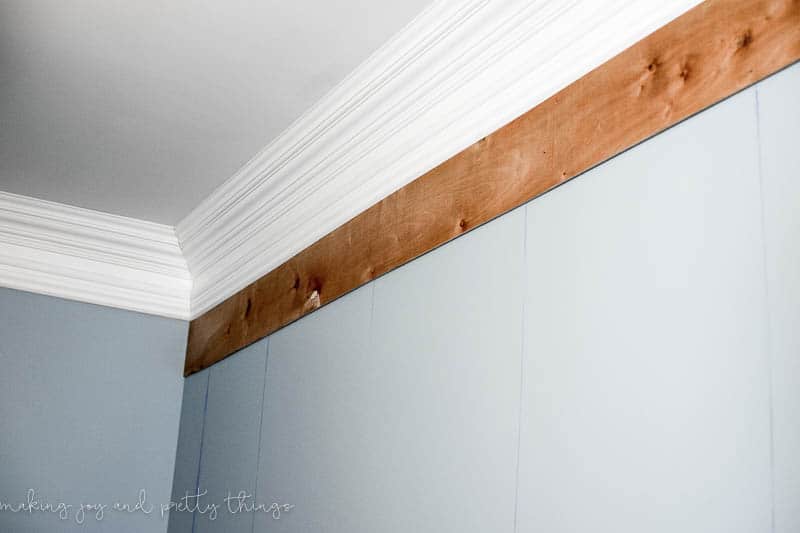
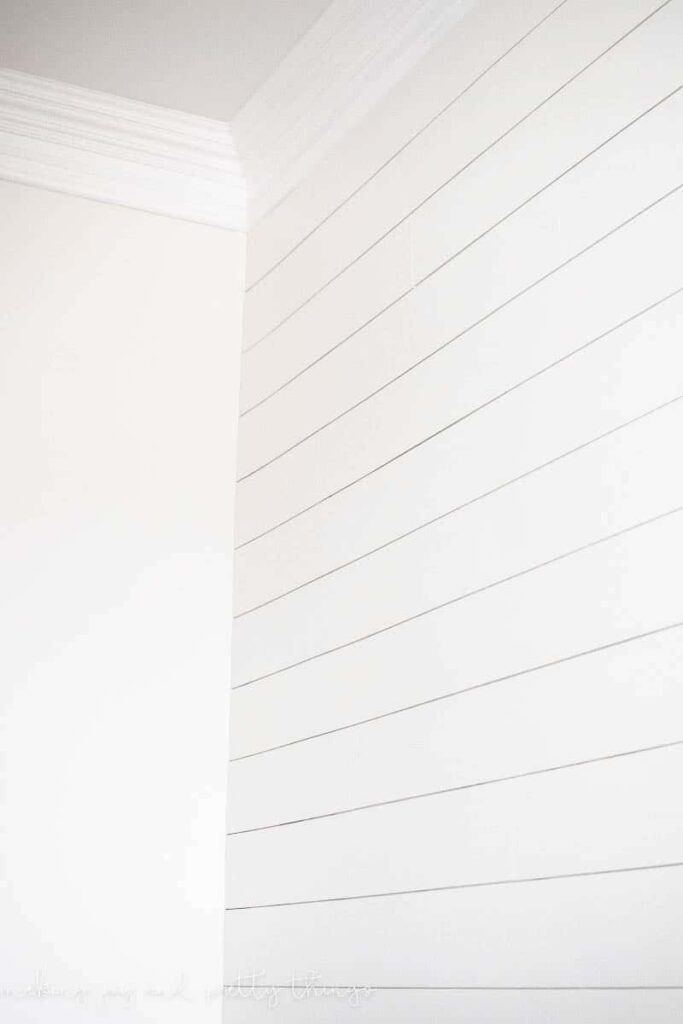
Since we knew the line under the crown moulding was straight, we were able to lay the first board flush against the crown moulding. If your ceiling isn’t completely straight, you may have some additional cuts to make.
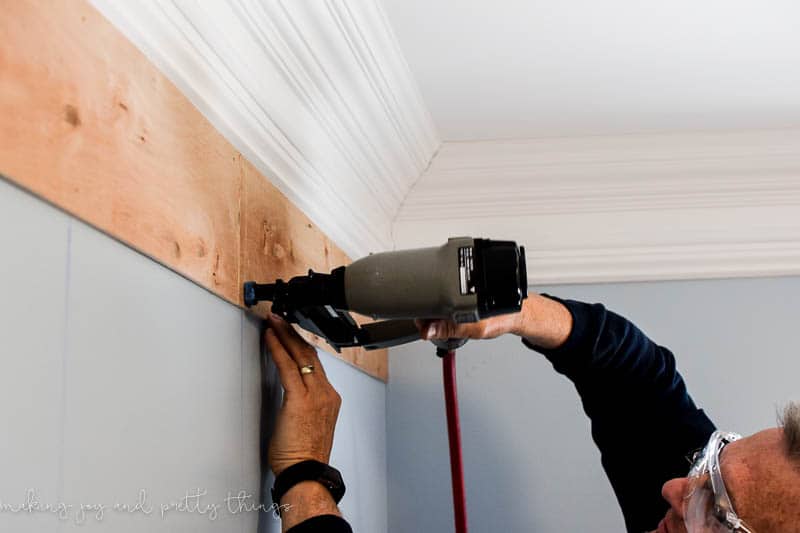
Place the board tightly against the wall and the crown moulding. Once in place, use the nail gun and nail twice (roughly top and bottom of the board) along each stud that the board is over.
With the first board up, measure the distance between the end of that board and the wall. Take another 8ft board and cut it down to the length you just measured. Follow the same steps from the first board (apply glue, fit onto wall, nail onto studs).
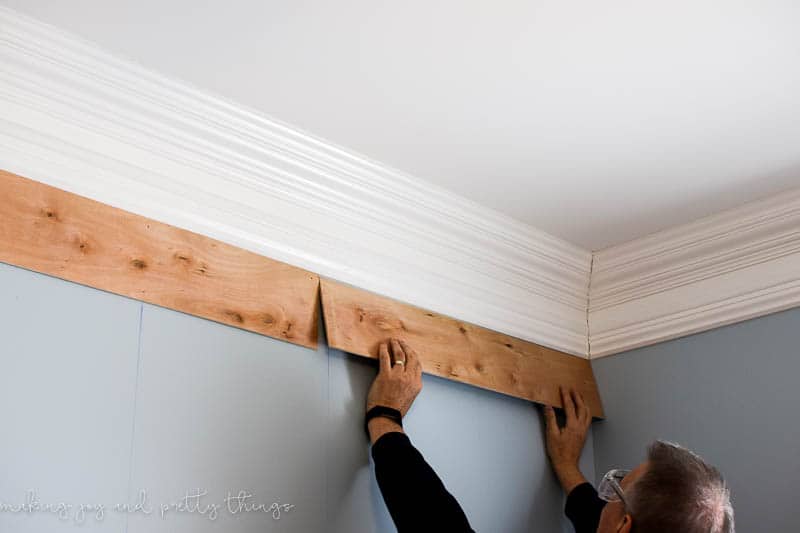
Next, for the second row, use the leftover piece from the 8ft piece you just cut. Place that piece below the first board you nailed in.
Before nailing in the second row (and any subsequent rows), use your spacer to assure equal gap width between rows. Slide the spacer between the boards to make sure the board is level and equally spaced.
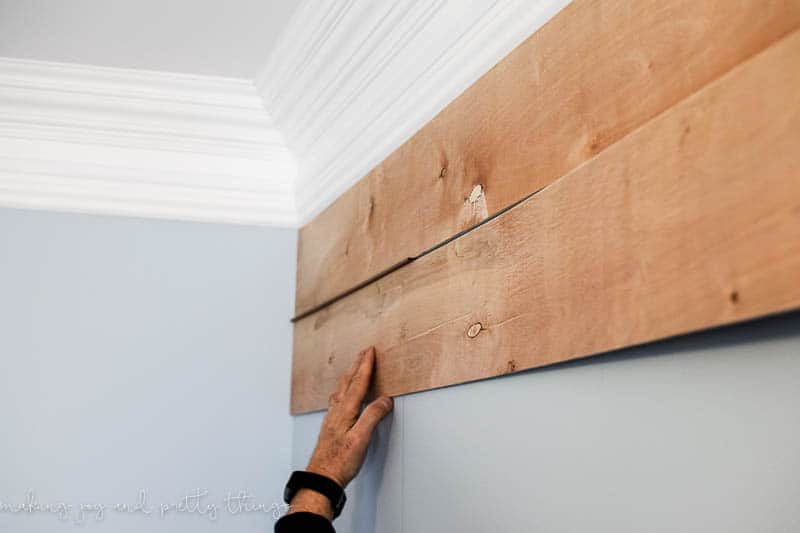
Then, repeat the same steps above. Measure the distance from the end of the second board to the wall and cut an 8ft board to that length. Start the 3rd row with the leftover piece.
Eventually you’ll end up with a pattern (which you don’t want). So, after you do each row, take a step back and make sure the boards look staggered and not in a predictable pattern. If you notice a pattern, take an 8ft board and cut it to a random length you haven’t done and start a new row that way.
We continued on in that manner until the wall was complete!
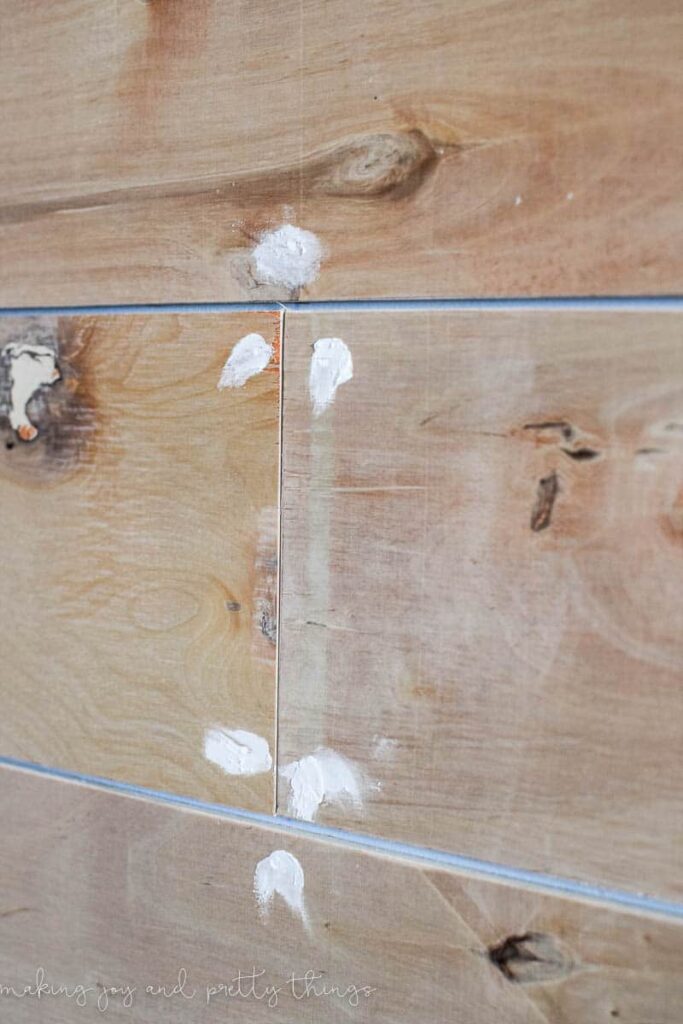
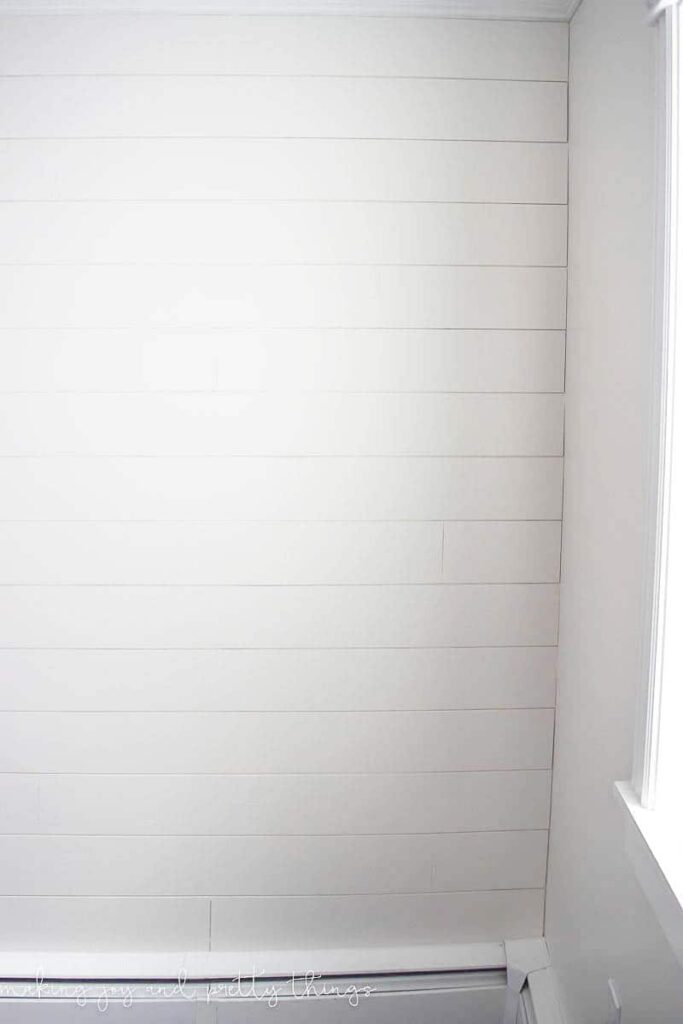
Next, fill in all your nail holes. Once dry, sand the nail holes smooth so they won’t show through the paint.
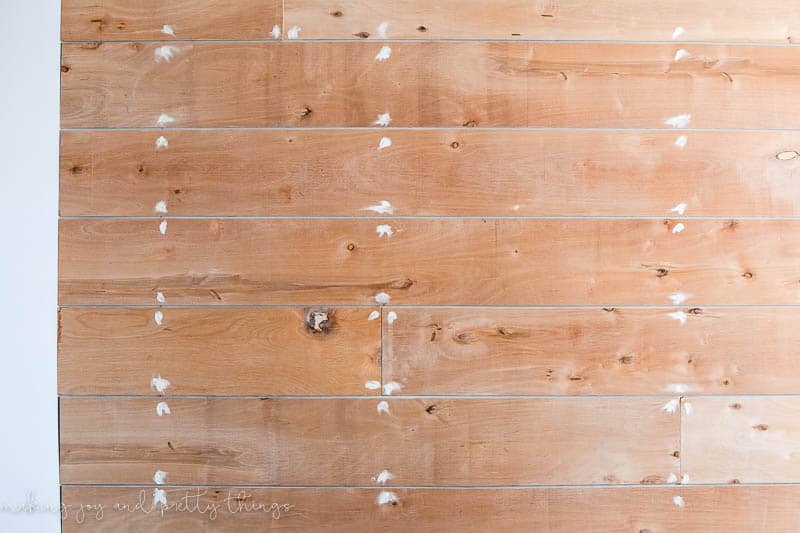
Post-sanding:
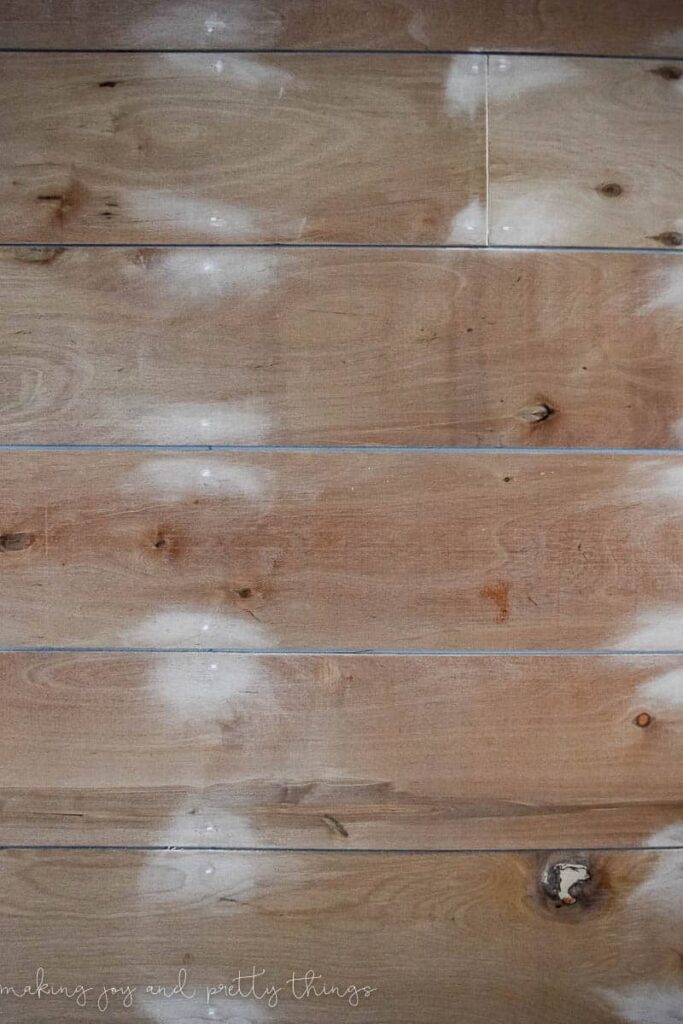
Not too bad, right?? And it looks crazy awesome for how inexpensive the wood was.
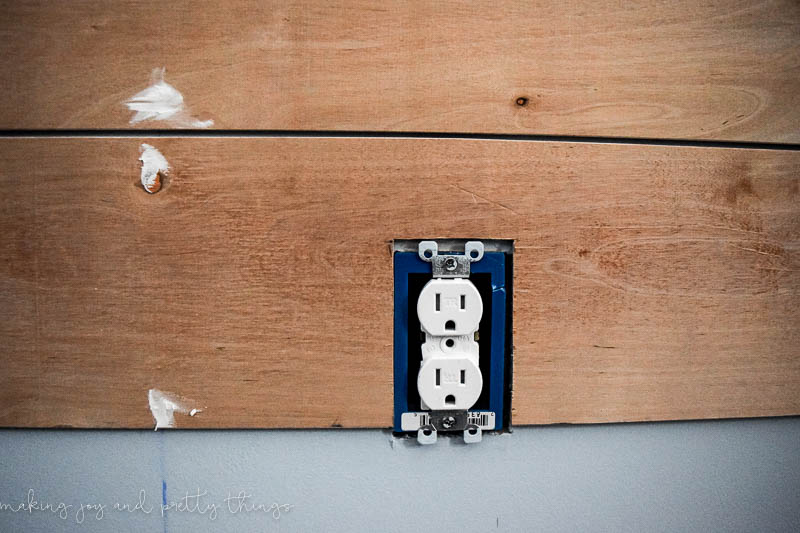
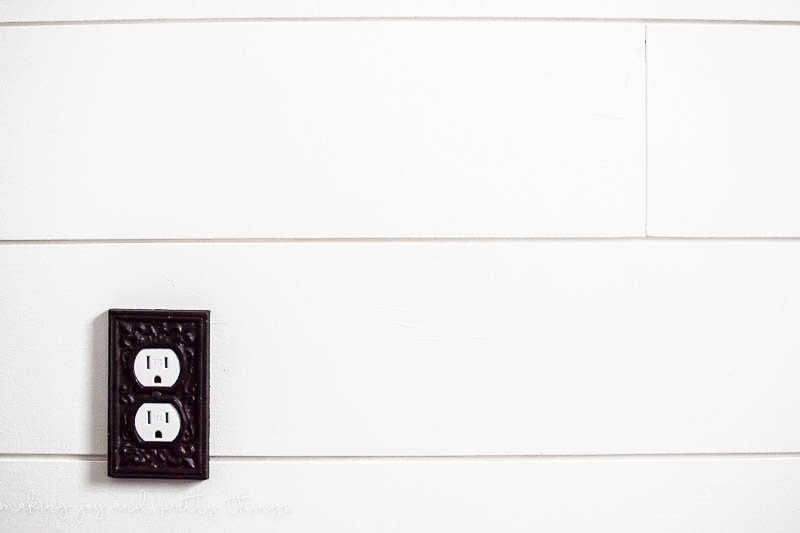
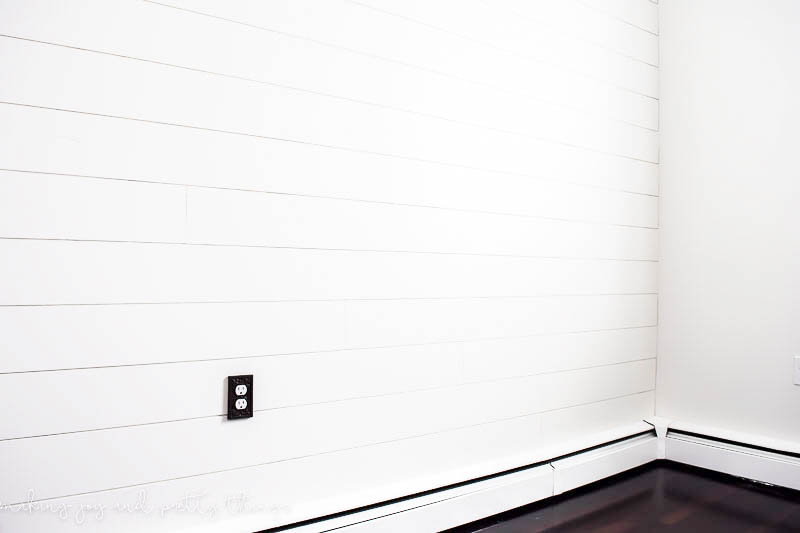
You may come across an outlet or switch you need to cut around. When you do, cut your plank to the desired length, and then measure out the location of the electrical box you need to cut around. We got EXTREMELY LUCKY in that the bottom of the box lined up PERFECTLY with the bottom of a plank, so we did not have to cut a square out of the middle of a plank. Once we had the measurements on the location of the box, we simply marked out the outline on the plank and used a jigsaw to cut the opening for the electrical box.
On to the paint…
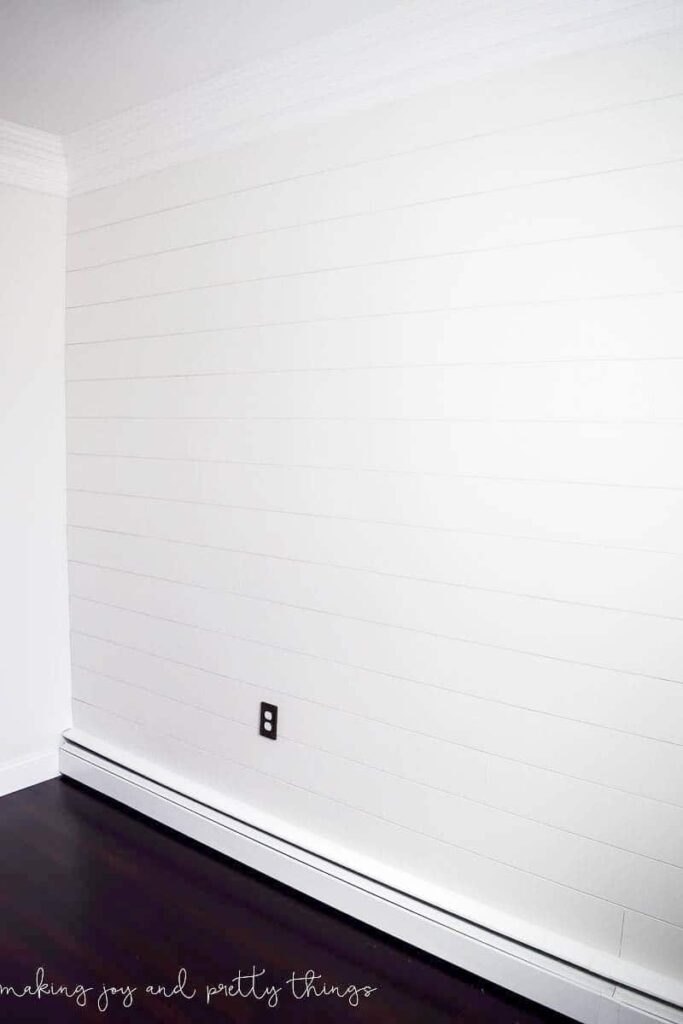
After priming, I used my new favorite neutral color Alabaster by Sherwin-Williams to paint the whole room, including the planked wall. I originally was going to make the faux shiplap a different color than the walls but decided against it. And, I’m SO happy I did.
Now, if the wall you’re planking is a bright color (say blue), you mayyy want to paint the wall before you start adding wood (read – DEFINITELY PAINT THE WALL FIRST). Unless you have a paint sprayer…. We had to go back and paint in between each board 500 2 more times after the initial two coats to completely cover the blue.
No matter how many coats of paint it took, I can’t get over how completely perfect the wall looks.

Depending on what room/wall/space you’re planking, you may want to add some quarter round trim to the edges. Since ours was just a wall, I didn’t think it needed any trim.
It’s hard to get a full shot of the whole wall because the room is so small. This was the best I could do…
It’s the perfect focal point for the nursery. I can just see her crib in front of the wall!
I added a new Outlet Plate that was a bit more rustic than your typical white plastic cover.
The rosy dresser really stands out against the neutral walls.
Ahh I want to just keep posting all of these pictures. Okay, just one more…
I’m thrilled with how it turned out, the ease with which the boards went up, AND the fact that I FINALLY have some shiplap in my house.
What do you think? Is it something you could try out in your home? If you have any questions about how it was done leave a comment below or shoot me an email.
A HUGE thank you to Sherwin-Williams for providing the paint for the nursery. Not only is the color absolutely beautiful but the Harmony Paint line is zero VOC, perfect for pregnant mamas like me and newborn babies. It also has Odor Eliminating Technology and anti-microbial agents that inhibit the growth of mildew. Who knew paint could do all of that??
UPDATE: Check out the full farmhouse girls nursery reveal!
Wishing you a joyful day!


That’s a great tutorial. Thanks so much for sharing. It looks beautiful!
I’m so glad you like the planked wall!! It was so much easier than expected!
What sheen of paint did you use?
Hi Mendy! We used eggshell 🙂
I’m glad I saw this, as I’ve been looking for a cheaper 5″ wide option than the $10 to $13″ individual boards. The pictures are kind of faded/ glaring and hard to see the actual wall. You said one time the paint finish was eggshell, but in the very next answer you said it was satin. Could you explain more? Thanks
This looks beautiful! I’m planning on doing a single wall too in my house. Can you please share the finish of your paint? Satin, flat, etc. I’m not sure what to buy. Thanks so much! Kristen
Hi Kristen! We used satin finish. You could use flat but I wouldn’t use gloss. Good luck on your shiplap wall!!
I love the shiplap wall and I’m mind blown that you did it for 30 bucks. Wow that is awesome, thank you for sharing this amazing DIY and sharing it with the world. Usually when someone finds out a way cheaper way they try to sale it,so thank you for Taking the time to share without a debt or credit card .What kind of wood did you use again and where did you get it?
Me and my wife, Nikki are going to redo our laundry room and the shiplap wall is first on HER LIST .any info on this will be a blessing thank you,
Wayne Holcombe
We used underlayment plywood for shiplap wall and cut it down to size into planks, which is definitely a cheap way to do this. We completed this project several years ago, which reflects the $30 cost. The cost of the wood has gone up since then, but you can still do this on a budget. Here’s a link to the wood used: https://rstyle.me/+nrp8yG9HXLojOozt1tKEFw
Think I’m going to do the same concept except it will be installed on the floor! My daughter used the preprimed plywood sheets for shiplap in her beach home—it looks perfect!
Thanks I love seeing someone that loves getting the shiplap look for less money, not work though lol. I started shipplapping just the front hallway, a year later I have done the front room, hallways, bedroom and office so far lol. I’m addicted, oh just a note: I use 4 by 8 sheets of pressboard from Lowes and then cut into four inch strips (anything wider in my house visually is too large)….small house. Just a big thanks for your great post Hun!
Your room looks perfect! What kind of saw did you cut your
Thank you! We used a table saw to the rip the boards to width and a compound miter saw for lengths.
I’m thinking that cutting that board into planks is probably the most complex part of the process. Thanks for sharing!!
That turned out awesome! I’m excited to try it. Thanks for posting.
Thanks so much for the learning and I love the finished room! Awesome!
Thank you Barbara!!
Thank you! Getting ready to do a wall and thought I might have to take all my crown molding and other trim down – this is perfect!,,
Heckkk no haha!! That’s probably the best part of this wall 🙂
Great instructions. I have one question. The wall i would like to work on has a big electrical box on it so do i frame it like u done the outlet? ??
Love your tutorial. Would your procedure work on a smooth plastered wall without plywood backing? I want to use shiplap in our garage for hanging coats, etc on.
Hi Cindy! If you’re planning on using it to hold anything (even coats) I would recommend it be anchored into studs. Is there lath behind the plaster? For decorative purposes only, you can just use the glue on plastered walls. But, since it’s going to be holding weight and possibly have people pulling on coats, etc, I wouldn’t just use the glue. Hope that helps!
Hi cindy, any tips just in case there are “waves” in the wall? My house is quite old but the drywall is new-ish. In certain light I can see it’s not perfectly flat.
The boards are flexible enough that it should conform to the shape of the wall, assuming there are just small waves or imperfections.
Wow! You’ve really got me thinking now! Great job, love it!
Beautiful! What kind of board did you use?
What size nails, what thickness plywood, was used.
Precisely what I was going to ask. Did you get a response?
I love how it turned out!! Can’t believe how frugal you were! 🙂 Love it!!
Thanks so much Chelsea!! I can’t believe how inexpensive it was in general – you should try it out!
Did you leave room between each board? It looks like you did but I wasn’t sure if it was intentional or how the board lays?
Hi Ty! Yes, we did leave intentional space between the boards to mimic the look of real shiplap. In the post I showed how we did that using an 1/8″ spacer. Hope that helps!
What if you don’t have sheet rock behind the planks? Just studs.
It looks so good! I have a dream of putting shiplap up in a half bath behind the toilet one day. I just need a house that has a half bath, haha! I love the color of the dresser and am so excited to see how it all turns out!
Thanks so much Shani!! The shiplap would look great in a half bath! Hoping to share the dresser next week 🙂
I’m crushing on the outlet covers, haha! Beautiful job!!
aren’t the covers great? I bought new switch covers, too! Thanks, Lora!
How to do this if all trim is removed ? Should trim be put up before ship lap is put up or can you ship
Lap then put up trim ? Love your wall !!
You can put the shiplap up then add the trim. You’ll just have to caulk the seams and possibly repaint
Wow, this turned out amazing! Great job!
XO, Vanessa
Thank you so much Vanessa! We are really happy with how it turned out.
Oh my Lanta, I’m redoing my doublewide to make it look like a real house. After removing the trips down the wall, I was so angry. There was no way I was going to paint smooth walls. I just started last light by using tissue paper for texture. Turning out great so far. A wall I havn’t started on yet is were my piano sits. Guess what I’m going to do with That wall. Thank you so very much.
That’s sounds like a fantastic wall for some faux shiplap! The piano will look so pretty in front of it. Thanks for stopping by, Luanne!
We are doing this to our manufactured home too! I hate those strips and we used paneling in our kitchen that looked like barn wood and turned it sideways! It looks great! We are now going to do this to our living room to cover the million strips in there…trick will be to find a straight wall! lol did you have this problem too? nothing is square or level!
It turned out awesome Sarah! So happy for you to finally have your shiplap! Yay for helpful hubbies and FIL’s!
Thanks Colette!! I’m happy to have it, too. And to put it in ALL of the rooms now 😉
I clicked on the plywood link and it says each piece is $11.99. at the Home Depot. Where were you able to find it for cheaper? Thanks so much!
Hi Becky!! Thanks so much for stopping by my blog 🙂 That is how expensive each piece is. We only needed 2 pieces to do the entire wall. The wall in the nursery is fairly small. But, even for a much larger space, each piece goes a long way. I hope that answers your question!!
It’s 2023 now & each piece costs $25.78 with that link. 🙁 We may still give it a shot. I need to cover up plywood walls in my shed. I’m not sure what to do with the other three walls though….
Yes, the costs have gone up quite a bit since the project was done years ago. I’m not sure what you are using the shed for but you could try just painting the plywood walls? Just be sure you prime first!
This really came out nice! Actually it looks more authentic with this type of wood than any other I have seen. With this particular one, I would never trim it out as that takes away from the authentic look. Back in the day, trim was never used. You have the nicest looking one I’ve seen so far, GREAT JOB!
Aww thank you SO SO much Shirley!!! I am really happy with how it turned out. I’m glad you agree with our no trim decision 🙂 Thanks so much for stopping by!
What finish did you choose to use? I usually do all of my trim and door in a high gloss, it is SO easy to clean this way! I just wasn’t sure what you used and if you thought high gloss would be too much? Thanks!
Hi Bethany! We did egg-shell finish. I’m not a fan of high gloss, even though it is easier to clean 😉 I think on something rustic or that’s intended to look “old” high gloss may be too much. But it’s completely up to you and your taste :)! Thanks for stopping by!!
What size was the plywood and what was the width of it?
Hi Megan! The plywood itself came as a 4ft x 8ft board. Each individual plank was cut to a width of 6 inches. I hope this answers your question and thank you SO much for stopping by.
Hi Megan! Love this budget friendly version and wish I had seen it before I spent $$$ shiplapping our nursery. I was afraid to buy large sheets and cut them down. Would you mind sharing your process for how you cut the sheets into straight and even planks? Any rough edges/splintering when they were cut? Going to try this in the hallway next!
Hi Lo! Two people (to hold the wood steady) and a table saw was all we needed to keep the wood straight. You’ll want to make sure you have a relatively sharp blade on your table saw to reduce splintering. We did sand down the edges of the cut pieces to smooth them out. Hope this helps!
Hi Sarah, it’s beautiful! I love the ideas of your site! Just a warning about sanded edges- if you use the product called luaun, any splinters get really infected quickly because of the additives in the wood. If it is luaun, I used this material for years in set building and I would recommend lots of sanding and heavy paint, or the baby fingers picking through the crib slats might get boo-boos! Actual plywood might have the possibilities of splinters but doesn’t have those awful additives that infect so quickly. It looks like you guys did a really great job!!
Great work on this! I love how it turned out and really love how you and your FIL thought outside the box on resourcing materials! You rock!
Aww thank you SO much!! I can’t take much credit for anything past the design … but I’m so thrilled with how it turned out!
Another twist and even less cost, collect some wooden pallets and use them. I collected the pallets no cost, any industrial park will have people leaving them out, and so they’re there for the taking. I sanded them done smooth but they maintained that rustic look. I finished them with some polyurethane.
What a great idea, Will! I’ve seen a few old pallets sitting by dumpsters that would be perfect! I hadn’t even though to use that.
I want to do this in our master bathroom. Did you have to “pull out” the light switch so the plate would fit on? Did you apply the wood without having to remove the baseboard? Looks like you did not remove the crown molding.
Thnx
Hi Beverly! We did not remove the baseboard or the crown moulding. We did have to pull out the outlet cover. You can buy spacers at a home improvement store to go between the electrical box and the outlet cover to account for the thickness of the shiplap. Sorry I completely forgot to put that part in the post – that probably would have been helpful!! Hope that answers your questions 🙂 Good luck!
Why did you use the spacers? Do you think this is a must or could one (or ones husband) do it without spacers and just butt them together? Love how your nursery wall turned out!!
Hi Carla! I’m so glad you like the nursery wall 🙂 We used the spacers to make it look like real shiplap. The real (expensive) stuff is sorta tongue and groove fitting so that there’s a space in between each board. Without the spacers, it wouldn’t look like shiplap. So, I think it’s a must if you’re going for a shiplap look. This was definitely a two person job, even without the spaces. The boards were pretty long! Hope that helps!
The spacers are like that on real shiplap to create expansion joints for the wood. You definitely need them. Seasonally they will expand or contract. No spaces and they may bow or force pieces to pop.
Wow thank you for ur very detailed money saving blog about planking ur walls i am almost done paying off home and I’m looking forward to doing well needed updates , and when I say well needed I can’t explain enough. So I’m trying to list priorities of what to do first. U now gave me the idea for a focal wall in living room. I’m excited to try and share all ur ideas
That’s great Jamie! I’m glad you found the post helpful. Good luck planking your living room wall 🙂
Hi, I love this idea. How will it hold up in a bathroom with the moisture from the shower?
I would love to try something like this for my bathroom ceiling. I just may have to try it now that I’ve seen what you did. Thank you for sharing.
Aww the planks would look amazing on a ceiling!! You may need some type of sealant since it will be in a bathroom and exposed to temperature/humidity fluctuations. Such a great idea! Thanks for stopping by 🙂
I am going to do this on my ceiling this weekend, but wondering how to nail it to the ceiling. Should I be using a special type of nail? Thanks!
The wall looks amazing! We are going to put it up in our laundry room. But I was wondering what paint color your ceiling and trim are?
Thanks so much Mallory!! What a great feature wall for your laundry room. The ceiling and trim are Behr Premium Plus ultra pure white (in high gloss). Have a great day!
I wonder if this would work if I stained each plank in different stains, lights and darks stains for a boys room or spare room!?
That sounds like SUCH a great idea!! I think the contrast between different stains would be amazing. Plus, this type of wood is naturally kind of rustic with knots and imperfections throughout which would be highlighted by stain (a good thing, I think!!). I’d love to see how it turns out!
That would look amazing!! It is so much easier to prestain the wood and paint a complimentary colour on the wall itself as there will be gaps.
I used old cedar fence panels that were a disaster at first but once sanded down well and treated with a faux barn wood finish ( specialty paint store) looks stunning!!
And, if I can do this anyone can!!
Just remember prep is 90 % of the work and the rest will fall into place. Plan it out on the floor before hand to be certain You are happy with the layout first!!
Have fun changing Your wall!!
Blessings,
Michelle
Such a good idea, Michelle! We used old cedar boards for a wood feature wall in our master bedroom. The cedar adds character and staining is a fun take on regular white shiplap. And yes, set up and planning are the most important parts, but also the least fun! 😉
If the wall to be shiplapped is less than eight feet could you cut the boards to length of the wall or should you still cut the boards so that you need two for each row?
Hi Jacquelyn!! You could absolutely just cut the boards to length and not worry about having multiple boards per row. I think it’s a personal preference. I would probably still do multiple boards per row because I think it looks more like authentic shiplap but that doesn’t mean that’s the right way. Good luck!!
WITH multiple boards per row – do you fill where the ends butt up like the nail holes or just leave them?
Wonderful tutorial, it’s so easy to follow! I’m going to try a shiplap wall in our spare room within the next few weeks, so I needed a step-by-step and this was so helpful! Hopefully I don’t mess it up 🙂 The wall and nursery look absolutely stunning!
Thank you SO much Emma!! Good luck with your shiplap wall and feel free to reach out if you need any help 🙂
Can you tell me how you didn’t end up with blobs of paint in between the boards? Love the idea. Terrified of doing this and messing up and having to start over.
Hi Jenny! We used a very, very small brush and hand painted in between each board. You can’t really “load up” the paint brush or else you would end up wth clumps and/or drips. If you paint the wall before hanging the shiplap, it makes filling in the gaps a lot easier AND you only need to do one coat 🙂
When painting the wall under neither, did you paint it black or white? It almost looks like black in the cracks but I’m thinking it’s just shadow? Doing this soon! Looks awesome!
love the whole tutorial and concept but i hate white and think it would be stunning stained or for your nursery tge palest of pink…. grest job!
Hi Nancy! I’m not normally a huge fan of neutrals and white paint either! But, I’m happy with it in this case. Stained or pink or really any color would be pretty, too. We did a dark gray shiplap in our master closet and I love it! Thanks for stopping by 🙂
Did you find that sanding the wood, and not just the nail holes, would have been preferable? Or did the paint smooth it out enough? I’m wondering about my toddler getting little splinters of wood in his skin. I love the look!
Hi Laura!! I’m so so sorry I somehow missed your comment!! The wood we use is pretty much smooth on its own and the paint smoothed it out even more. I don’t think it’s necessary to sand the wood. Now if you’re using a different kind of wood than we used and it’s rough or has the potential for splinters I would definitely sand!
What colot paint did you use for the ceiling?
Hi Denise! We tried to find the paint in the basement but I think we got rid of it! It was Behr brand and the kind that goes on pink and dries white. Sorry I couldn’t be more specific!
Did you sand the edges of the planks or just leave them how they were after cutting? I am working on my entryway now! I can’t wait to see how it turns out! Thanks for the post and inspiration!
Hi Aaron! We did sand the edges of the planks after they were cut (just not the “face” of them). Good luck!!
This is gorgeous! We just moved into a wonderful new home with a wall full of dark pallet wood planks and I’ve been struggling with how dark it is. This may be just the inspiration I need to paint it all white!
That’s great, Stacy! I’m glad the dark wood planks aren’t in style anymore haha. I quick coat of paint could definitely bring them back in style!!! Good luck, girl!
Love that wall, Sarah! I want to do our bedroom and need to show this tutorial to my husband!! Thanks so much for sharing it!
I’m so glad you like the planked wall, Kendra!! Hope you can do it in your bedroom!
I just love planking and this turned out beautifully! Love the color you choose too!
Thank you Carolann!!
I loved what you did and the tutorial was fantastic! Maybe I missed a question/answer on the spacing between the rows to make it look authentic, what did you use (we used to use different size spacers for our tile work) so I didn’t know if it was similar or not. Thanks!
I just re-read your tutorial and now I see what you recommended and what you used . . . I should have read everything first!! Thanks again for a great tutorial!!
Haha glad you found the spacer info! Thanks so much Donna!!
Really like your blog! What kind of wood did you use? How thick was it? You mention using a table saw to cut it.
Thanks in advance!
Hi Rhonda! We used underlayment plywood – I actually linked to the exact product in the supply list. Hope you can make the faux shiplap wall 🙂
You used luan underlayment plywood. This is a terrible idea for a wall in a child’s room. Luan contains high amounts of formaldehyde
hi! this looks great can’t wait to try it! How thick was the wood that was used on the floor? thx!
Hi Helen! I’m so glad you like the tutorial. The wood flooring is bamboo from Lumber Liquidators. I honestly don’t know what brand/make/model it is but I would never recommend it to anyone. It scratches if you look at it the wrong way and shows every single scuff mark and scratch and everything. It’s horrible!!
Love this tutorial! I bought my house just over a year ago and I’m working on the master bedroom now but am making all sorts of plans for the entrance. The previous owner had an obsession with pressboard. It’s everywhere! The entrance is entirely pressboard. I plan to do wainscotting/board and batten to the long and short walls next to the door, of course with benches, cubbies, and hooks. I’m choosing that route so I can add insulation to the walls, very drafty house. I’m thinking about the shiplap for the large wall you see once you step in. It’s my husband’s stereo wall so a lot won’t be seen. I want to add a wall length shelf to it as well for plants and a more farmhouse look. I’m planning on using a grey paint for the board and batten. Should I keep it one color? And would the gap between the shiplap be enough to hang a full wall floating shelf? I need to cover this awful pressboard any way possible!
Hi Brandi! Those plans sound beautiful. I don’t think you need to keep it one color necessarily. But, I wouldn’t go too bold with a second color. Maybe use a cream or white? The gap between the shiplap is pretty small, I don’t htink you could hang a shelf. If it’s going to span the entire length of the wall you could just leave a bigger gap for the shelf? Hope that helps!
Is it really necessary to use the glue in the back of the board? Wouldn’t the nails be enough? I just hate the thought that in the future if you want to remove it the mess would be awful.
It’s hard to say. We did that just to be on the safe side. I can’t guarantee anything but I think nails would probably be enough.
Hello: LOVE this shiplap wall!!!! Very beautiful.
I’d like to do a wall in our kitchen too – we had some renos done last year to our sunroom, and have lots and lots of leftovers of “1×6 tongue & groove clear cedar v-joint 2S1”. I know I know….such a crime to cover clear cedar, but we have no use for it, and have tried to sell it, but no response. So….why not use it as ship lap?? Do you think? Would this be suitable material to use? Thanks.
Loved reading about your experience with hanging your shiplap!:) Definitely a good idea to remember to paint behind the wall first. I will totally remember this! We have used mdf plain white molding on our shiplap projects but they come out less rustic than this. I love this wood you used better! Beautiful nursery??
Thank you SO SO much Angela!! I’m so glad you like it. And yes, paint that darn wall first haha 😉
Just wondering how you painted the actual planks? I saw that you used a small brush for the cracks… Did you use a roller? or brushed the whole wall? Thanks!
Katherine! I’m so sorry I missed your comment from November. We rolled the wall planks and brushed in the cracks.
Love the end result, but I have to tell you….you have so many ads and scripts running on your site that I almost gave up waiting to see the whole article. Took forever to load everything and it kept freezing as I was trying to scroll down.
Looks awesome! I am definitely trying this. : )
I am so excited about this idea. It solves a problem wall of mine and it would look so awesome. Thank you for sharing
Oh I’m so glad Cindy!! Hopefully it turns out beautifully 🙂
What type of wood did you use?
Hi! We just did this in our master bedroom and are getting ready to prime and paint. Did you have any issues with the paint chipping off or not adhering the way it should? Thanks.
Hi Jenn! We have not had any issues at all with paint chipping or not sticking. We did this about a year ago at this point. Hope you love your new faux shiplap wall 🙂
I have a hallway that is wallpapered. I started to remove the wallpaper at the wall near the kitchen (which everyone can see) and the wallpaper came off with chunks of the drywall. I tried to wall paper over that part of the wall with wallpaper designed for “rough walls” but it is clearly not a fix. Thought about applying this technique in the hallway. Any suggestions if this is a good idea? What size planks? I won’t paint over the wallpaper – it’s a waste of expensive Benjamin Moore paint.
$30?!? Do you mean “minus the cost of the lumber”? Home Depot has 4’x8′ sheets of plywood underlayment for about $14. It would take several sheets to cover even a small room. It looks fantastic, but I’m dubious about what you claim to have spent.
I have to agree. As someone in the construction field, this clearly does not take into account any time nor misc. materials.
Do you think it’s necessary to use 1/8th inches spaces? Would 1/16th work?
I love this project and am about to get started on our “beach” guest room.
Thanks! Rebecca
Congrats on the new addition! First thanks for replying to our comments, I rarely see someone who reply’s…. On that note, my question is did you have to paint/prime the wall with a particular color prior to you installing the shiplap so when you look at the wall the spacer between the planks are not sticking out like a sore thumb?
I love your shiplap wall in your nursery! I have done this process twice and thought I would give a couple of suggestions: with the first wall we did, it was almost impossible to go back with a tiny paintbrush and paint the wall in between the planks, but at some angles you could see the wall so you could see how shallow our faux shiplap boards actually were. So the second time we did it we had some very dark gray paint and would run a line where our seam would be. It really made it easier to do this before the plank was set.
The second suggestion is we used nichols for our spacers. They seemed to work perfectly.
I love the shiplap look and I think it gives so much interest to a wall.
Love the way your wall looks! It’s beautiful!
I am fixing to start a big project knocking down walls between my kitchen and living room and dining room and I definitely love the shiplap design for my dining/kitchen area. I always figured that the boards overlapped to make the design, but looking at your pictures, they don’t. Even better to work with! Thanks for sharing!
Can this work on cement walls? If not any ideas ? Thanks 🙂
Just remind people that if they use old painted furniture or old painted wooden windows that they are careful to check for lead paint. They make in expensive testing kits for lead paint which I didn’t know about 30 years ago when my 5 yr old ingested lead and it seriously affected his health!! We were able to use chelation therapy which decreased the lead in his brain tissue and restored his balance and fine motor control and returned his speech to normal!
I love this idea!!! I have a small sunroom/entrance that is in dire need of an update. When we moved in, the walls (and ceiling), were varnished plywood – nice, eh? I painted the walls and papered the ceiling, but it’s still pretty hideous. THIS is just what I’m looking for! I can’t afford to spend a fortune having it someone drywall it, and besides, I love the look of this. I want to do the whole room, the only tricky part will be the corners, as there are 10 windows to work around. Thanks again for your great tutorial!
That is just the most beautiful room i have ever seen!!!
HI Sarah-great tutorial! Thx for providing it!
Two questions—did you paint the edges of each board along with the face of the board so bare wood could not be seen between the small gap?
Do you have a tutorial on the crown moulding? I love it!
Looks great!! I know you used spacers between the planks as you worked your way down. My question is did you use spacers between the pieces of planks in one row? Side by side? Or did you try and put them flush against each other?
Hello! Where did you get the wood for this wall?! Absolutely beautiful!!
Just beautiful and your detailed instructions are amazing! Thank you!! Quick question.. Did you paint the shiplap SW Alabaster? Also, do you know the color of your crown molding too? Thanks again!
What type of sheet wood that the name you never heard ofbdid u use? Hard tonfind at the lumber yaed with no name
Looks great! Where did you get the wood? The link that you have here is for Home Depot and the wood is like 13 dollars per piece!
Hello! Thank you so much for the tutorial!! I had a quick question. Did you space the boards in order for the shiplap look to be more evident? Also if you had painted the wood a different color/stain, would you still space it and what color would the back wall be? Thank you for your input!
We just moved into a house and my sons room has dentil crown molding (yuck for teenage boys room) we are planning on shiplap but my husband wants to keep the existing molding, I say it looks like it’s from a different era and no way. Your opinion?
Your home’s nursery is absolutely lovely! I just love how everything looks white and fresh. I’ve been meaning to ask; would laminated planks also work for this?
Awesome! We wanted to do a planked wall for our island cottage, but whoa, the cost put us off. Now thanks to you, we’ll go ahead and do it. Thanks.
Aww great!! I think it will look perfect on an island!!
As someone who works in a home depot lumber dept. I want to thank you for being the only person to diy this that didn’t suggest getting us to cut the u derlayment for you. While I’m glad to make cuts for anyone I don’t like explaining to people that the smallest I can go due to safety policies is a 12 inch cut. A second point though is anytime your working on a project like this come find that departments staff member. Sometimes we’re too busy to chat (particularly on weekends) but we love talking to people about what they’re trying to do and offering options instead of people just asking where something is. It’s doesn’t take very long on the floor before you’ve almost heard of it all.
You literally just saved me a weekend of work taking down crown molding and repairing the walls! I love your final result with the crown molding – I really was going more for texture on more my walls than being a shiplap “truest” and your final result is awesome – thanks so much for sharing
Oh I’m so glad!!!
Hi Sarah, do you think it would be possible to put shiplap OVER wall tiles? Love shiplap and trying to avoid having to take down ugly brown tiles that run from floor to ceiling. Thanks!
Umm I don’t think that’s the best idea, unfortunately. I can’t foresee it laying flat and you’d see the brown tile between the boards
The shiplap is beautiful.. Did you use adhesive on all the boards or just the first one?
All of the boards. Thank you!
So do you think I can do this over wallpaper?!
Absolutely! But, you’ll probably see the wallpaper through the space between the boards. I’d paint the wallpaper first for sure!
What size wall did you plank?
I have 10 ft. ceilings and a 14 ft. wall I’d LOVE to shiplap…
but fear it will cost more than $30-$40!
Thanks
Hi Sarah
This room looks great and your directions sound so easy! When it came to the outlets and switches, did you have to use spacers behind them to raise their profiles out from the original wall?
We only had an outlet on that wall to worry about and we didn’t need to use spacers.
Looks great!
Did these planks hold up over time? I read another DIY post that used the same material and they ended up warping and bowing away from the wall since they are so thin. Did you have any trouble with this?
We had our local HD do the cuts for us on .25 inch plywood and the cuts were not straight so we couldn’t use the planks, total waste of money. I’m debating buying the real shiplap since we have tried the cheap route ( twice now) and still ended up with crooked boards, which ruins the entire idea since the spacing would be off. Your hubby was able to get each of the boards perfectly straight?
Hi Chris! We moved 2 years after we finished that room and none of them had bowed or warped in any way. We did use glue and nails on each piece though. My husband and FIL did get completely straight boards with the saw!
Can you please tell us what size nails you used?
I don’t remember unfortunately and I’m a bad blogger and didn’t add it to the post. My husband thinks we used 1.5″ nails 🙂
I would love to try this but we have plaster walls. Do you think the adhesive would work alone?? Any suggestions?
Hi Kathy! Clean the plaster walls down thoroughly to get anything off the painted plaster. The adhesive should hold the boards up because they’re very thin and light!
Great tips, especially how to get the plank-wood look on the cheap.
The ads on your site are OVERWHELMING.
I cant find in the article what type of wood you used. Thanks in Advance
Underlayment plywood
In what world is this 30 dollars?
She did one wall of a tiny room….3 sheets of plywood at $ bucks a piece, she rounded to $30 from $33 (as she admitted) and she got the paint for free.
We have an UGLY wall that I would love to cover, but it will be taken out in a few years. Is the adhesive necessary, or can we use nails only?
You can definitely just use nails. We used both just to be safe – that wall isn’t going anywhere haha!
Okay, i really loved the way you explained it in simple ways, gonna try it on my ugly wall for sure. Thanks`
where to buy Pneumatic Nail Gun? pls help.
Hi,
any alternate to Underlayment Plywood? pls let me know. Thanks!
Thanks for this excellent guide, will try to implement.
This is a great tutorial and fairly easy for the average person! My husband and I were able to plank an accent wall and it was totally doable! We used all of the materials listed and while it was WAY cheaper than any other option, its definitely not a $30 project unless you have the perfect paint laying around and don’t need to buy anything other than the wood (which was still more than $30 for us)! I think its 100% worth doing and easy and ours turned out wonderfully but I also think it would be good to know that the materials alone cost us about $150 so just something to keep in mind and consider before starting!
it would be super duper helpful to know exactly what kind of wood you used……. was it Luan? Eucaboard?
Was it really for $30? Just asking!
Hi, this is beautiful and the instructions are super easy to follow. I imagine that the price really depends on the size of the wall. I was going to do one living room wall and it will take about $85 in the wood alone. But that isn’t bad, cause peal and stick would be about the same pricing as the wood and the wood will hold up so much better! Thanks for sharing.
Question
Do you have strips down your walls? If so did you just place the planks right over them or remove them?
I want to do that to our walls we live in a manufactured home with the strips on the walls.
how do i know how much plywood i will need? I love your room , but yours is the first I have read that has used glue!!
What type of wood? In your checklist you stated .. (add type of wood , you had never heard of)
So what type of wood… by name…please and thank you
Underlayment plywood
I would love to do an inexpensive wall, do you think I could stain it different shade of a light wood color?
Hmm I don’t think this type of wood will hold stain that well. Or, it may not look exactly how staining a piece of pine would look, if that makes sense
For a time saver, most lumber yards will rip your lumber to width you choose. That way you would only need to use the chop saw for end cuts.
Unable to do the things i used to but still enjoy watching the fun projects. Thanks so much for sharing. The wall looks amazing.
God Bless you and your family. Especially your new little one.
Thanks again
Thanks Velma!
Looks great! Thank you for sharing. I will use this idea for my laundry room.
Love this!! How many sheets of wood did you start with?
Love your shiplap wall and would like to try it in my living room but only on one wall. Question, what wall do you put the ship lap on? My living room is quite small! Thanks
I’d put it on the wall either with the TV or behind the largest piece of furniture (like a sofa)
How visible are the knots in the wood after painting? Does the paint do a good job at hiding them?
You don’t really see any knots in underlayment wood. If you used 2x4s or something really “knotty” you’d be able to see them. I would still prime before painting!
Would love to do this on our main wall in our living room. But that wall has an A/C vent, several outlets, a light switch, and a TV mounted to it. Any suggestion on how do that with all of those obstacles on that wall? Thank you
I love your project! I was wondering what crown molding you’re using in that room…? I absolutely love it!
Looks great! Now that it’s been up for a while are you finding the knots in the wood are coming through the paint job? If not, what product did you use to seal it? Thanks!
\
No we don’t see any knots! If you have big knots in your wood we have used wood filler in the past to fill them
Hi, I was wondering if you filled and sanded where you joined the 2 pieces of board together for the length of the wall. Did you see the seam after it was painted? Or did it look like one long board. Thansk!
no we didn’t fill those seams. we wanted it to look like multiple boards, not just one all the way across
I enjoyed the explanations and it was very helpful. This is a project I might try in the future.
Looks great, thank you for all the tips on what to do and not do. Would like to this in my entrance where the drywall was not taped very well.
I know this is an old post, but I’m hoping you see this question! Do you think this type of wood would work if we use wood stain and poly on them instead of paint?
No I don’t. It won’t take stain evenly.
This is beautiful! Curious the width of the boards? I really do not want to take my existing baseboards off the walls but I am thinking this will overhang?
Can you do the same for a bathroom and does it require a water sealer because of the steam moisture?
Beautiful nursery! Thank you for the informative tutorial. The info about the paint is very much appreciative since I’m a migraineur with health issues exacerbated by the environment.
I cut plywood in random lengths and sizes and flanked my kitchen island with it as it is also in my living room. Then I stained it, scraped paint across it to make it look like old barn board and added a foot bar. I got all my plywood from home depots store bins (they were happy to give them) and just had to buy nails to secure my cut boards. Truly turned out to be a piece of art and so many complements for the last five years I’ve had it. Let’s keep on DIYing?
Do it!!
Obsessed with how this turned out! So bright and beautiful! I would love to recreate this in my guest bedroom at my home here in Cherry Hill, NJ. Officially adding this to my summer to-do list. With this and a little hardwood floor refinishing my guest room is going to be getting a major makeover. Thanks so much for all the great tips.
Absolutely beautiful! Thank you for the step by step directions. They were very easy to understand. Great job!!!
Thank you so much! I used this and will be doing more room!
I enjoyed your explanations, it was very helpful. Thanks so much for sharing.
Nice
This turned out so cute! I would love to do something like this in my guest bedroom. I am going to have to do some carpet cleaning first but this is next on my list!!!
You can also have the handy people at the big box home improvement stores cut the big sheets down to planks for you. Even though I have a table saw, I don’t have any vehicle big enough for a 4 x 8 sheet of anything. It’s also way easier to handle that much wood in smaller pieces. Those not gifted in life with much in the way of upper body strength and old guys like me can’t wrangle plywood sheets like that without risking personal injury. And who has a table saw that big anyway? A few extra bucks at Home Depot will literally save you a metric butt-ton of hard work.
Great tip! It just depends on the store – some Home Depot’s will do it for you and some will not do anything smaller than 12″. Doesn’t hurt to ask though – thanks for sharing.
My Dad and I had done the same a few weeks ago. Your procedures were familiar and I love the photos here plus, you look fit! Thanks for this post!
With the DIY sip lap what if your walls are not flat in places? Like it bulges in spots? Any ideas for me?
The wall needs to be flat for shiplap. I would work on flattening the wall first before trying to add shiplap to the top.
Sarah,
How did you deal with the baseboard? Couldn’t tell from your picture. Looks like there’s something jutting out from above the baseboard.
Thanks,
Kate
We had baseboard heaters in this room, so the shiplap just went all the way down and set on top of the trim piece above that. You either bring it all the way down to the baseboards or trim it out with some quarter-round or something. Since it is so thin at only 1/4″ thick, it will definitely be thinner than your baseboards so it works fine to just set it on top of those.
Sorry about this. We did this project many many years ago when the cost of the materials was cheaper. Inflation has changed the price.
Very cool! FYI: its Sptember 2023 and the 4×8 boards you linked to at Home Depot are $20/each gotta love inflation
Just cut all of my planks down on the table saw. I was as accurate as I could be. While they all measure exactly 5-7/8” at both ends, there is some variance in the planks along the length, which means they aren’t gapping uniformly. Was this an issue you faced at all? If I go forth, I’ll have to sort of pull/push planks into alignment on the wall. Thanks for any insight!
We used a spacer throughout to make sure the gaps were uniform. Maybe you’re running into issues because your wall isn’t square or the first piece isn’t going on level? If so, you can adjust as you go down the wall as needed to make it look more uniform.
Hello , first you did a beautiful job! If I may ask, what thickness are these boards? 1/4 inch or less and where did you buy these boards?
I was quoted $2,500
to do the wall behind ny sofa in the living room and the boards are 1″ x 8″. By a handy man! Personally I think 1″ is too thick and 8″ is too high! I REALLY want to try this myself as I am abpretty handy gal! Thank you, Rhonda Metsker
Yes no need to use 1x for this project! We used 1/4″ underlayment sheets and cut them down to size. There’s a link in the article above for the exact ones we used.
Thanks for the tutorial, I was looking for a cheaper project, to cover my out of date textured ceiling. What you think?
Yes, this would totally work on a ceiling. We actually did it on a ceiling in this closet if you want to check it out: https://www.makingjoyandprettythings.com/farmhouse-industrial-master-bedroom-closet-reveal/
Awesome thinking of trying this in my laundry room. Thanks
Awesome, good luck with your laundry room project!
Your plan for the plank wall is awesome! Thank you for sharing😁
Beautiful! Did you have to do much sanding before you painted it?
Nope, we just sanded the filled in nail holes.
Can I get more detail on what the kind of plywood you used is called?
It is typically called “underlayment plywood” at the store. It is 1/4″ thick and comes in 4×8 sheets. There’s a link to the exact product I used from The Home Depot in the blog post under supplies. 🙂
What if I wanted my shiplap boards to be an antique with browns mixed what color shld be on wall prior to install planks? I have walnut stain baseboards and what color shld I paint rest of the walls ? Thanks in advance
You’d want to paint the wall similar shade of brown so you can’t see it poking through. I’d go with the darkest shade of brown that matches your brown tones in the wood.