
Simple Farmhouse Decor: Upcycled Frame and Wreath
If you love farmhouse decor, you’ll love this upcycled DIY wreath hanger! Today, we’re going to transform a thrifted picture frame with some paint, a grapevine wreath, and some twine.
Welcome to another month of simple farmhouse decor! I’ve made a Simple Summer Farmhouse Centerpiece and a Mason Jar “Choose Joy” Display in the past months. This month, I made an Upcycled Frame and Wreath!!
This crazy easy DIY sits atop the DIY Farmhouse Shelves I just blogged about a few weeks ago. I couldn’t be more excited that the decor for these shelves is finally coming along.
Even though I chose to add my DIY wreath hanger to my shelves, you could put it on your front door using command hooks or a door wreath hook (regardless of the style of door – a wooden door, glass door, or metal door) or hang it on the wall using command strips. You could even put this on your bedroom window! When hanging decorative wreaths on the door or wall, it is best to keep them at eye level.
Side note: I hope you guys love the simple farmhouse decor series. All of these projects you can make in an afternoon and are budget-friendly. My goal is to make crafting and DIYing an attainable project, and I’m so so excited to continue this series.
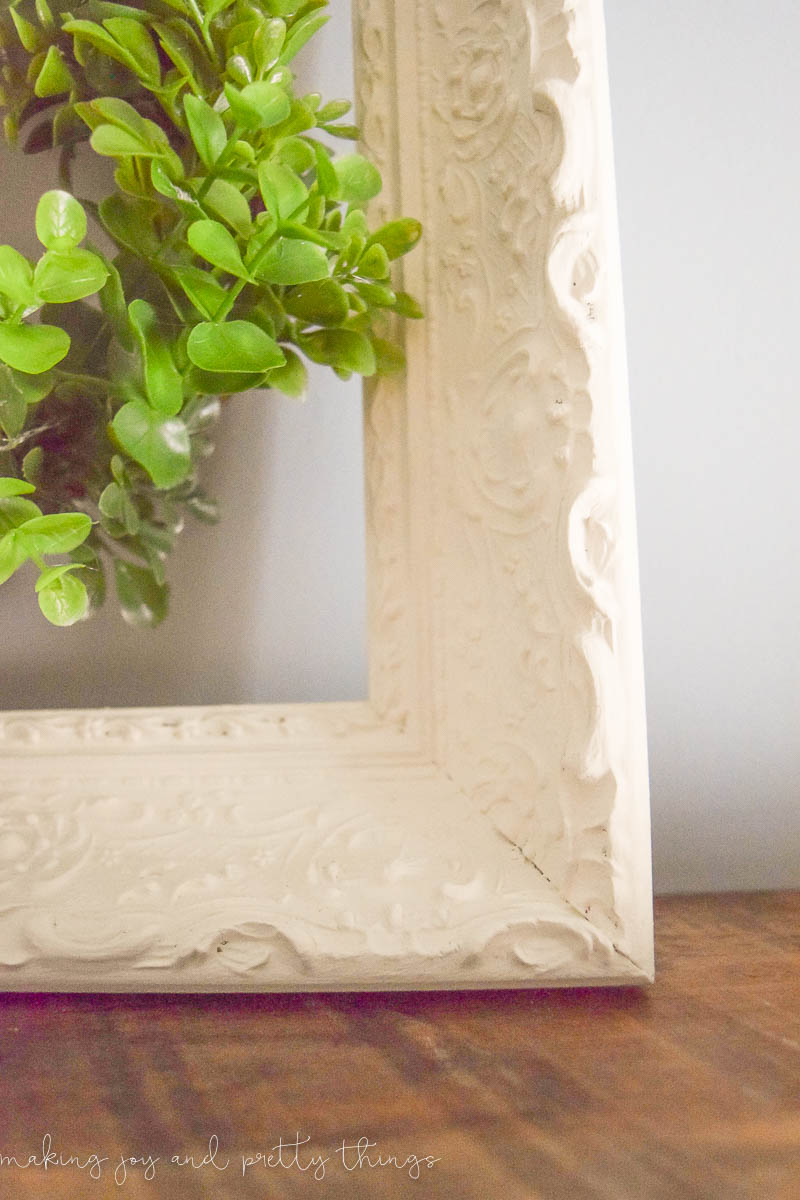
This little project started when my mom picked up a dingy old frame at a yard sale for $1. The frame begged for some lovin’ being a dirty gold color and lacking glass and backing.

How to Make an Upcycled Farmhouse-Style DIY Wreath Hanger
A little dingy frame sat on my living room shelves for many months before an idea came to mind.
It needed paint. Why didn’t I think of that before?? I think I hoped to magically fall in love with its old rustic, chipping gold paint. You know I’m constantly rambling about loving the rustic, distressed look. I HAD to love the gold.
Well, I didn’t. Busted! I guess I don’t love every distressed-looking piece.
Moral of this tangent story: use that paint, girl! Paint transforms everything.
Supplies for DIY Wreath Hanger:
- Thrifted picture frame
- Faux greenery
- Grapevine wreath
- Twine or any type of ribbon material
- Hot glue gun
- Paint
- Paint brush
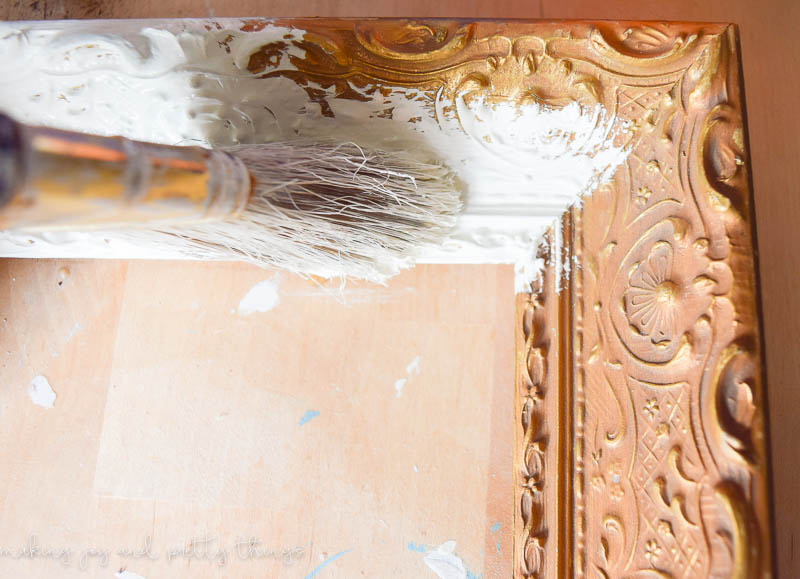
Step 1: Paint the picture frame.
The first thing you want to do is paint the picture frame.
I painted the gold frame with Martha Stewart Vintage Decor Paint in Linen. I love the intricate details of the frame and how the off-white color really makes it pop.
If you want to make the details pop, even more, you could rub some antique wax or rub’n buff over it. That’s a really great idea, but I didn’t think of it until I was already done with the wreath hanger.
Alternatively, you could use spray paint to paint the frame. Did you know that even make chalk style spray paint that has the same matte-finish?
{I actually used one of my kid’s paintbrushes for this step. Don’t judge!!}
The frame actually looked so pretty after two coats of paint that I considered leaving it like that.
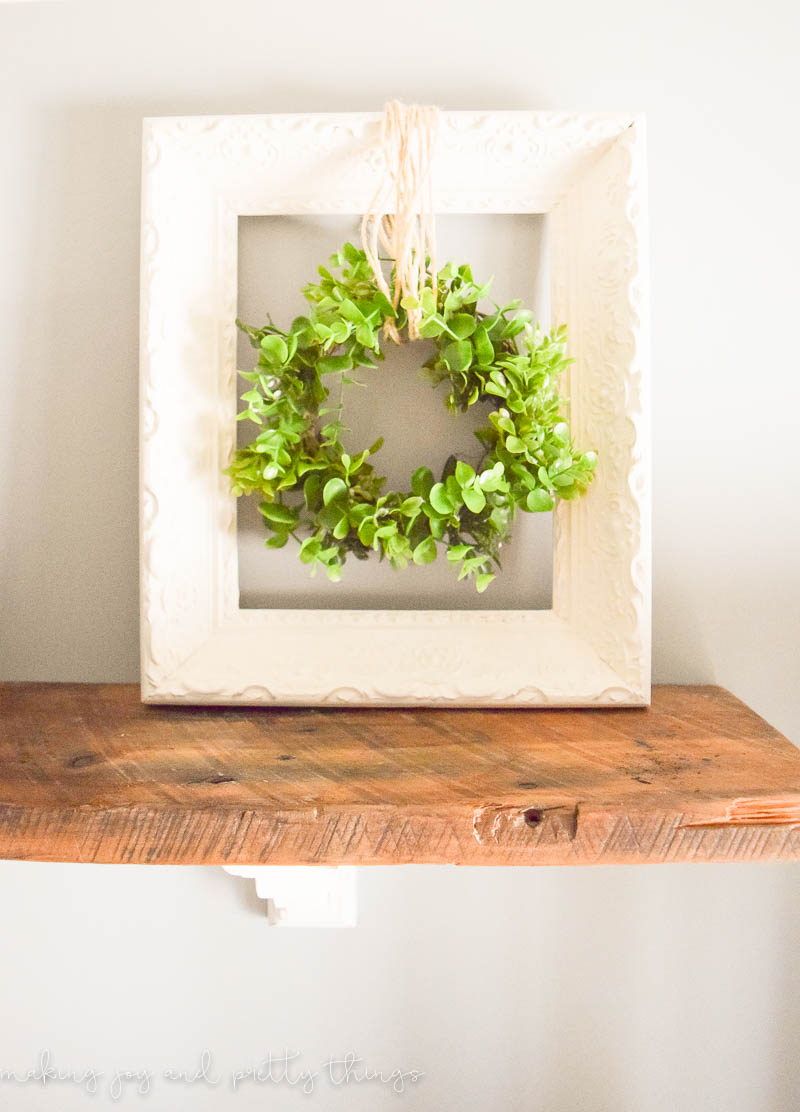
I was afraid that it would be drowned out on the farmhouse shelves being so neutral. So, I decided to make a quick, but beautiful wreath that could hang from the top of the frame and bring it some color and attention.
{{ I made a much larger DIY Farmhouse Wreath perfect for hanging on the front door if ya wanna check that out :). For that one I simply attached the twine to the top edge of the door, where you can’t see it, using heavy-duty gorilla tape. }}
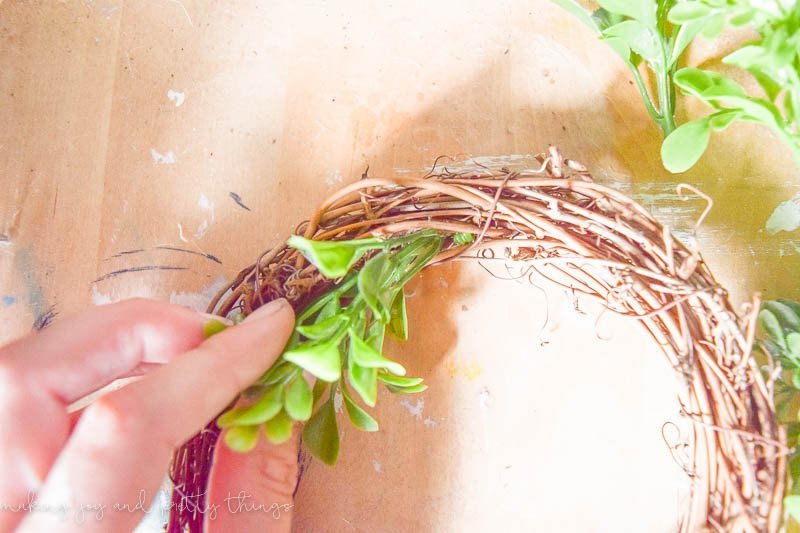
Step 2: Make the grapevine boxwood wreath.
I used a 6″ grapevine wreath and some various faux boxwood sprigs I had lying around from previous years, so they were an obvious choice. Please tell me you guys have extra faux florals lying around, too!? I can’t be the only hoarder 😉
Armed with my hot glue gun, I placed each piece into the grapevine wreath and then used any extras to fill in the gaps. I found that it is easier to start with the middle of the wreath (meaning the inside edge) and work your way out to the outer edges when attaching the faux florals.
If you don’t have a hot glue gun, you totally need one. You can even get one, along with hot glue sticks, at the Dollar Store if you can believe that! Check out your local Dollar Tree to see if they have one.
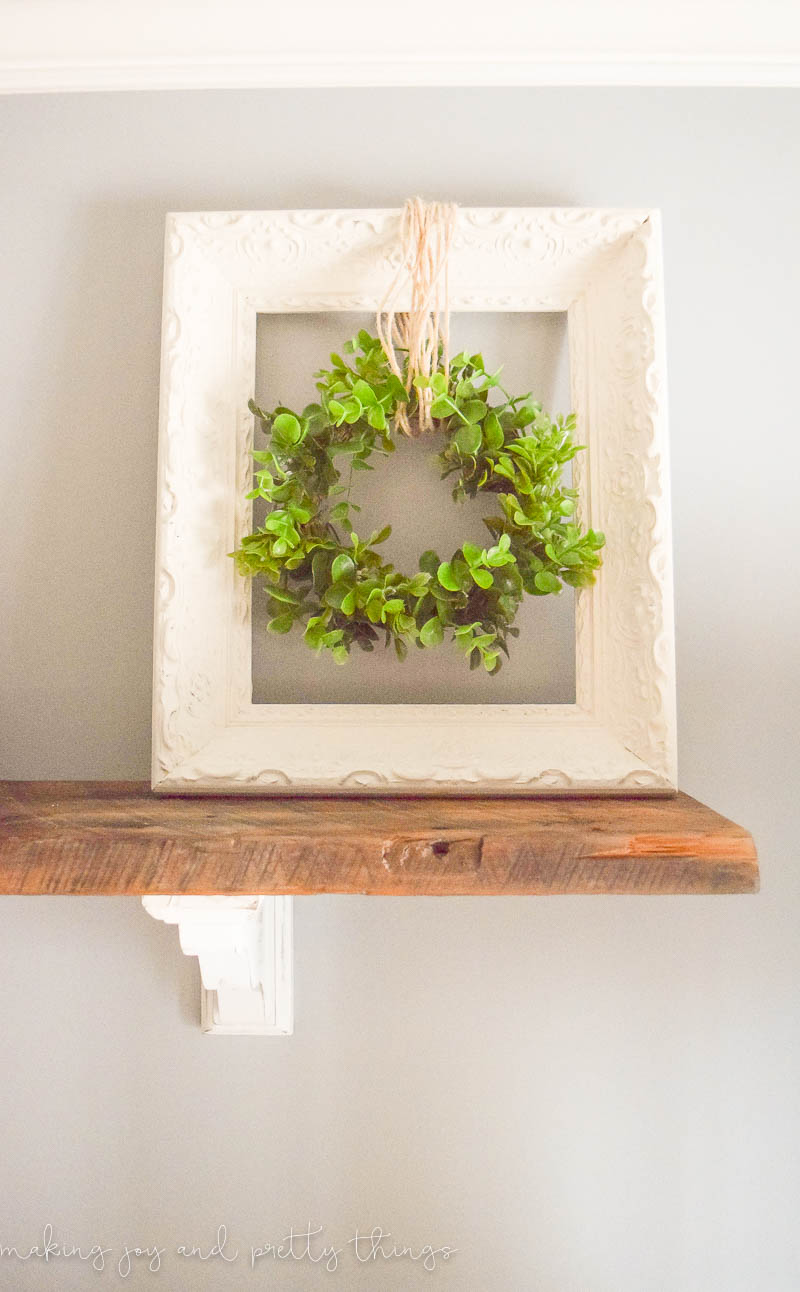
Step 3: Hang the small wreath from the picture frame with twine.
Lastly, I wrapped twine around the frame and wreath to hold it roughly centered. I wrapped it around several times, so you’ll need a length of ribbon or twine if you plan on doing it like mine.

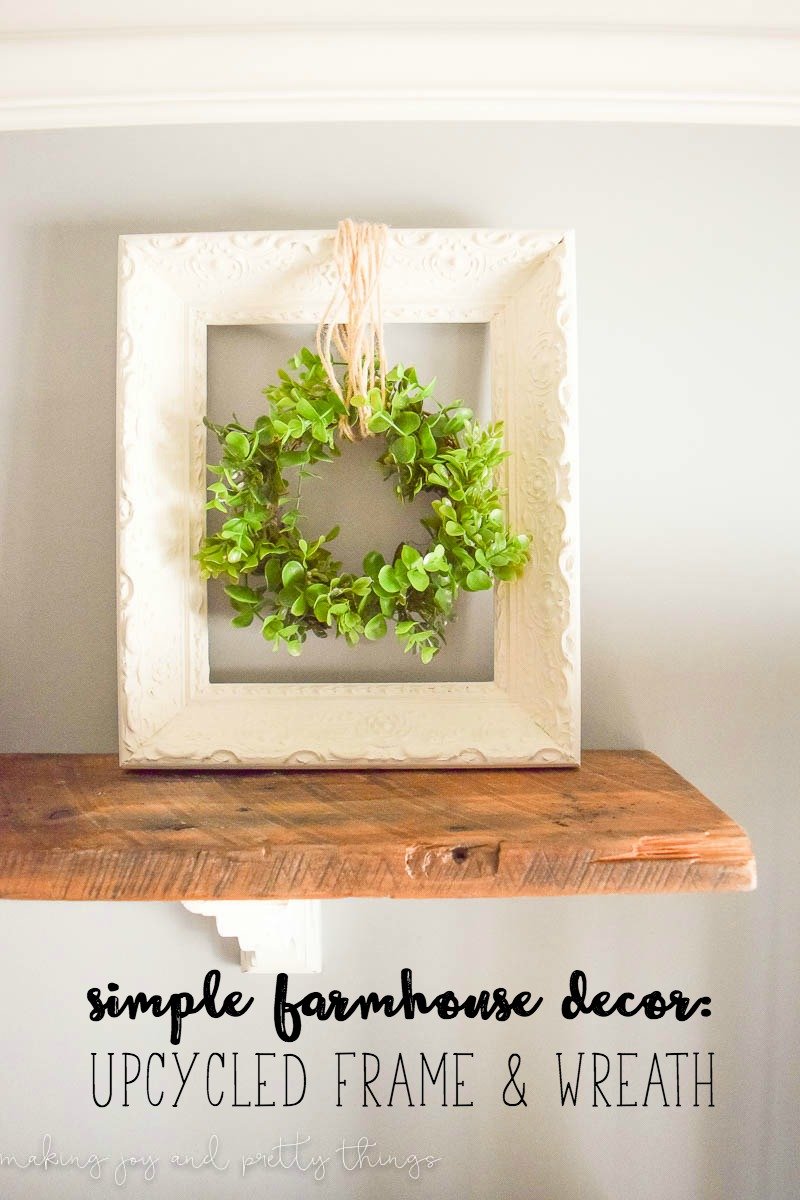
The Finished Product: A Farmhouse-Style Wreath Hanger!
Do you love how it turned out??
Do you love festive decorations? Me too! It would be so easy to swap out the wreath during the different seasons to have this decoration fit in with the time of year.
A wire wreath form wrapped with ribbon would make for a fun Christmas wreath. Or a tulip wreath for a Spring wreath would be perfect.
Embroidery hoops are another great way to make a decorative wreath that is low cost. Check out this DIY embroidery hoop wreath I made, which I ironically also hung from a vintage frame and put in our IKEA built-ins around our fireplace.

There are so many different ways to make this DIY wreath holder your own. A simple way to use this would be to change the size and scale by simply choosing a larger frame and then making a full-size wreath, instead of a mini one.
Looks so so pretty sitting on the farmhouse shelves. They are quite the match together!
It fits right in with the rest of the rustic decor for the shelves that I added when I finally got around to styling the open shelves.
The best part of this wreath holder is that I made it using supplies that I had on hand, so it cost me nothing.

Painting this thrifted frame and using it as a DIY wreath hanger was the perfect way to give these materials a quick and easy makeover so they fit better with my style.
That’s all for today, friends!
Wishing you a joyful day!

DIY Farmhouse Style Wreath Hanger
If you love farmhouse style, you'll love this DIY wreath hanger made from a thrifted picture frame! With some paint and an easy faux greenery wreath, this piece will fit in any room in your home.
Materials
- Thrifted picture frame
- Faux greenery
- Grapevine wreath
- Twine
- Glue gun
- Paint
Instructions
- Paint the picture frame. I needed two coats of paint to completely cover the frame.
- Make the faux grapevine wreath. You can use any greenery you have laying around. I used a glue gun to secure the greenery in place.
- Hang the wreath from the picture frame with twine. Simply wrap the twine around the frame and wreath roughly centered.


That’s so pretty, I can’t wait for the autumn to come! I was thinking to make something like this from metallic paper, to add to my door. I love that it doesn’t even go off and you can use it next year again.
Aww I’m so glad you like it, Alina!
It turned out really well. Yes, you have to love something in order to really enjoy them in your home. I had a piece of art that was gold framed but eventually, it did not go along with my decor. I painted it white and loved it more. Thank you for sharibg these easy decor ideas.
Thanks so much, Zan! I love the look of it now 🙂
Love, love, love anything with boxwood! Very cute (and simple)!
Thank you, Cristy! I agree, I’m a huge boxwood fan 🙂
I love this wreath! And isn’t it amazing what a coat of paint can do to refresh something?
Aww thanks, Shani! I’m so glad you love the wreath. And, yes! A coat of paint can transform almost any piece.
I love updating old, detailed, wooden frames with paint. The wreath with it is very pretty and simple!
Thanks, Lora! I love what a coat of paint can do to really transform a piece 😉
Faux florals? Who, me? I’m the queen of florals. I use faux greenery, faux (silk) flowers in my wreaths, on the sideboard, vases, anywhere a little green or color will brighten the house. I just got a faux pot of greenery yesterday – resembles boxwood! I’m using it in my decor for St. Patty’s Day.
Ahh there’s nothing better than faux florals right?! They’re pretty and best of all, you can’t kill them if you’re a black thumb like me 😉