
How to Design an IKEA Pax Closet System
Trying to design an IKEA Pax Closet System? I’m here today to share all the tips and tricks I learned designing our own master closet using the IKEA Pax Closet System!
Today I’m going to try and simplify the IKEA Pax system for you! This is a beast of a post with tons of information and a video where I show you how to use IKEA’s Pax Planner.
Want to see more of our IKEA master closet renovation?
- How To Use the IKEA Pax Planner to Design Your Closet (you are here!)
- Custom Plywood Backs for IKEA Pax Wardrobes
- IKEA Pax Wardrobe: Making Your Closet Look Built-in
- Upholstered Waterfall Bench DIY Tutorial
- IKEA Walk-In Closet Reveal
Let’s start by chatting about our master closet a bit.
This is what we’re working with:
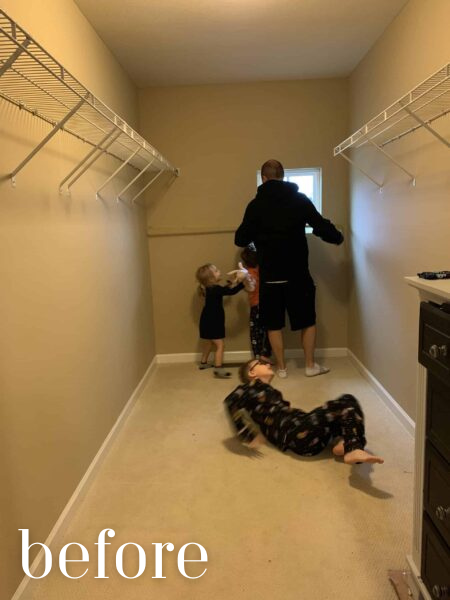
I’ll share more about our closet situation in another post.
If you want to see how to design the IKEA Algot system, I have an entire post on that here!
But, basically we decided to use grasscloth wallpaper on the ceiling and back wall. Then, we’re painting the Pax units and the remaining walls Smoke by Benjamin Moore.
Note: that’s not the color in the pictures *face palm*. I decided on that later so we have to redo it. Lesson learned – if you don’t love a paint color, don’t do it!
We installed as many Pax units as we could fit and I’m really happy with how it turned out so far!
Always start with a floor plan
Before you start designing your Pax closet.. make a FLOOR PLAN of your closet.
While it sounds fun to jump right in to planning, trust me when I say it’s better to have everything visually mapped out so you don’t accidentally buy something that doesn’t fit. Or covers an outlet. Or vent.
Here’s the floor plan we made for our closet:

Here’s what to include in yours:
- Accurate measurements for all the walls
- Add in permanent elements such as
- Doors
- Windows
- Floor vents / hot air returns <– very important!
- Add in elements that *could* be changed if needed
- Lighting
- Light switches
You need to make sure you have all of these elements listed out because the last thing you want is to buy all your Pax units, then realize they cover up a floor vent!
IEAK Pax Closet System: Overview
Now that you have your floor plan, let’s chat a little about the Pax system in general.
The biggest thing to remember when designing your custom Pax system is that they have 2 different depths, 3 different widths, and 2 different heights.
Now on their website you’ll see other depths, widths, and heights listed. Those are for their DONE products. Like when you select a Pax system that is already done with everything in it.
That’s not what I’m talking about here. We are designing your own Pax system. Basically starting with just the basic Pax shell and adding in from there.
Let’s take a look at the differences…
Widths
Here are the 3 width options for your custom Pax system. All widths are available in each of the depths and heights listed, too.
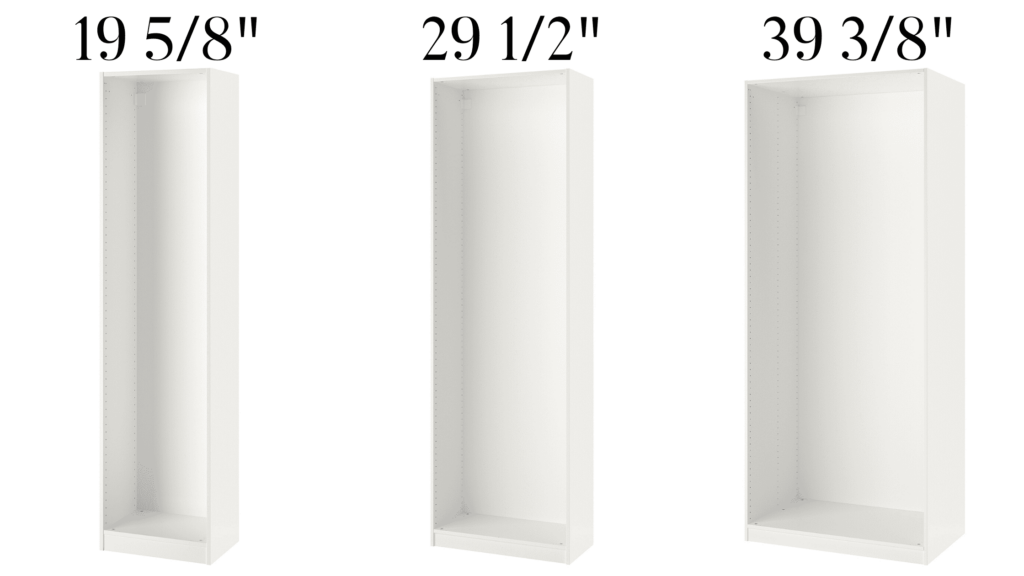
The thing to keep in mind with the widths is how big your area is. This is where the floor plan you came up with comes in handy.
For us, we had 12′ 11″ on both walls.
On one wall, we used 3 x 19 5/8″ and 3 x 29 1/2″ which totaled a little more than 147″ total. This left us with 8″ of extra space that we’re covering with wood (since we’re building them in). But, if you’re just installing the pax system and not planning on building them in to look custom, be sure to think about which units will fit the best.
The other wall, we used 1 x 39 3/8″ and 3 x 19 5/8″. This wall didn’t matter as much because we knew we weren’t taking them all the way the full width of the wall. Because of the window location (which is another reason to make sure you make a floor plan first!).
Make sure you look at your floor plan to make sure you’re not covering any windows, doors, floor/wall vents, lights, or outlets.
I think choosing which width Pax units to buy is also a personal preference. The shelves and drawers will obviously be wider with a wider unit. I know myself and if I have giant drawers and shelves it’s just going to get cluttered. So, for that reason we ended up choosing a lot of the 19 5/8″ width Pax units.
Depths
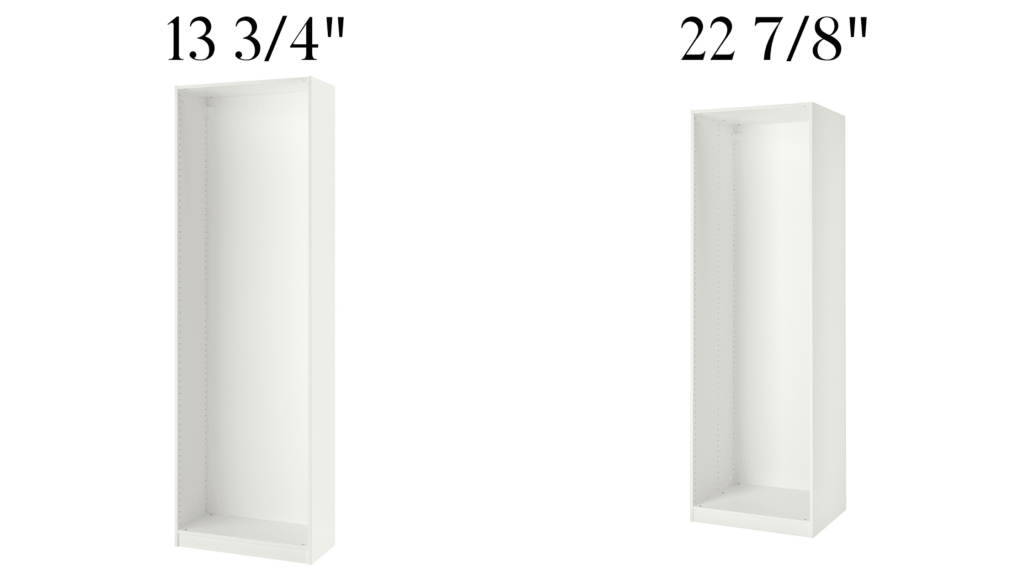
Before choosing your depths, be sure to refer to your floor plan again. Make sure you map out if a specific depth will cover any vents, windows, doors, or switches/outlets.
The biggest difference between these two depths is the type of clothes hanger you can use.
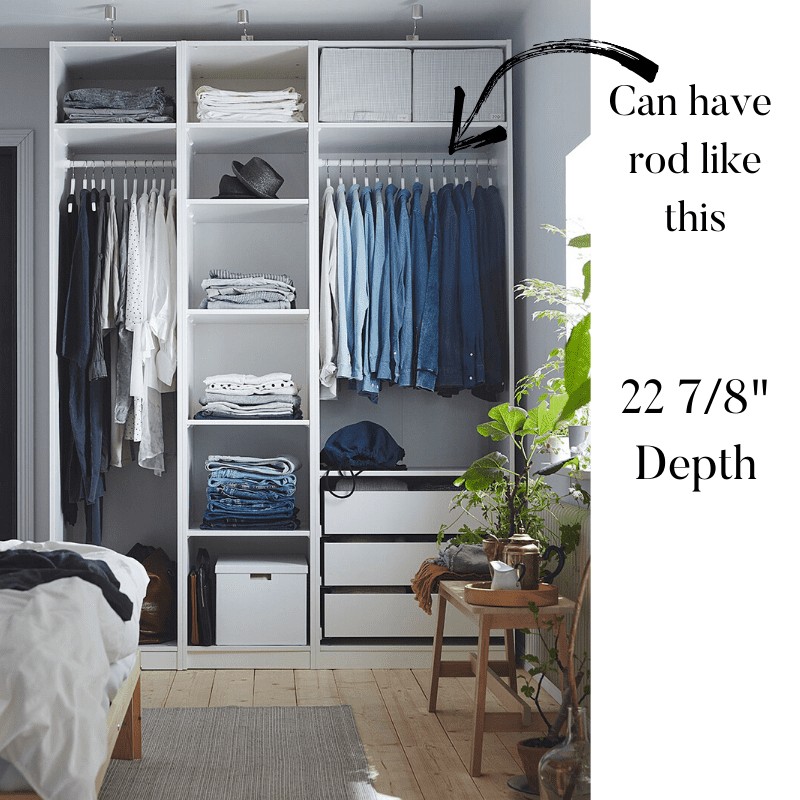
You can only use a rod going with width of the unit with the 22 7/8″ depth because clothes hangers don’t fit in the 13 3/4″ unit.
This is what I mean:
You can still get clothes to hang in the 13 3/4″ unit but it looks like this:

Now, for me, it didn’t matter that I had to hang my clothes like the above picture. But for TJ, he has a ton of work clothes that he needs to be able to see more clearly. Thus, we went with the deeper 22 7/8″ units for him.
BUT, and this is a big but, if we had used the 22 7/8″ the entire length of the wall, it would be covering a floor air vent.
This is why it’s SO important to make a floor plan first. I know I’ve mentioned that a million times so far. But, please, save yourself a ton of time, money, and hassle and figure this all out before you even start designing your Pax system.
Heights
Not too much to consider here. But, you should be aware of the two heights offered in the custom planner – 79 1/8″ and 92 7/8″.
Quick Tips for Using the Pax Planner
- You can access the Pax Planner here
- I would only use Chrome browser. All of the features didn’t work for me in Safari. I didn’t try any other browsers.
- The system runs using Flash.
- Try to be patient when adding things. Sometimes it takes a few seconds for your products to show up.
- Make sure you’ve only selected one thing on your planner when moving stuff around. Products do not “de-select” so if you click over to another product, you’re still selecting the previous product.
- There are many selections for interior organizers. I would suggest the following:
- Shoes on the bottom
- Drawers on the bottom
- Shelves in the middle to top
- Pants on the bottom
- Shelf at the top to store stuff you don’t need all the time
- *Always add a shelf above the top drawer*. You don’t want to be staring into your top drawer all the time
- Remember the clothes hanging tip I shared above that depends on your Pax unit depth
- IKEA recommends at least 1.6″ of space between the top of the Pax units and the ceiling
How to Design an IKEA Pax Closet System
Step 1. Create your Pax project in the planner
First, you’ll access the Pax planner here. Remember to use Chrome or another browser that supports flash (not Safari).
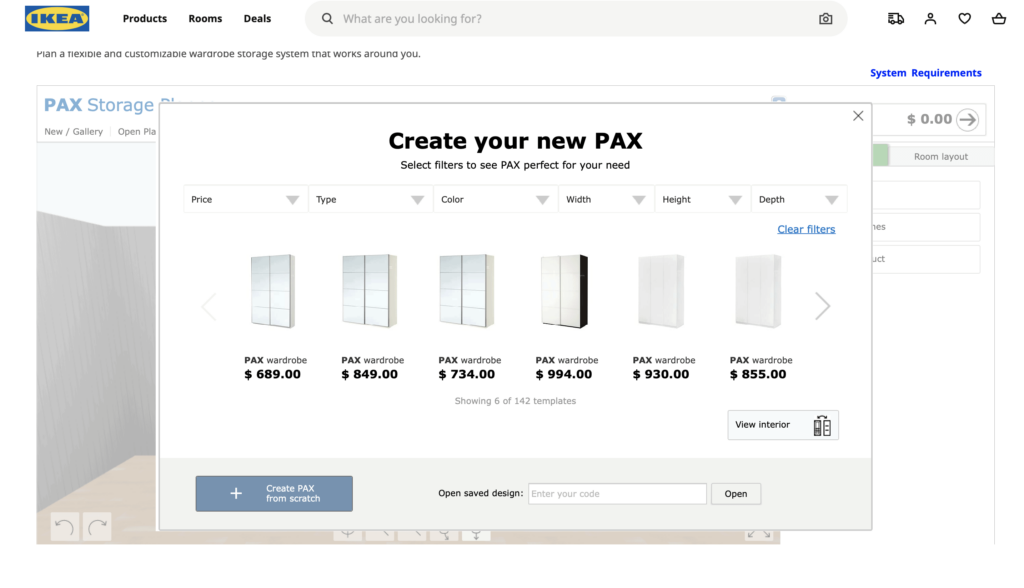
You can select one of their pre-made options. But, I suggest clicking “Create Pax from scratch”.
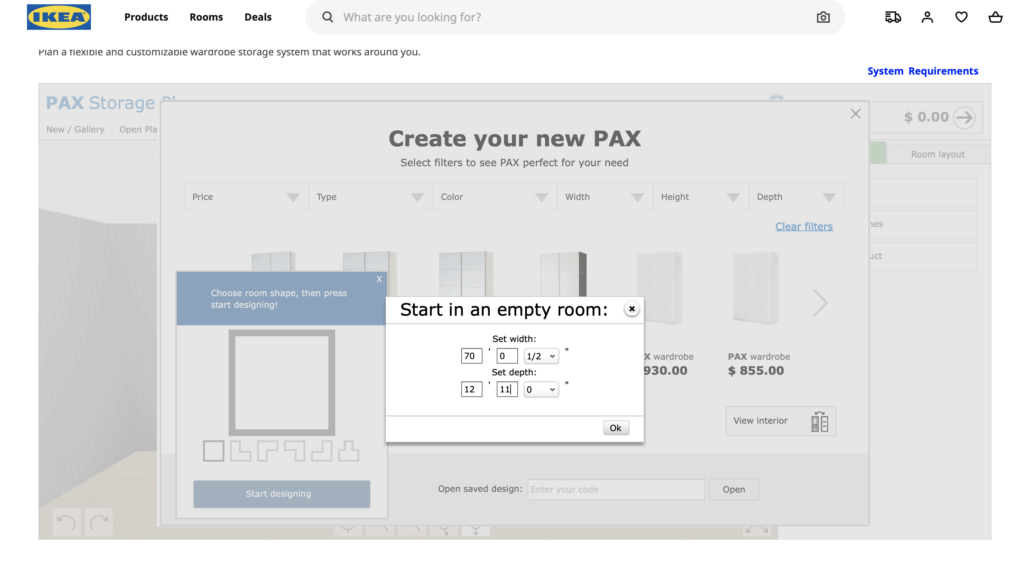
From there, you can select a room shape. If your room fits one of their shapes, select that. You can adjust the measurements.
Mine is a rectangle, so I selected their “square” and then input the measurements of our closet.
Step 2. Add doors and windows
Next, you’ll be able to add in doors and windows. Don’t skip this step! It’s important to be able to visually see what everything will look like.
Maybe in your head you don’t think have the Pax unit come 1″ from the window will look bad. But, when you see it visually you feel differently.

When you add the windows and door, you’re able to add all the dimensions and location. Since you’ve already made your floor plan (like I said 29389827 times), you’re good to go!
You can also click and drag both windows and doors to wherever they fall in your design.

Once you have your structural elements in place, you can change the wall and floor colors/materials. I don’t believe this is really necessary but it’s definitely something you can do!

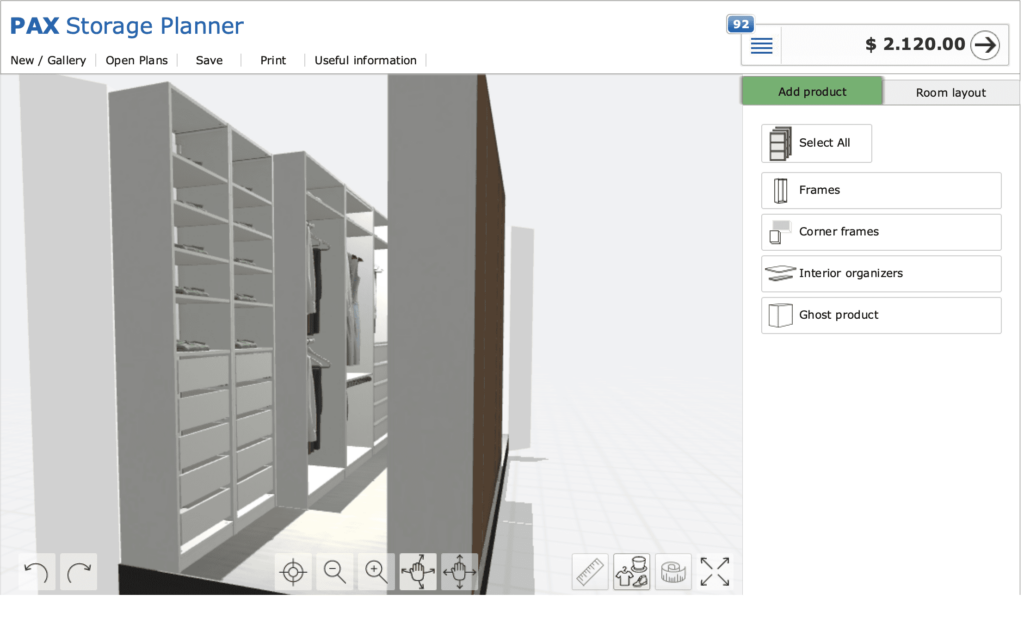
Step 3. Add products
Now that you’re done with that, you can click “Add Product” and we can starting building the Pax System!
You can always go back to the “Room Layout” section if you realize you made a mistake or need to change measurements.
In the “Add Product” section, you can select your Pax unit based on Width, Height, and Depth.
Select your unit from the pictures once you have your desired width, height, and depth and drag it into your Pax planner.

From here, I would recommend adding in all the Pax units BEFORE worrying about the interior unit design.
Step 4. Design the interiors of the Pax units
Once you have your units in place, click the “interior organizers” button to add in shelves, drawers, etc.
*Tip: Use the hand with squiggly lines button to move your design around*

When you’re adding interior organizers, the Pax planner will tell you if things are too close together!

Video walkthrough of the Pax Storage Planner
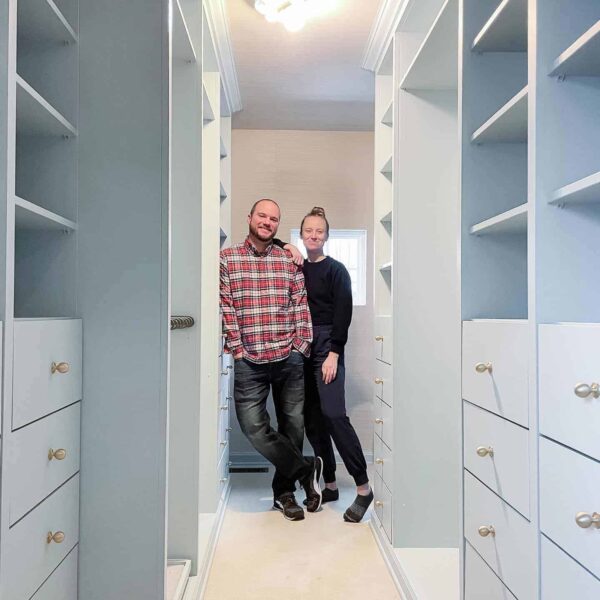
Here’s what our custom IKEA Pax Closet looked like after designing:
Try to add symmetry where you can. See how there are an equal number of drawers in the first two sections? Done on purpose!
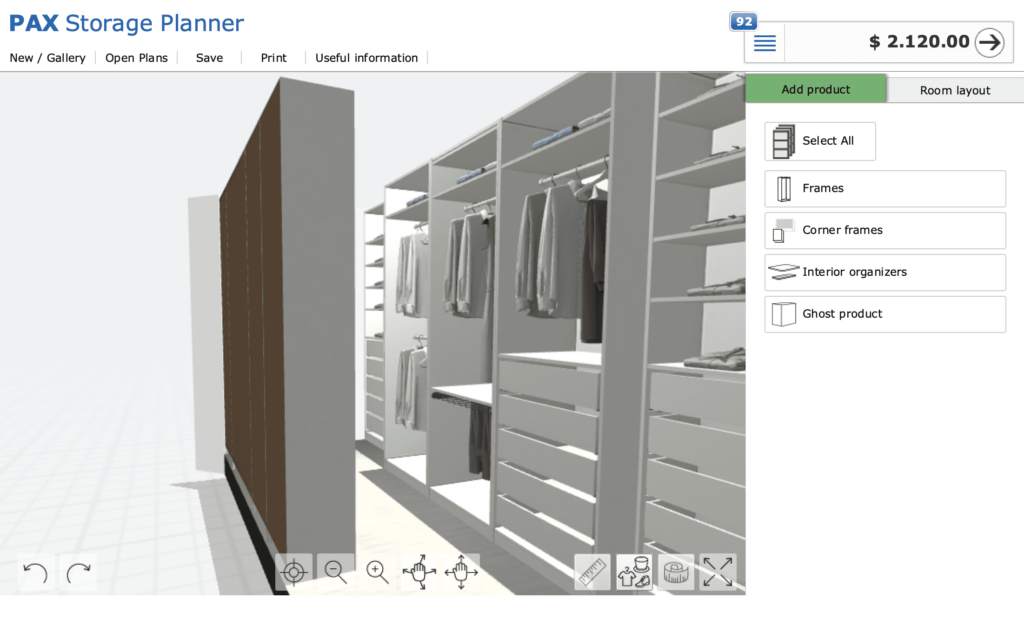
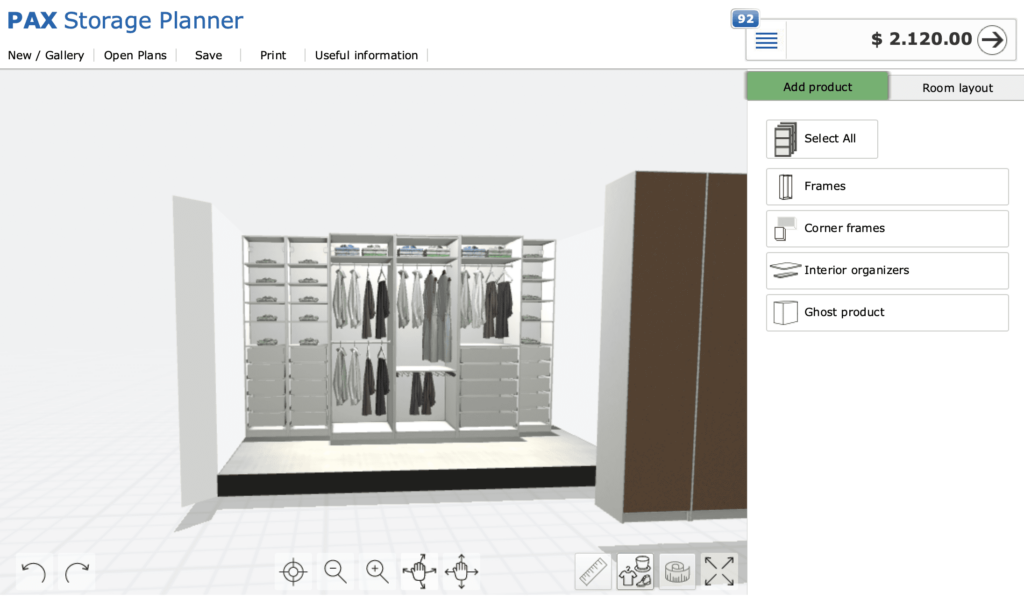
The total price for the entire closet of $2120. However, we bought everything during a sale and got 20% off!! That’s $1696 for our entire closet. For the amount of stuff you get I think it’s 100% worth it!


Fantastic job! Looks beautiful!
Thank you so much!