
(IKEA Closet Hack) How To Add Custom Backs To IKEA Pax Wardrobes
Planning an IKEA closet hack? Learn how to replace the famous white IKEA particle board backing (with the ugly seam down the middle) with plywood!
We’re finally moving along with our IKEA Pax closet hack!
Want to see more of our IKEA master closet renovation?
- How To Use the IKEA Pax Planner to Design Your Closet
- Custom Plywood Backs for IKEA Pax Wardrobes (you’re here)
- IKEA Pax Wardrobe: Making Your Closet Look Built-in
- Upholstered Waterfall Bench DIY Tutorial
- IKEA Walk-In Closet Reveal
The IKEA Pax system itself is actually really nice. If you plan on keeping it white (or whatever color you’re getting from IKEA), then I wouldn’t replace any of the backs.

The #1 reason we’re doing this IKEA closet hack is that we plan on trimming out IKEA’s wardrobes and then painting the entire thing.
Having that white seam down the center of the IKEA wardrobe’s back would make it impossible to paint and look nice. We did try to fill in the seam because we could paint over that, but it didn’t hold since the particle board backing is so flimsy.
This post contains affiliate links. Please, click here to read my disclosure policy.
Tools and materials needed
- 1/4″ Plywood Underlayment
- Straight Edge Cutting Guides
- Clamps (to hold your guides in place)
- Speed Square
- Saw Horses (at least 2)
- Optional: Roller stands to catch your waste
- 18 Gauge Brad Nailer
- 1 inch 18 Gauge Brad Nails
- Circular Saw
- “Fine” or “Plywood” blade (high tooth count)
- Drill
- 1″ Spade Bit
IKEA Pax Closet Custom Plywood Back Process
First, we actually put all the regular IKEA-provided white backs on. DON’T DO THIS. We had to pop each of them out and remove all the nails. Such a waste of time.
Instead, use the regular IKEA backs as guides to make the custom plywood back!
Remember there are 3 different width options for the IKEA Pax Closet System.
(I got over in much more detail the different types of IKEA Pax Wardrobe units in this post)
So, depending on how you designed your IKEA closet system, you may have 3 different sizes to measure out.
You can assemble the rest of each Pax unit. In fact, adding the backing is the last step in every IKEA product we’ve built. Just keep in mind that the units are extremely flimsy without the back.
If we were doing this again, I would probably remove the white backs from the boxes that the units came in and make the custom plywood backs FIRST, before I put anything else together.
This would allow you to build your IKEA Pax wardrobes with the custom plywood backs straight from the start, making it a lot easier to maneuver your units into place as soon as they’re assembled.
[Step 1] Lay out underlayment plywood
As you can see in the first photo if you look closely, our garage is a disaster. That’s beside the main point, which is this: I have lined up 3 sheets of 1/4″ underlayment on top of each other on my horses to cut all at once.
I did this because 1/4″ underlayment is flimsy, and because getting three usable pieces in the same time it would’ve taken to get one usable piece is a tremendous efficiency boost and felt like a no-brainer.
I did do one piece at a time at first to make sure the process I had was going to work, including fitting the first piece I cut on the back of one of the Pax units to make sure it fit. Spoiler alert: it fits like a glove, hence the three pieces you see below to speed up the process.

CUSTOM IKEA PLYWOOD BACK TIP: We tested the process and found that you can have 3 pieces of plywood on top of each other. That means you can make 3 custom plywood backs at the same time and speed up the process!
Side note: we did this over a weekend. On the Monday after that weekend, I was researching Kreg’s rip-cut and Advanced Cutting System for making projects like this easier in the future.
I saw, repeatedly, that people will use 4×8, 1-inch thick foam insulation pieces (like this) to stabilize and support their plywood when they’re making cuts. That is so smart!
The circular saw blade is set just deep enough to cut through the wood and a little into the foam. I definitely plan to try this out in the future, and I’d recommend you consider it if you attempt this yourself.
The flimsy plywood underlayment really is annoying to work with.
[Step 2] Align white backing with plywood
Once you have your plywood on the saw horses, lay the white backing piece that came with the IKEA Pax unit on top of your underlayment.
Line it up with the factory edges of the plywood.
PLYWOOD CUTTING TIP: Make sure the “good” side of your underlayment is facing down. A circular saw will make a cleaner cut on the bottom of the piece you’re cutting than on the top.

[Step 3] Trace outline
Use a pencil to mark the edges of your backing piece.
You don’t have to completely trace the whole thing, but you do need to know where the edges are going to be so you can line up your straight edge/saw guide later.

Don’t forget to mark the location of the little holes at the top of the backing. These line up with the metal brackets at the top-back of the IKEA Pax unit that is how you anchor the units to the wall you’re installing them against.

Just trace the circle with a pencil so you can drill it out with the 1″ spade bit later.

This is what you’re left with:

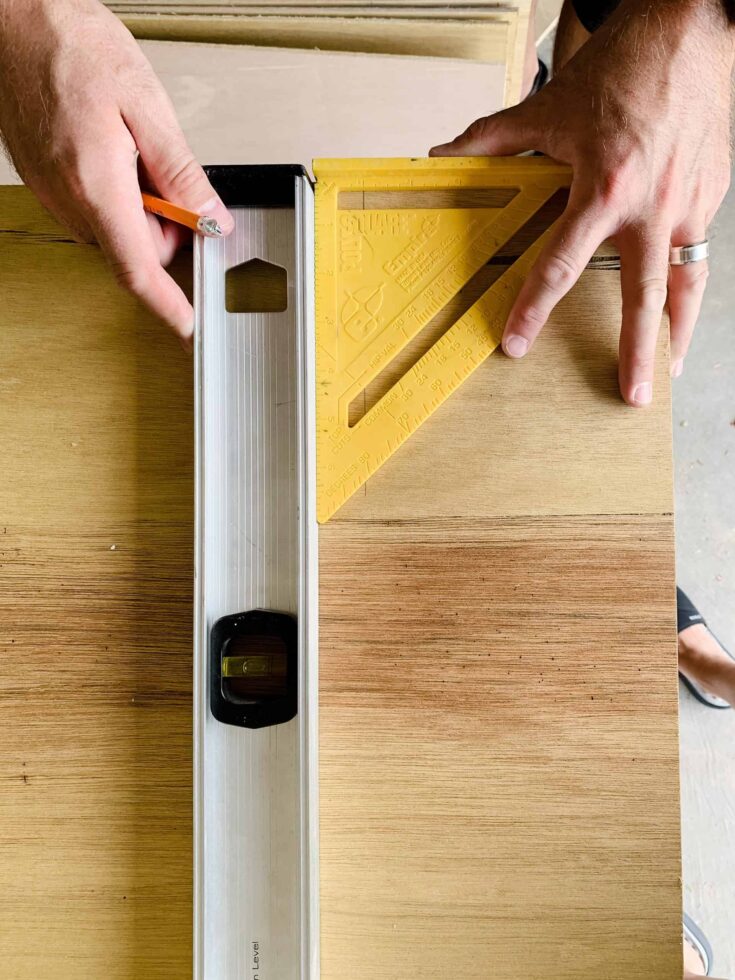
[Step 4] Line up cutting guide
Now it’s time to line up your level or cutting guide (depending on which dimension you’re cutting first) to help keep your circular saw cutting straight.
I know that the circular saw I use cuts exactly 1″ from the left side of the base plate. For this reason, I use my speed square to line my straight edge (in this case a 4′ level) 1″ away from my cut line.

After I have that done, I clamp the straight-edge to the material to be cut, being sure to position the clamps so they’re not in the way of the movement of the saw.
Depending on your setup, it is possible to have the clamp be clear of the blade but not the body of the saw, so be careful there.
[Step 5] Make the cuts!

Repeat this process for both cuts you need to make per backing piece.
[Step 6] Drill holes with spade bit
Next drill out the holes you marked earlier with your 1″ spade bit. Keep in mind that the holes you drill will be slightly larger at 1″ than the holes you marked, but it’ll be okay.
[Step 7] Install plywood backs
To install, we used the 18 gauge brad nailer loaded with 1″ brad nails as opposed to hammering in 20+ individual panel nails per Pax unit. This saved us a TON of time, but there are a few considerations to make.
Because the brad nails do not have heads as large as the panel nails, you want to ensure you don’t place your nails too close to the edge of the underlayment or too deep into it.
Take it slow on your first few nails and pay attention to the depth, adjusting it as necessary. Also, you may want to ever-so-slightly angle your nailer toward the outside of the Pax unit so you don’t accidentally shoot a nail through the inside of the unit where it will be visible.
Once you have your depth set and get a good feel for where to align the nailer, you can really fly. I’d say we were attaching the backs in about 1.5 to 2 minutes once we really got a feel for it.

Here’s what the closet looks like now


The plywood backs look SO much better than the white, IKEA-provided particle board.

You can see below that we will need to caulk the seams before we paint. And that was expected.


The next steps for the closet are moving a light switch, anchoring them to the wall, and then BRING ON THE TRIM! Excited that it’s finally moving along.
How to Add Custom Backs to IKEA Pax Wardrobes
Ditch the flimsy backs that come with the IKEA Pax wardrobe and make your own from plywood!
Materials
Instructions
- Lay out underlayment plywood. You can cut more than one piece at a time by simply laying them on top of each other. Trust me, it works!
- Align the white Ikea Pax backing with the factory edges of the plywood and trace the outline of the white backing onto the plywood. Be sure to also trace the hole cutouts.
- Clamp your straight edge to the material and make the cuts.
- Use a 1" spade bit to drill out the holes you marked earlier.
- Install plywood backs using 1" brad nails.
- Caulk seams and paint!


This was an awesome tutorial. Heading to Home Depot now to get that backer. Thanks so much for explaining this so easily. Your work is beautiful.
I’m looking into this closet system and this hack was very intersting! Do you think you could use decorative paneling instead of plywood? My closet is an alcove and I had been planning on paneling it and then using an open-back closet system before I actually looked at PAX.
Yes decorative paneling could definitely work for this!
Paint the ply before fitting and put cork in the joint before nailing, it saves a lot of time if you are staying with white for the interior. Melamine coated mdf is available if you want a no paint finish. I have done this as part of making a pax built in and i used a trim router to flush the rim on the back panel, it gives a bigger overlap and more edge width to aim at so less risk of blowing through the interior of the panel. Makes the cabinet super stable.
Thanks so much for sharing these tips!