
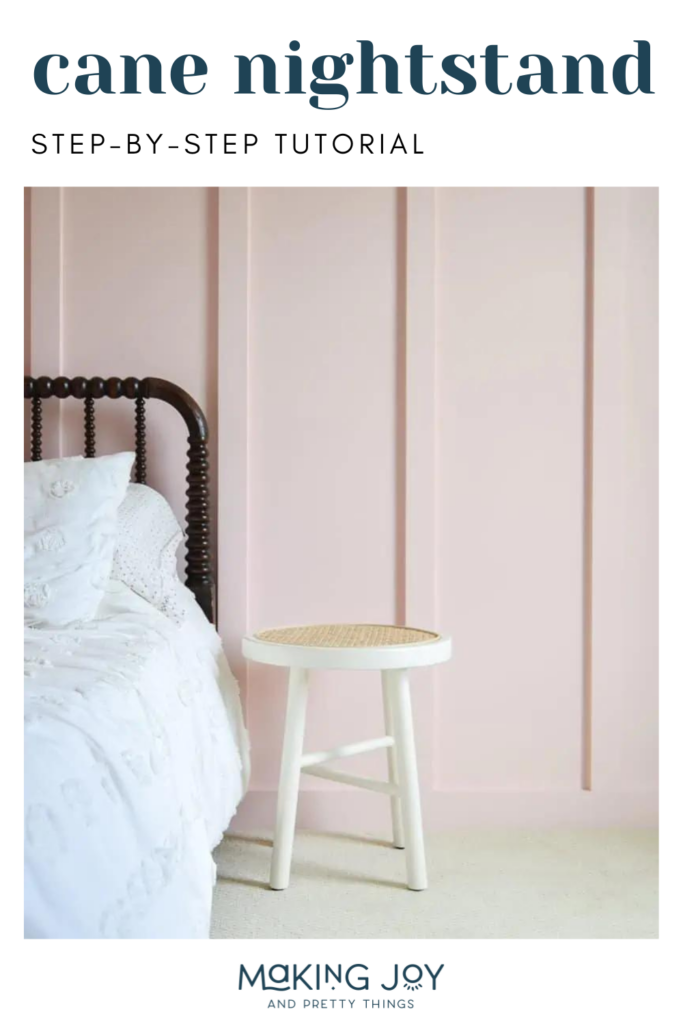
How to Make a DIY Cane Nightstand
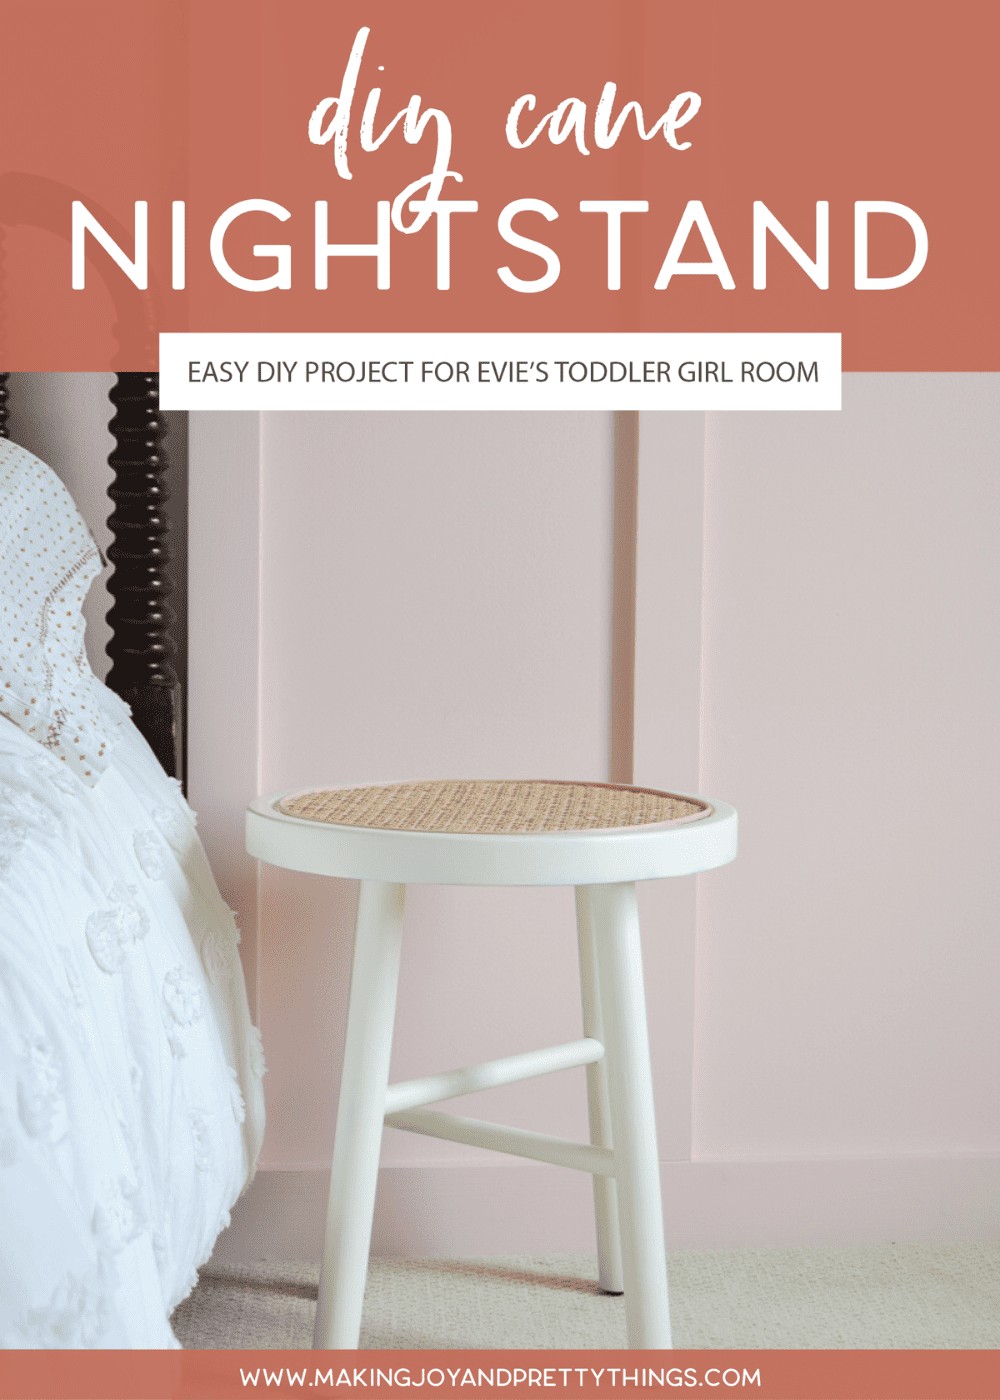
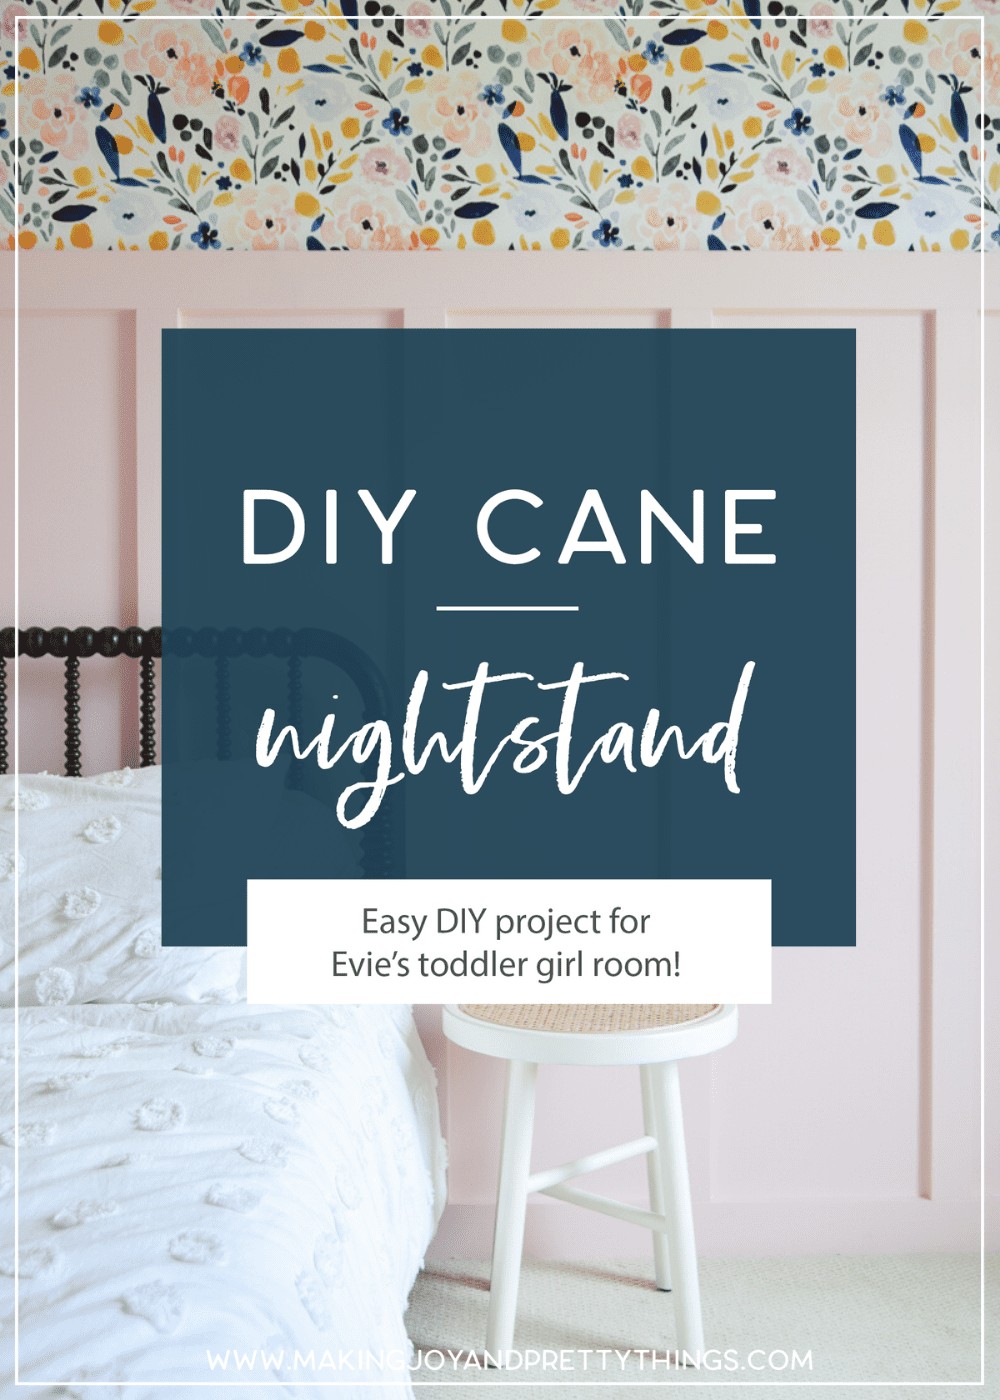
Today, I’m sharing an easy DIY cane nightstand using a table from Target, spray paint, and cane webbing! This is definitely a beginner-friendly DIY!
I love the look of cane webbing, especially when it’s a DIY cane nightstand. We needed a nightstand for Evie’s big girl room, but we didn’t want to take on a big furniture build.
We found a way to create a DIY caned nightstand using a pre-made end table/stool from Target. We gave it a new look with spray paint and then attached cane webbing to the top.
If you’re looking for a super easy beginner-friendly way to make a DIY caned nightstand, you’ll love this tutorial. No furniture making or power tools are needed!
Other Easy DIY Projects To Try
My Inspiration: DIY Cane Ideas
I’ve been loving the cane and rattan trends in the home decor / interior design community right now. Really, any natural material is in style!
I’ve seen a couple of DIYs using cane webbing that looked amazing and knew I had to try it.
Mandi from Vintage Revivals did these crazy cool DIY cane wall panels. I love DIYs like this that are completely original and turn out perfect.

Meg from Roost and Ramble used cane webbing to makeover an IKEA Rast dresser. I love me a good Ikea hack!

Christine from Honey Built Home built an entire cane bed inspired by a CB2 bed. How gorgeous is this?!

Do you want more DIY cane furniture ideas? Check out this post where I rounded up a ton! Don’t feel like DIYing it? Check out these cane and rattan furniture items to shop!
My Idea: Easy Cane Webbing Nightstand with an End Table
I didn’t want to do a really big project with cane webbing on my first try using it. I’m also not a furniture maker or master builder so I knew I needed to start small.
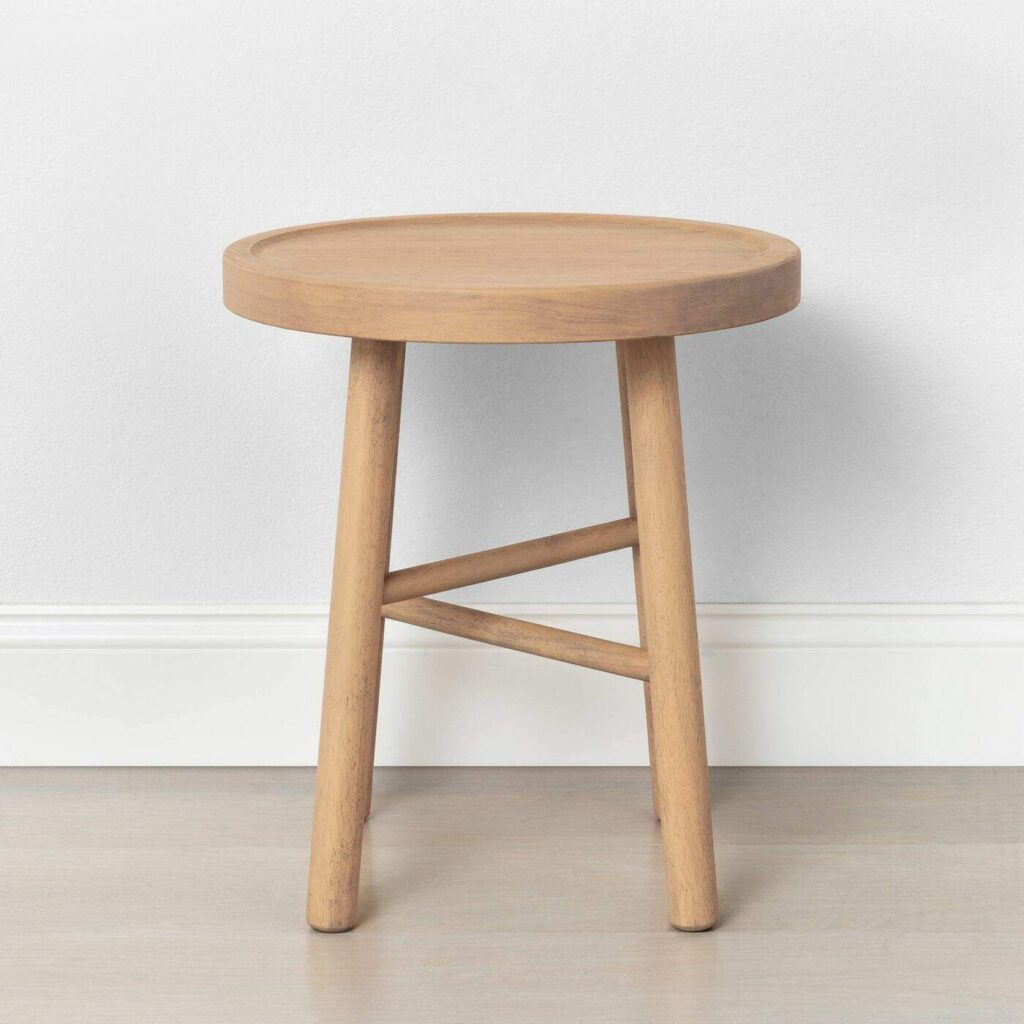
I found this end table from Target that was honestly pretty cute, to begin with. But, it didn’t really go with the general vibe we had in Evie’s room and I thought it was the perfect table to try out some DIY caning!
How to DIY a Cane Webbing Nightstand: Step-by-Step Tutorial
This post contains affiliate links. Please, click here to read my disclosure policy.
Materials for cane webbing nightstand
- Target stool
- Sanding Block
- Rustoleum Spray Paint in Heirloom White (Satin finish)
- Cane Webbing Kit (which comes with the cane webbing, 3 sizes of spline and wedges)
- Hot Glue Gun
- Gorilla Glue
- Scissors
Step 1: Spray Paint the Nightstand
My biggest advice for spray painting is to do really, really light coats. If it takes you 3 coats, fine. Trying to do it all in one coat will lead to drips 100% of the time.
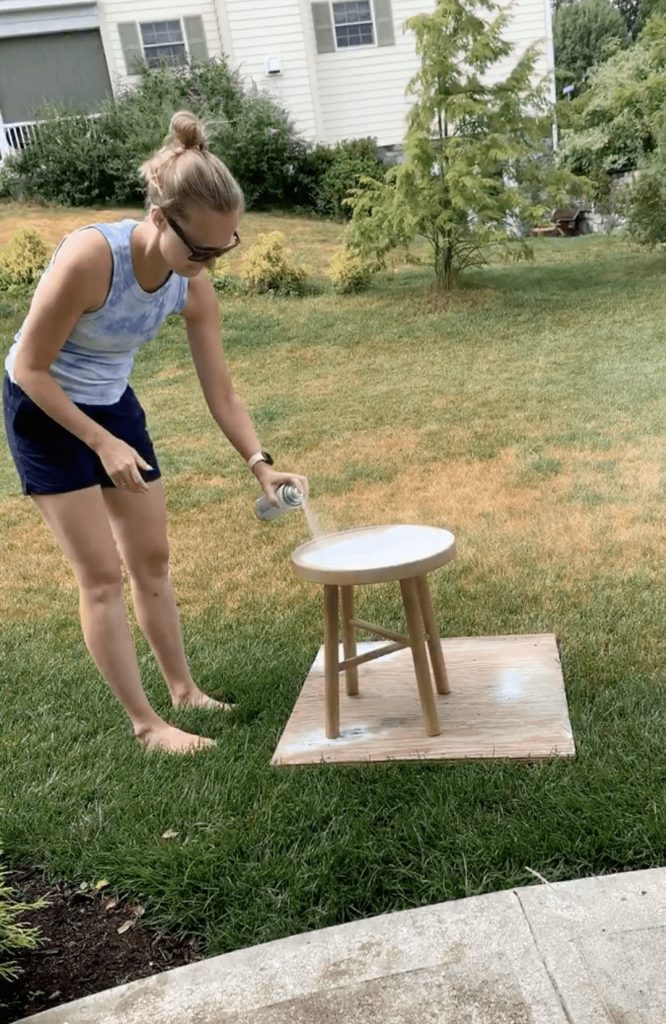
It took us 2 coats. Be sure to sand any ridges or paint drops in between coats if needed
Depending on your spray painting abilities, you may need to sand and spray paint a third time.
Two coats were perfect for us! We used just a little more than one can of spray paint to cover the end table.
Step 2: Cut Webbing for Stool
I used a 14″ gold ring to trace a circle on the cane (like the ones I’ve used for hoop wreaths like this). I used just a Sharpie to trace the circle and cut it out with regular ol’ scissors.

Cane webbing can be pretty difficult to work with. It wants to roll back up.
So, I would recommend getting it out a day or two in advance, laying it flat, and laying something heavy on top that will keep it flat.
Step 3: Adhere Webbing to the Top
First, we tried using wallpaper adhesive. But, it wasn’t strong enough to hold the cane in place.
Next, we tried Gorilla Glue and that worked!
I would carefully apply it along the cane. You don’t need to hit every single spot. I made sure to apply it around the perimeter the most and randomly throughout the rest of it.

Press into place and hold for a minute or so. We then put some wax paper on top, then a flattened cardboard box, then a 30lb weight to hold it all in place.
I don’t know that this is necessary but we wanted to be sure it held and stayed super flat while drying.
Step 4: Apply the Splining to the Edge
For this last part, you probably need two people for this.
Person one with hold the splining in place while person two will apply glue from the hot glue gun.
Start wherever, just pick a random spot. You want the splining to be just on the edge of the cane.

Apply about 2 inches of hot glue then press and hold the splining down.
Work slowly and make sure the splining is thoroughly adhered to the edge before adding more glue/splining.
Continue this the whole way around.
When you get to the beginning, cut the end and finish wrapping it! You’ll have a little crease where the two ends meet. You honestly can’t really tell unless you’re looking for it.
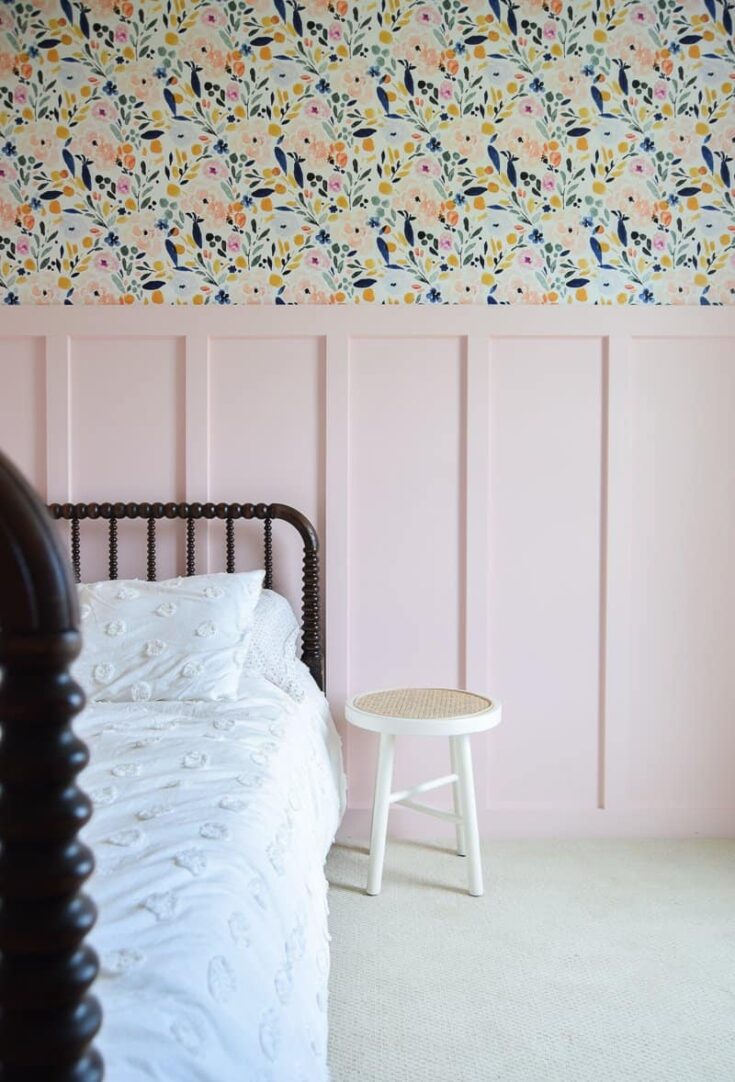
The Reveal
I love how it turned out!


It’s the perfect addition to her room. I’d say she’s a big fan!


One of my favorite parts of the stool-turned cane nightstand is the little bars between the legs. I love how they’re offset. Such a neat little quirk to the table!

DIY Cane Nightstand
If you're looking for an easy DIY nightstand for a toddler girl's room, this DIY cane nightstand is for you!I Using a stool from Target, some spray paint, and cane the stool was completely transformed into DIY cane nightstand.
Materials
- Cane Webbing Kit
- Target Stool
- Rustoleum Spray Paint in Heirloom White (Satin Finish)
- Sanding Block
- Hot Glue Gun
- Gorilla Glue
Instructions
- Spray paint nightstand
- Lightly sand any bumps or drips
- Spray the second coat (or more coats if needed, remember to sand in between coats)
- Cut cane
- Use gorilla glue to adhere the cane to the nightstand. Press and hold the cane in place for several minutes.
- Apply splining to the cane nightstand using a hot glue gun.


Loved the instructions that identified the problems you ran into and the solution you came up with.
Thank you so much! I think it’s important to share mistakes we made and problems we had 🙂
What a lovely project Nice and easy thank you for taking the time to show us how you did it Also that little girls bed is amazing Thanks again
Aww I’m so glad you like it! Thank you for the sweet comment 🙂